Showing posts with label chipboard. Show all posts

Sunday, May 8, 2016

More Red Rum, Please


I used to love the thrill of self-induced fear... absorbed in a terrifying good read, I'd sometimes clap the book covers closed and regain control of my breathing, then slowwwwly reopen the frighteningly good novel to once again set my heart racing- much to the amusement of my family! Nowadays, I'm more likely to cause myself a near heart attack reading about the potentially harmful effects of consistently eating dairy products, but if anyone asked, I wouldn't hesitate to reply that my favorite author was, and still is, Stephen King.
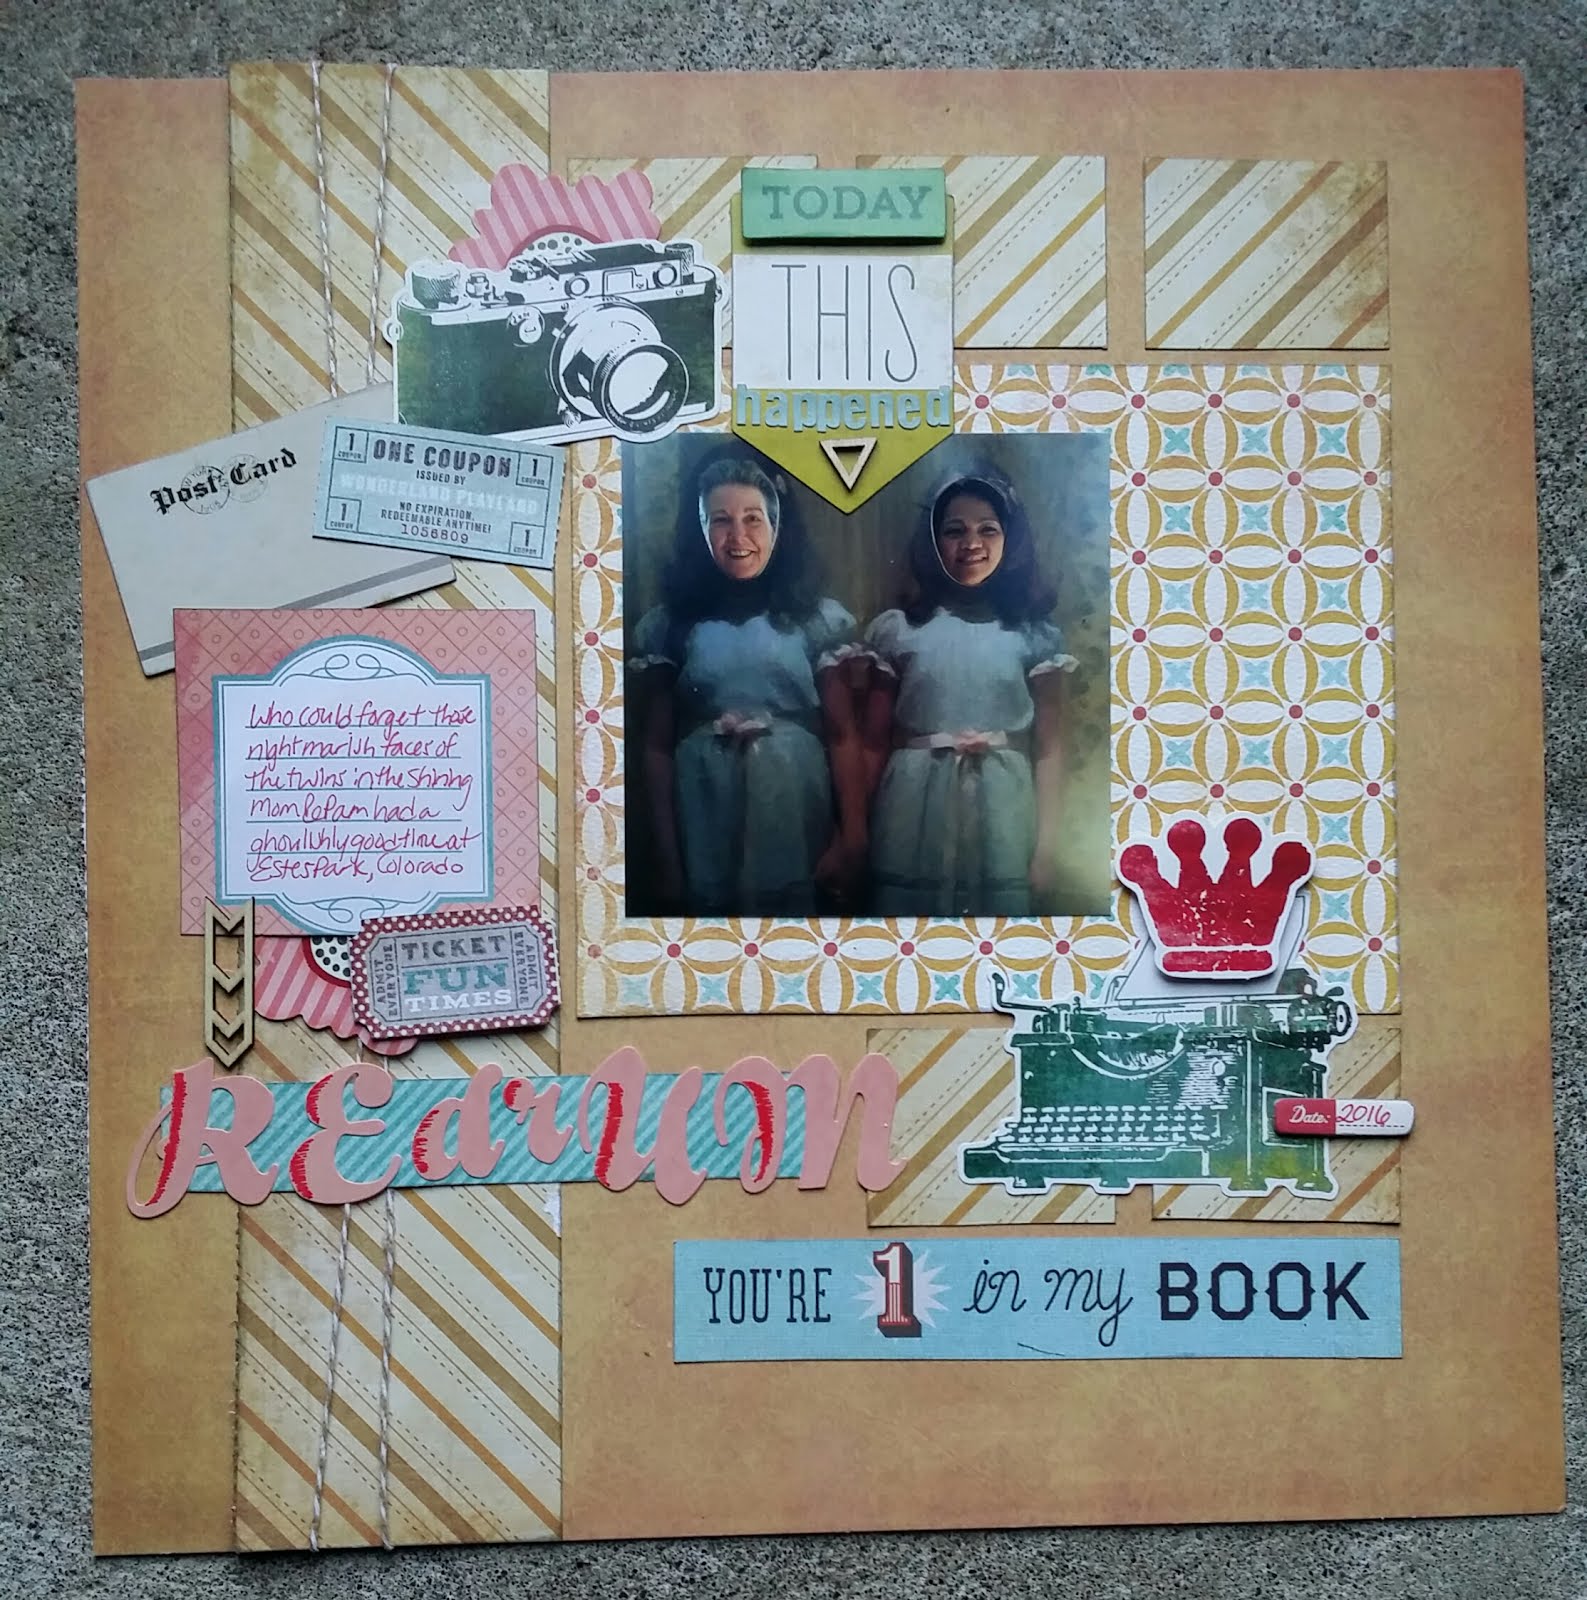
The funny thing is, I can't bring myself to read any of his new works-the idea of even trying is in fact too scary! Well, I'll be honest, I can't actually re-read his older books either- too scary (even though I know how they will end)! But, after my mom sent me this adorable photo of her and a bestie all dressed up in matching outfits- oh, wait, that's a cardboard cutout they are standing behind- I realized I could scrapbook something having to do with the Master of the Macabre. And, I could make it scarrrrry!

I thought my page (see photo above) was complete. It had a terrific photo on show, a typewriter and crown as symbols for Stephen King, die cuts that compliment the story of how I got the photo and a clever title -Redrum. My layout felt flat though, despite adding foam adhesive behind a few layers... wood veneer arrows brought a little more dimension, as well as the tiny chipboard date block. Bakers twine ran down a column of patterned paper which brought the focus inward toward the picture. Still, I wasn't quite satisfied with calling it complete.

Despite my grounding bases, there still seemed to be some floating of elements going on down at the bottom. And, even though I had designed the use of space to include a resting area to the right, my eyes felt unsettled as they roamed the page, trying where to decide to look away. Turning to a gigantic amount of unused chipboard I keep "just in case," I found a few rain drops, and, inspired by the scene in which two twin girls stand against a backdrop of cascading blood in The Shining, I painted them bright red!

Dripping down from a chandelier, again, reminiscent from the "remembered" ball room scenes of the movie's main character, Jack Torrence, powerfully played by Jack Nicholson, they are now drops of blood. Ew! right?  Thinking about that unnerving performance, and replaying critically frightening scenes in my mind while creating this one page layout brought out one of my favorite secondary titles to date, "Who needs Johnny?!" (You're number 1 in my book). A little strip of highway looking sticker reminded me of the isolation of the characters during their catastrophic caretaking job with their little boy, Danny.

As much as I adore how the finished version turned out, I still get a little shivery looking at it. Who could have predicted that a few dozen well-written, word packed novels read in my youth could have such a profound effect on my scrapbooking today? Or that, while I've donated my entire collected works by Mr. King, and planned to load them on my Kindle, I just can't seem to get the courage to do so.

Perhaps I have to admit, ever since I've had children of my own, I'm more likely to squeal with delight over a new Fancy Nancy than I was over the release of Stephen King's latest trilogy about "Mr. Mercedes." Perhaps, dear reader, I would have been too frightened to even go into the massive Stanley Hotel, where The Shining was filmed. Perhaps I was only too happy to scrapbook a memory of my mother's than to experience the fear myself... yeah, that's it, I'm sure :-)


Wednesday, October 21, 2015

DIY Door Decorations

Fall is a fun time to decorate your entry way, right?  The Friends of the Key Center Library sponsored a fun, free, Family friendly event last weekend, and we had a blast creating our own door decorations. With the generous donation of supplies from one of my favorite scrapbook suppliers, Queen & Co., we were all set up with patterned papers, twine, and washi tape galore to decorate with.
Just look at these smiles! And imagine my own :-D
My older daughter Rainie was along to assist with any of the younger kids, and we were having quite the time by ourselves, waiting for our first victims er, participants :-)
Soon enough, our first family came in and we all got down to the business of crafting up a storm! Then I had the pleasure of a repeat CraftWithAnna student, and his sweet enthusiasm for repeating back info he'd gleaned from other classes was the cherry on top of a really fun filled afternoon.
I'm always surprised by how unique everyone's projects turn out. Actually, I always hope they will look nothing like my examples, because then I feel like it's really theirs.
The other part of this class that I got a kick out of was using more of those donated Queen & Co. supplies. You'd never know it, but those are all summer papers we're using! So, take a look through your stash and see if there are some "B" sides that can be used throughout the year. You might just make a surprise discovery of a really right now piece that just has to be used tonight... or maybe that's just what I'll be hoping to do myself~ so go ahead, get crafty!


Saturday, October 3, 2015

A Lesson In Best Intentions

I'm surely not the only person associated with this blog who fails sometimes to live up to our full potential. Not that I'm not super amazing, no friend, that fact does not escape my self assessment; I simply mean that there are many opportunities where I set out to fulfill a vision and fall short.
Take this beautiful card I found while scrolling my inbox. Artist Jennifer Bloomquist of Stampin' Up shared this awesome design which uses the impact of a black matted inset stamped piece layered over four strips of washi tape in different designs. Oh Great, I thought to myself when I saw it. This will be so easy to duplicate, was the continued thought as I quickly located my cardstock, a few stamps, a Close To My Heart ink in Slate, and my treasured tin of tape.
Sitting down at the table with my paper trimmer, gathered supplies and some spare time, my excitement and joy at just the right level of craft-productivity, and this simple but striking design, I imagined sets of four cards in assorted greetings that I could market in the upcoming months. I could even make some Christmas cards!
Or... not.
A simple strategy for mass production: a box of scrap papers + stickers+ bling = awesome!
Do any of these cards look even remotely like the very duplicate-able design I had before me? I didn't think so either! I ended up making 8 cards in one go- nothing to scoff about. But, there is not a singe piece of tape to be found. not one bit of matting. I did manage to get some cardstock in there as the card bases, and amazingly enough there is even some stamping! But friends, you see what I meant at the beginning of this post about not living up to my potential- no set of four similar cards can be made from this grouping lol.
There are a few silver linings to this short lived cloud of dismay; my scrap box is a little lighter! I used quite a few pieces of chipboard! There are some very old stickers that are finally out of my stash in this photo! And, best of all, I was able to Make Something! As I mentioned before, I even did some stamping, which is a tendency that escapes my creative impulses lately.
Another little cherry on this cupcake of intention is that my father-in-law purchased most of these for distribution on the East Coast. Just thinking of that is enough to make me smile- and want to sit down for another session of production. I fully intend to follow my papers as they lead me though the beautiful process of layering pretty on pattern with a side of sentiment. And in that, I will most assuredly not fail... I think lol.

#ScarfSelfie!
Thanks for joining me today as I muse my way down to Oregon for a three generation road trip of celebration over my mom's last radiation treatment for Breast Cancer. If you haven't heard, it's Breast Cancer Awareness month and you ought to get a mammogram. I had my first medically induced super squeeze at the beginning of the year following my mom's diagnosis. It was an opportunity to put myself in the shoes- or in this case, the bras- of those I know who have had the unexpected reading come back of "further investigation necessary." As in, I needed to go back for further scans, followed by a biopsy of found calcium deposits, followed by a weekend of wondering what the results are, and a few weeks of limited arm movements.  Hmpf. A lot of worry but also a new appreciation for what my family and friends dealing with the disruption of cancer go through, and the renewed understanding that everyday should be lived to it's fullest!
 Today is World Cardmaking day to boot- hmmm, I wonder what we'll be doing tonight !? Check out the social media links on the right and you can see some of most candid camera moments showing up on my Instagram feed.
Happy Crafting! 

Thursday, September 24, 2015

Finishing Touches for Fall

 Here's another page I've made recently using a photo of Rainier dressed for the outside. It must have been taken in the beginning of Spring. She's got on a knit cap made by my Aunt's mom... it's so nice to have a warm cap of love to top off an outfit!

The theme of this post concerns my ongoing trials in journaling and title creating...and as the Virginia Slims of the past proclaimed, I've come a long way, baby! You can see that the layout was completely perfect as it was in the top photo. But it really comes alive when the sentiments are added, as you can see in the photo below. Like the hat Rainie wears, the difference is not overly obvious.  She could just as easily be wearing something from Target. My page could just as easily have been included in an album sans additional embellishments.
 
What area of scrapbooking could you leave out of the creative process and not miss too much?
 
I would usually choose to avoid the finishing part. The thinking of what to say. The figuring out a summarizing phrase that invites further reading into the story of the photo. The finishing touches that sometimes seem to take away from instead of adding to the over all theme of the project.  
I'm terrific about creating page kits! Paper hoarding, I get an A+++ in! Even putting together patterns and textures, balancing my layout with proper photo placement, adding more bling, tape, buttons, etc with abandon, and of course, enjoyment to the umpteenth power; all these come quite naturally and I could immerse myself in doing so for days (and have)!

I would still be satisfied, but would future generations, or even those reading through my albums now, be able to read between layers of pretty paper to find the reasons why I put these particular photos in between plastic sleeves of protection? I don't think so. And that is why, despite my underlying reluctance to share, the heartfelt sentiments I feel so passionately end up on show. I do it for "them." And me. And even you :-)

Just like that warm cap on her head, the journaling and title contain the warmth, show my love in written form, and invite the reader to participate in the art of story telling. Just as winter's chill brings on the extra accessories of coat, hat, and scarf, these words add a layer of love to my albums. And that, I can not do without...

As the weather changes, the boots and sweaters, knit scarves and caps come out, take a moment to add an additional layer of sentiment to your next scrapbook page or creative project- and yes cooking counts as being creative (I've been told)!

Warm thanks for stopping by today!


Friday, August 28, 2015

The family that's scrapped together...

Whoo-ee crafters, I've been busy busy busy this month! What with making all the pages and the cards featured in this new video, spending more time than ever with my loved ones, and creating a storm of cards to sweep through the latest Key Peninsula Barter Fair, I've hardly known where to hang my hat! Or, I guess it should be a place to hang my scissors. Or the washi! (Oh, the waaashiii)
I counted making something like 20 cards this month... not bad, huh? That's a little more than a card a day. UNLESS you're like me, and postpone somehow the inevetible and then crank out 9 in a single sit down! Okay, I realize you may not have that kind of time, motivation, or inclination. One of the reasons I never sold cards regularly was because it does indeed take a certain amount of discipline. Not a word I tend to accompany with my craft habits lol.
I've found myself in the conundrum of wanting to make, having reasons to make, and yet, not being willing to part from participating with my family to do so... good thing I've raised the girls to make right along side me! But, supervision is often times necessary, and not always easy to give when the desire to create for me is in the way. I suppose being aware of the problem is half the problem itself, and I think with a little thought towards scheduling some paper time, I can get a good little cushion of ready to sell's amassed yet again.
The holidays are coming- no, I know they are not just around the corner- but friend, they are! Lucky for me, my creations didn't sell quite as quickly last year and I have a box of fall through the end of the year beauties to re-release next month. For now, I'm going to turn my attention back to the family, and mentally compose some late summer, early fall colored patterned paper themes, harvesting good times inside and out :-)
As always, hope you enjoy the video, and thanks for reading!

Tuesday, May 12, 2015

May 2015 Card Share for EmbellishKits.com!


It took me a few days to get my video made- instead of my usual craft submersion this weekend I instead participated in the creation of some terrific Mother's Day memories - go figure! I laughed to myself throughout the day because usually I take this day off from any caretaking activities, child related or otherwise. For some reason though I kept washing dishes and comforting the kids- so maybe I'm maturing in my motherly way lol.
My brother came over in the morning and helped us set up a playset one of Ray's clients gifted us last fall. I somehow managed to convince him that the best place for them to play would be directly across from my craft room window... so yes, I will need to spend even more time in there, "supervising!" Later in the day my mom and her husband came over and we enjoyed a lovely afternoon, complete with BBQ and a long distance chat with my step-sister in Germany. I couldn't help but show off my seedlings- but did not mention the crop of aphids I discovered hiding in all my kale. YECH!
But back to the showing off- you're here, you know I love to do it so here it is without further ado:


We certainly hope you are enjoying these kit preview and share videos! Show your support with a big thumbs up and tell a friend what they're missing- inspiration, ideas, and non-intentional impersonations of Rachel Ray by yours truly :-)
Thanks again for following!

Friday, May 1, 2015

Flashback: Got Washi?


This probably isn't the first post with this title found on CraftWithAnna.com, but it's still a phrase I quote to myself once a day (at least). I do hereby declare for all legal purposes possible that this is officially one of my catchphrases!
Washi tape, or decorative paper/masking tape, comes in  huge variety of different printed patterns and widths. It takes about ten minutes to adhere permanently paper, making it very versatile. It also sticks well to things like refrigerators and tee shirts!
Since debuting on the paper crafting market, I've managed to collect enough rolls that I use it as an extension of nearly every tool in my kit... it also means I've had to upgrade my storage container a few times!
Need to hold something in place on my desk or within a layout or on a card front? Want a small amount of pattern in just the right place with the least amount of effort? Just feel like running your hands through a box of it like it's treasure, maniacally shouting, "My Precious!" ?
Boom- Washi is there for you!
I hope this Friday's Flashback has you reaching for a roll of your favorite tape this weekend, and if you're looking to fill up your YouTube queue with lots of National Scrapbooking Day vid's, be sure you're subscribed to my CraftWithAnna channel.
I've got two new tutorial movies for you this weekend, the first can be found HERE and previews the May 2015 Card Kit from Shelby Dredge of EmbellishOnline.com. I love the way she puts exactly what I love about her class events; the current paper collections, large packs of embellishments, coordinating quality cardstocks etc. together and sends them out each month through EmbellishKits.com.
This month's pack of 8 cards would be perfect for any graduate or to show your appreciation for a more masculine individual in your life. I've found myself reflecting on all the fatherly lessons I've gleaned over the years from the men in my life... how to set up a Washingtonian themed camp, how to get the best deal in the flea market, how now matter the age, a man in love can act like the kid in his heart <3. Lot's of good stuff both in the kit and in the process!
Then tomorrow you can take a peek at what Shelby puts in her scrapbook layout kits- ever wondered at a layout with awe at how it just looks so darn awesome? That's pretty much what I think with every layout she's helped me create :-) I can't for tomorrow's National Scrapbooking Day festivities, and sharing the gorgeous layouts from the May kit. If you're not already a subscriber to this YouTube channel, I have new videos coming out about three times a month, and there is a link to the right on this blog, just look for the purple circle icons.
Thanks for stopping by, and I look forward to your comments!

Tuesday, March 17, 2015

Hello, Baby! Feeling Lucky?


EmbellishKits.com Feb '15 Card Kit Review
EmbellishKits.com February 2015 Card Kit Review and CraftWithAnna Tutorial
Greetings Crafters!
What a whirlwind of craftivity I've been in since returning from my vacation/research trip onboard Royal Caribbean's Navigator of the Seas. In case you hadn't been following along, I went for a one week cruise with my best friend at the end of February. We each paid a little extra through our travel agents, Gail and Cheri over at CruiseOne to have crop space in the conference room onboard with one of our favorite teachers from Creating Keepsakes Conventions of the past, Shelby Dredge of Embellish It!  
You may remember, I had the opportunity to interview Shelby for the August edition of DieCutCrazy, a digital magazine whose back issues are now available free through the Apple store. As many classes as I have taken from her and cool tricks I have learned over the years, I was thrilled to spend a week with the other 90 or so crafters who enjoy her projects as well. So many beautiful memories, and even better, terrific relationships formed with my fellow cruisers.
I'm beyond excited to announce that each month, I'll be showcasing the new kits offered from EmbellishKits.com. There are many hot products included in each release, and I'll be sure to include a quick tutorial, as well as showing my finished projects and even a few bonus creations made from the leftover supplies (there are always a lot of those). 
You'll want to head over to my YouTube channel and click the subscribe button (if you haven't already)- now you'll have my latest videos posted directly to your watch feed!


Below are the 8 cards I completed from the contents of the EmbellishKits.com February 2015 Card Kit. Each of their kits contain complete cutting and assembly instructions, those gorgeous quality papers we love, embellishments, and all the cardstock bases and custom envelopes to inspire you to create card collections that you will love to give away. Heck, sometimes I even put mine in a little frame on the mantel for a while... so go ahead and show off: you certainly have my permission!

#1 "Baby Love," and #5 "You & Me Baby"

The best part about the kits for me, aside from all that delicious product, is that the complete instructions for each card are included with full color detail pictures, so I can hop around from card to card completing them as the desire strikes me. Knowing that some of my cards will end up in the shop for sale, I was able to change the designs by simply alternating the patterns or elements- super easy!

First off, let me show you my versions of the large, 5x7 card, number One, "Baby Love," and the 6x6 "You & Me Baby" card with the blue Bazzill base. While many of the same suggested elements appear, you'll notice I added a few more chipboard pieces and fussy cut images to my little hearts desire.
#2 "Hello Baby"

Next up is my this darling little elephant saying, "Hello Baby." Again, by simply choosing an alternate 3x4 card from the kit and that chipboard friend, my card takes on a new look that was so simple, I can't wait to duplicate it!

Now, we all know how fast babies grow. One moment they are a twinkle in our eye and the next thing you know they are thier own person! No matter what stage of life, we care for them with "Love Beyond Measure," which is the theme of card number three in this kit. See how I changed the design from landscape to portrait? And that I used a smaller chipboard heart, and turned the stick pin on it's side. The addition of another fussy cut pennant added to the expressed sentiment and brought in some of that lovely pastel turquoise. The adhesive backed satin scallop trim can be used as a whimsical banner, and home for another enamel dot. Bling bling, baby!


#4 "Baby" Banner

Speaking of banners, don't you just love when the paper does all the work for you? The six by six papers included with this kit make mixing and matching all these patterns a breeze. For this card, I actually just used the piece I had cut for the bottom; one piece of paper, two patterns= one crafty masterpiece! Whoa, that was a little to close to doing math for me to feel comfortable haha.


Something I had no trouble with? Reaching into my seldom used stash of baby themed embellishments to add a little more flair to the bottom of the card. This would have been the perfect place to add a sentiment sticker or even Baby's name! Shelby's idea of wrapping a bit of the included baker's twine and layering the chipboard flower elements is one of the reason's I've always enjoyed her classes... sure, it's a simple trick, but it's one I'll actually remember!

#6 "Love You To the Moon"
& #7 "Hello Baby W/Duck"
 Now for two of my favorite cards in this collection, #6 "Love You To the Moon," and #7, "Hello Baby w/Duck." Aren't they precious?

Again, you can see that I've taken a few liberties with the designs. A few placement differences on our Moon card simply bring the focus to one side and saved me a little fussy cutting. Between elmental-color-matching ruler patterned strips cut from a six by six piece, my little Duck is smelling the tulips atop a distress ink watercolor background.

That's another valuable, unadvertised element included in these kits; they are packed full of Inspiration! Do you identify with a go-with-what-feels-good craft-itude, or are you more apt to read and re-read directions before committing to the cut? No matter your style, you'll be making something... BONUS!


Leftover's Galore!

Created this before I even got off the ship :-)
Let's jump ahead to my bonus projects for this kit! Remember how I mentioned the scores of left over's there would be after this collection's completion? As you can see, I've got lot's more patterned papers to play with, plenty of enamel dots, and some large chipboard elements that will be great for more card making, or even ...some scrapbooking!

Time for the Bonus Round
This simple card used a few fussy cut pieces from the six by six pad, including a little of that ruler print I adore. Shelby's trick for tying a bit of ribbon around the flag is mimiced by knotting what's left of the grey polka dot grosgrain and using a glue dot instead of tying it. Wow, that was easy!

Last but not least by any means, is our featured card for this month's video preview, "Expecting You." Created in a matter of moments, little details like the organza ribbon around the chipboard flag make this a wow card big enough for multiple signatures inside. Can we say, office party (or baby shower, or just big handwriting lol)?

Thanks again for stopping by and playing with me today!
You can preview February 2015 Card kit from EmbellishOnline in the video below. Shopping for your must-have card kit is easy and only a click away at EmbellishKits.com.


And just in case you missed the linked picture at the top of the post-


Sunday, February 15, 2015

Waiting in the Sun

All this year our weather has been unseasonable warm, which feels great but of course can confuse the early bloomers like daffodils and crocuses. What a treat to be able to spend so much time outside with the girls though. With our vacation on the horizon, it's good to get a little exposure on them too, and I'm always encouraging them to go out and swing awhile while I get chores like the dishes done inside. I guess I'm fortunate that they beg to help, I know most kids don't consider doing so, but I do kind of push them out the door, telling them t go chase chickens or that TaTa (or little dog) needs someone to play with.
Or, if Ray is home, he'll generously offer me some alone time, and I'll take advantage of the opportunity for a little spurt of unencumbered craft time, and can whip out a trio of cards like this one, created in about an hour while they walked around the back of the back yard. When you live on acreage, you have to be specific lol. Some of these will go into Pickers Northwest Antique Store and the horizontal card will head to Gig Harbor's Copy & Mail.
I don't usually use our dining room table, but the sun was shining on it so invitingly that I pushed aside the placemats and set up a mini studio of supplies, including crochet thread, that gold chevron trendy tape from Queen & Co, and a 6x6 paper pad that complimented a handful of scraps from my bin. Then it was onto the MME pinterest board for inspiration! My favorite is the one that looks like little polaroids... I'll be using that idea again for sure.
Interested in soaking up the sun while crafting, or just sitting in the dark of winter reading this post? Come craft with me in this cardmaking video I published last Spring:

Wednesday, February 4, 2015

Right On Target!

Best Friends for Life
 This week my dad was in town and booked us for a few nights in the Silver Chalet condos up on Crystal Mountain, just past Greentree, WA. My brother and I used to go on ski trips once a year with Ed, but once our older brother started his family, and I had my two girls, we now congregate in the summer months. Summer's a beautiful time of year in the Pacific Northwest, but we're talking over 5 years of no snow filled adventures with the dudes in my life!
I managed to entice my long time best friend Jen into coming up to stay and watch the kids, hoping that with her along, I'd find it easier to sneak up the mountain for a couple runs on my antiquated snowboard. They are the same boots, bindings, and short board I started sliding on in 2001, and you know what they say, if it ain't broke, there's no need for an upgrade! Well, they also might suggest that if it takes you a good five years to learn to ride the front edge of the board, you may want to stick with what you know lol.
Sweet & Sunny Shopping
Well, you know I wasn't planning to be up there for three days with no supplies, and I was up into the wee hours scrappin away. I love how these leftovers from an Embellish It Valentine's kit were versatile enough to be used with my fall pictures of Sunday waiting with me in Target customer service. She is such a little cutie. I crack up during each of our photo shoots; whenever I ask her to smile, she sticks her tongue over her top lip. Not sure where she picked that trick up but it's hilarious! I'll add tiny letters to complete my title, "Target of my Love." This was like, our first trip to go shopping together alone. So Sweet.
I'm a cutie and I know it
So did I ever get up the mountain? Well despite my friend being called back work, yes I did get the chance to ride a couple runs with my bro, who still kindly waits patiently at each turn so he knows I'm okay and still behind him. What a gentleman. Almost makes up for the countless snowballs and ice chunks he hurled at us throughout the week! Imagine how I felt when I learned that prior to this trip he had never been around for a bed time observation. He even got a chance to babysit Sunday for the first time, pulling her around in a sled until she slept like a little pink popsicle at the base of the kiddie lift.
Aww, relief- now get these boots off!
Rainier and I signed up for a mother-daughter ski lesson- what an experience! I have never attempted it but last year I found a good deal on some old fashioned skis at the goodwill. Roxy boots that fit perfectly made me feel quite stylish- until the instructor advised me that the skis were actually too small and that she would not want me to go down from any higher than the bunny slope. Fine with me! Riding down with my oldest between my legs was exhilarating enough, I certainly did not feel the need to add any levels of danger to our thrilling descents. She had been up last year with her dad, who actually does know how to ski, so really she taught me a thing or two. I was so proud to see her trying, not giving up, and relishing the thrill of learning alongside me. And was she afraid of the chair lift? oh no, not at all! Wow, another great example and source of strength for her height hesitant mommy.
Beauty is more than skin deep
I finished out the weeks craftings with a reflective page titled, "Embracing my no blush flush." Funny thing is that in this picture, I probably have quite a bit of makeup on, but I wrote about how I've learned to embrace my pregnancy-induced rosatia as this physical reminder of my greatest accomplishment; my Rainier. She helped shape my destiny and focused my attentions of living as the woman I know I can be. Not a day goes by that she doesn't somehow inspire me to love at another level, and I wouldn't change that for any degree of beauty. On the flip side of that inspiration is what she learns from me; hopefully that God made us each perfectly, and that natural beauty comes from the inside!
So what imperfections have you learned to accept? Or do you have a funny mountainside story? Click on that comment link below this post to share!


Tuesday, June 24, 2014

Michael's Haul and Projects!

I'm really excited today to be posting my latest video, a Michael's shopping trip and what I've made with the stuff I've bought!


I love working at Michael's in Gig Harbor, the store is so clean and bright and the scrapbooking section is close to the front of the store so I can still see outside. This really helps because otherwise time disappears when I'm in there lol. It's almost like the casino, except, well I never leave with more money than I came with...
There are a lot of good sales usually and then my employee discount boosts my percentage off as well. It's hard not to find SOMETHING to take home! I find that shopping from a sales rack almost guarantees my products will coordinate, too. So that's a great tip for a shopping trip :-)
Coming home with the intention of sharing what I had bought and then building a kit was so exciting! It took a little longer than I expected for my video to get made, mostly because of getting my cards in the store and then just my usual scrapbooking and teaching schedule (You know, whenever possible).
Looking back through the finished projects, I realized I must have got an additional sticker sheet, or maybe I already had one from the same DCWV Vintage collection. I also used a lot from Basic Grey, one of the 4x6 Journalling card pads.
I hope you enjoyed this shopping trip! I love to read your comments and am grateful for my followers. What do you find yourself bringing home from Michael's? Let me know if you need suggestions, and Happy Crafting!

Tuesday, March 25, 2014

A peek at whats to come


Here is a peek at just one of the 15 cards I've made in the last few days- one stolen moment at a time :-)

Friday, February 14, 2014

L O V E


Love is in the air, and lately I've been thinking of, well, things I love! Specifically, "things" I feel like I need. Things, that aren't really things at all; like my family, cuddles and snuggles, creative time and space, good nutritious food, healthy communication... all the important stuff that gets me through life in as effervescent state as is possible. But "the greatest of these... is Love."


It's all I really need.


Everyone knows that Valentine's is the perfect occasion for getting a loved one a little something, like chocolate, or perhaps a beautiful card, maybe dinner out at a fancy restaurant, or my dream: A DIAMOND :-o
However, there are a few people out there who look at this special day more as a marketing gimmick than as an opportunity to make it magical. Those kind of people believe in spoiling everyday, not waiting for holiday occasions, and I'm lucky enough to live with a guy like that.


My sweetie has always been great at making dreams come true. He is usually willing to pick me up a box of chocolate - it fuels my creativity- when he's at the store. He loves to spend an hour or more gazing into my eyes as we dine on an exquisitely prepared entrée while dining out. However! He is completely against the purchase of diamonds because of the hardship their extraction places on miners in impoverished countries. What a Bummer for me!


Enter... my new favorite website to wish list on! The considerate folks at BrilliantEarth.com offer Beyond Conflict Free diamonds, meaning, not only are they considered conflict free, mined ethically and with respect for people, but for the environment as well! According to their website, they even track their diamonds from the source to the store, ensuring they arrive without being entangled in the corruptive practices that can profit from these valuable stones. Brilliant Earth even goes so far as to incorporate recycled and reclaimed gold, silver, and platinum. Wow, I think that's an awesome way to create beauty out of what someone else can't use anymore.


Hmmm... maybe I'll just casually place honey's name on their mailing list...


Here's how I created my Valentine's layout:
 I find it easiest to mix and match patterns and colors when I'm using papers that are all from the same collection. I'm in LOVE with the SEI Alpine wood grain patterns and color tones, so I knew that a few of these tones and wooden textures would form the neutral base of my page. I had this idea of highlighting the "O" and using a heart shape instead. I found a cute double heart on the cut apart sheet, which gave me some more ideas about the colors and embellishment choices to come.
  I also envisioned polaroid style frames around my new Posterboard alphabet stamps by Close To My Heart. Stamped in Chocolate ink on this cream and red grid two or three times to get that dark solid outline, and then shifted the stamp slightly without re-inking to achieve the shadow effect. Then I used my square punch to create identical openings in three brown, kraft flocked rectangles.

I ended up with a lot of these little strips of paper and thought it would be cute to staple them all together and do ... something with them! My staples didn't quite work the way I envisioned, though, and I'd love for you to comment with a use for my little whatever it could be.

To highlight my heart shape even more I framed it in red gingham, and backed it with a square of red. There was a line border pattern going around the red square, and only one line of the box shows... and that is just fine to me! I fussy cut with my exact-o knife around the outside of the heart shape and popped up the outside border with two sizes of dimensional adhesive; thin at the top and bottom, and thicker pop-dots on the sides. I thought it would look more dimensional that it did, so maybe if you try this yourself, either leave off the thin top and bottom dots, or double up the side pops.
Once my polaroid style frames were adhered atop stamped-letter-topped grids, I considered how I would dress them up. Some of my ideas included tying twine around the edge or bottoms, or adding enamel dots or brads, but in the end I added some red chipboard arrows on top of a sticker that I cut into three edge pieces and stuck to the left of each letter. From what was left in the middle of the sticker, I punched two hearts and placed them at the bottom right of my heart's polaroid.
For contrast to all the warm colors, I added some silver Mr. Huey's ink to the background, and then layered silver ribbon, dots, and hearts stickers to each of  my framed groupings. A double dose of hand cut hearts and a peach woodgrain in between put the focus on "L O V E," and left me a little room for my handwritten title add on, "it's all I need."


It's true. Despite all the things I want (chocolate, more washi tape, and yes, Diamonds) and feel I need; time with friends, being surrounded by family, having a creative escape daily, it all boils down to the fact that without Love, I'd be lost.


Check out the upcoming March edition of Die Cut Crazy to see even more fun ways to use the heart shape, Thanks for stopping by, and enjoy a Happy Valentine's!


I love you, Law!


Tuesday, January 28, 2014

Christmas Cards Continued


I've been concentrating so much lately on getting organized around the house that I haven't taken much time to write about it, what a bummer. But, as usual, in between my chores I have still found ways to release some creative energy, so here is another fun way I figured to use my Christmas cards received this year; enter the hole punch.


This relic of our school days still comes in useful and makes it really easy to slip just about anything into a binder, provided it can span the width of two of the binder rings. Otherwise things get a bit wobbly, which bothers me, but may not bother you?

I put all these cards in between the couple of Christmas pages I've created and I love the way they break up the monotony of my regular 12x12 album pages. For some extra visual and textural interest I added this large chipboard piece and glued on all the postage that was on the mailing envelopes. I just couldn't let all those pretty little pictures go in the garbage :-)

I accomplished two things with this dash of inspiration: 1) I got that stack of Christmas cards received off my craft desk. Who put them there anyway!? Oh yeah, me, whoops! Anyway they are cleared and there is more room for crafting yeah! and 2)Now we have the names and addresses of those thoughtful clients and family members who spent the time and postage to let us know they were thinking of us over the holidays. Every year it seems like I hear of more and more people doing away with card sending. Even Ray has made the comment a few times, but of course I still make him take my homemade cards around to all his clients heehee.

I even included an extra Christmas letter card Rainier helped me make for my Close To My Heart friends. I think this is a really neat way to include a little summary of what I thought it was important to share with people I don't see very often but think of while crafting regularly. Since I didn't do any journaling yet on my Christmas layout, I now am feeling completely guilt free about what I consider to be "unfinished business."

Last bit of this post, and then I'm going to spend some time on a new process video I'm hoping to release in conjunction with this Saturday's Valentine Die Cut Crazy Blog Hop... I've got a couple other blogs started up and put some new posts on there tonight as well. So if you're interested in what I have to say about the latest in our families lifestyle/food choices, or what I'm up to with my PartyLite business, just click on my blogger profile and you'll see them listed under my name.

Thanks for stopping by!


Saturday, October 12, 2013

Finally Catching On to the Subway


 Last week my cousin's boys twin boys celebrated their first birthday. I am so in awe of she juggles the two of them with the needs of her six year old too. Somedays I feel ready for baby number three- and other days I want to run in my craft room and slam the door shut on mothering, if only for a wee bit :-)
I've been wanting to try my hand at the Subway art trend I've noticed appearing throughout the year in different forms but until this project I hadn't visualized his to do it. Then it occurred to me that I could be denting my humongous collection of word stickers if I spaced a whole bunch across this little photo holder I was creating for my cousin.
I'm really happy with the balance of the simple outside title, "My Boys," and then the wow! impact of the opening page.


On the inside I chalk inked some raw chipboard and added a few label stickers. I figure she can place a favorite photo of each boy alongside their initial.
 

Then of course she needed a card.
 

And of course you need to see this scrap able photo of my girls at the party, which had a farm theme and was held at Schultz farm out in Orting, WA.
Looking forward to some more fall fun!