Showing posts with label die-cuts. Show all posts

Thursday, February 8, 2018

Thanks Love Card

Thanks Card-
1. Fold a large cream cardstock base in half to 4.25x5.5”
2. Center and Adhere the Large Patterned Paper block to front.
3. Center and Adhere the Medium Patterned Paper block to front*
*if your patterns are the same, turn one to the reverse side for contrast.
4.Center and Adhere a Large Pink Doily.
5. Adhere a yellow stamped “Thanks” banner die-cut to the center of the Doily.
6.Under the banner die cut, center and adhere a Yellow Baker’s Twine Bow.
7. Adhere a yellow stamped “Thinking of You” banner die cut to the inside of your card.
8. Sign the back


Sent from my Verizon Wireless 4G LTE smartphone

Tuesday, February 6, 2018

Happy Anything Card

1. Fold a Cream Cardstock Base in half to create a 4.25x5.5” card.
2. Adhere the Dark Green paper strip.
3. Measure a hand’s length of Green Baker’s Twine and cut. 
Tie the twine to the top of the Large Green Tag.
4. Overlapping the Dark Green paper strip, Adhere the Tag.
5. Adhere the Green Paper block.
6. Adhere one “Happy” Die Cut (3 choices).
7. Use a pen to complete your sentiment, i.e. St. Patrick’s Day, (Happy) Everything! , (Happy) Go Lucky
8. Sign the back!


Sent from my Verizon Wireless 4G LTE smartphone

Saturday, February 3, 2018

Washi Tape Tag Card


1. Fold a piece of Pink Cardstock in half to create a 4.25x5.5” card

2. Center and Adhere a Large Pink Patterned Paper block.

3. Select and Adhere an Alternate Patterned Paper block to the front of your card.

4.  Adhere a Large Pink Doily.

5. Adhere a Paper Flower of your choice centered over the Doily.

6. Adhere a Heart Die Cut to the left of the Paper Flower.

7. Wrap the Small Tag Die Cut with a piece of Black Butterfly Washi Tape.

Wrap ends to the back of the tag.

8. Adhere the Tag on top of and to the right of the Heart.

9. Adhere a Pink Rhinestone Gem to the Tag top.

10. Adhere a coordinating Small Paper Strip to the inside of your card.

11. Sign the back!


Sent from my Verizon Wireless 4G LTE smartphone

Sunday, June 26, 2016

Color Wheel Challenge, Kit Reveal, & CK Portland Review


 If you were to click on the word "challenge" from the search list on the right hand side of this blog, you'd be able to tell by the number of posts that came up, how much I love a good challenge. A few years ago, I even challenged myself to scrapbooking 30 layouts in the month of June- and succeeded!
The latest challenge over at Shimelle.com is to scrapbook with the color wheel in an unusual way; using split complimentary colors. "Split complementary means choosing one colour to start, then going straight across the wheel to the opposing colour and instead of that central colour, choosing the one either side."- Shimelle.
I also love to be resourceful when it comes to my patterned paper. Truth be told, it's a compulsion to savor each pretty printed sheet in it's entirety. I've been working on using the beauty I have in supply instead of continuing to hoard the ones I've pay money for. The physical cost, the joy of purchasing remembered when I see favorites, the textures of some, like the Indi Chic print from My Mind's Eye, at left.
When I went down to Portland for the Creative Keepsakes Convention with my mom and brother a few weeks ago,  it was with the intent to bring home some intel on what's to come over the next couple months in the scrapbooking industry. That, and to sit in on some classes as a volunteer. Oh, and to celebrate my younger brother's upcoming 30th birthday. Let me tell you how thrilled he was to be helping out when all 10 of the drying tools wouldn't work in our mixed media assist! And you know the ladies enjoyed seeing his smile- we shared the same orthodontist.
You'll see the artsy layout I made to commemorate that trip tomorrow, when I (gasp!) guest blog for my scrapbooking savior (Glitter Girl) Shimelle Lain. Today, I played with the contents of my Bible Journal Society kits. The die cuts are vivid and have a doodled or handrawn look that is so on trend, I can't help but adore them! Bo Bunny in bright, watercolored hues of turquoise and green are offset by orange and brown.
The focal photo is of my Grandmother's side of the family reunion, and the large arrow in the middle points to her and my Great Uncle, Grant. Preserving the handwritten year and family name were essential.
 Stretching my supplies is also a must for me, and there are layers of cut-apart frames behind the large quote at the right. All of these colors from Basic Grey in the background compliment the vibrantly hued curtain behind this group photo.
Complimenting the story of this family's migration to North America from Norway are a big bold globe, with arrows pointing to the respective countries. Word sentiments included in the set are so versatile, I don't even have to include journaling :-) But one thing I will do is put this pic up on facebook and ask my  relatives to identify their kin. Technologically enhanced scrapbooking, will this be my next big focus? hmmm.


Once I'd finished this layout, I couldn't just put my leftover pieces of paper away, of course I had to create one more layout! It has been a beautiful summer day, I was scrappin' outside in all of God's glory (read:bikini) and here I had the die cuts to exclaim my appreciation. Couple these bits with a devotional read through written by one of my favorite kit designers, and it was easy to whip up another page with a single candid photo of my girls about a year and a half ago.


That look on Sunday's face... What a little toughie.
Growing up isn't easy. There are all sorts of fears that young children face. There are simple times of joy when I want to sing it from the back pasture, Girls, don't ever feel alone!, and the watercolor quote on the left with the printed sentiment is then perfectly echoed by that pretty block on the right.   It would be fun to get some colored pencils, markers, or paints out to play against that bold black doodled designs Shelby came up with.

The amount of love that is included in each of these kits has actually been a little moving. From the sentiments, book marks, rub-ons, washi-tape, die-cuts etc, to the words and references in the included devotionals, my thoughts naturally gravitated towards appreciation for my family - and the time they afford me to pursue my pursuit for Craft Diva Superstardom!
I've had a surprising amount of mini albums surface from the depths of my craft space, and put a little kraft covered, twine closing cutie from Close To My Heart to good use with little 3x3 pics.

 
Hey, thanks for reading down this far! And...
 
Here's Your Video!


@EmbellishKits #BibleJournalSociety #EmbellishKits
@AnnaBradshaw #CraftWithAnna #makersgottamake

Sunday, May 8, 2016

More Red Rum, Please


I used to love the thrill of self-induced fear... absorbed in a terrifying good read, I'd sometimes clap the book covers closed and regain control of my breathing, then slowwwwly reopen the frighteningly good novel to once again set my heart racing- much to the amusement of my family! Nowadays, I'm more likely to cause myself a near heart attack reading about the potentially harmful effects of consistently eating dairy products, but if anyone asked, I wouldn't hesitate to reply that my favorite author was, and still is, Stephen King.
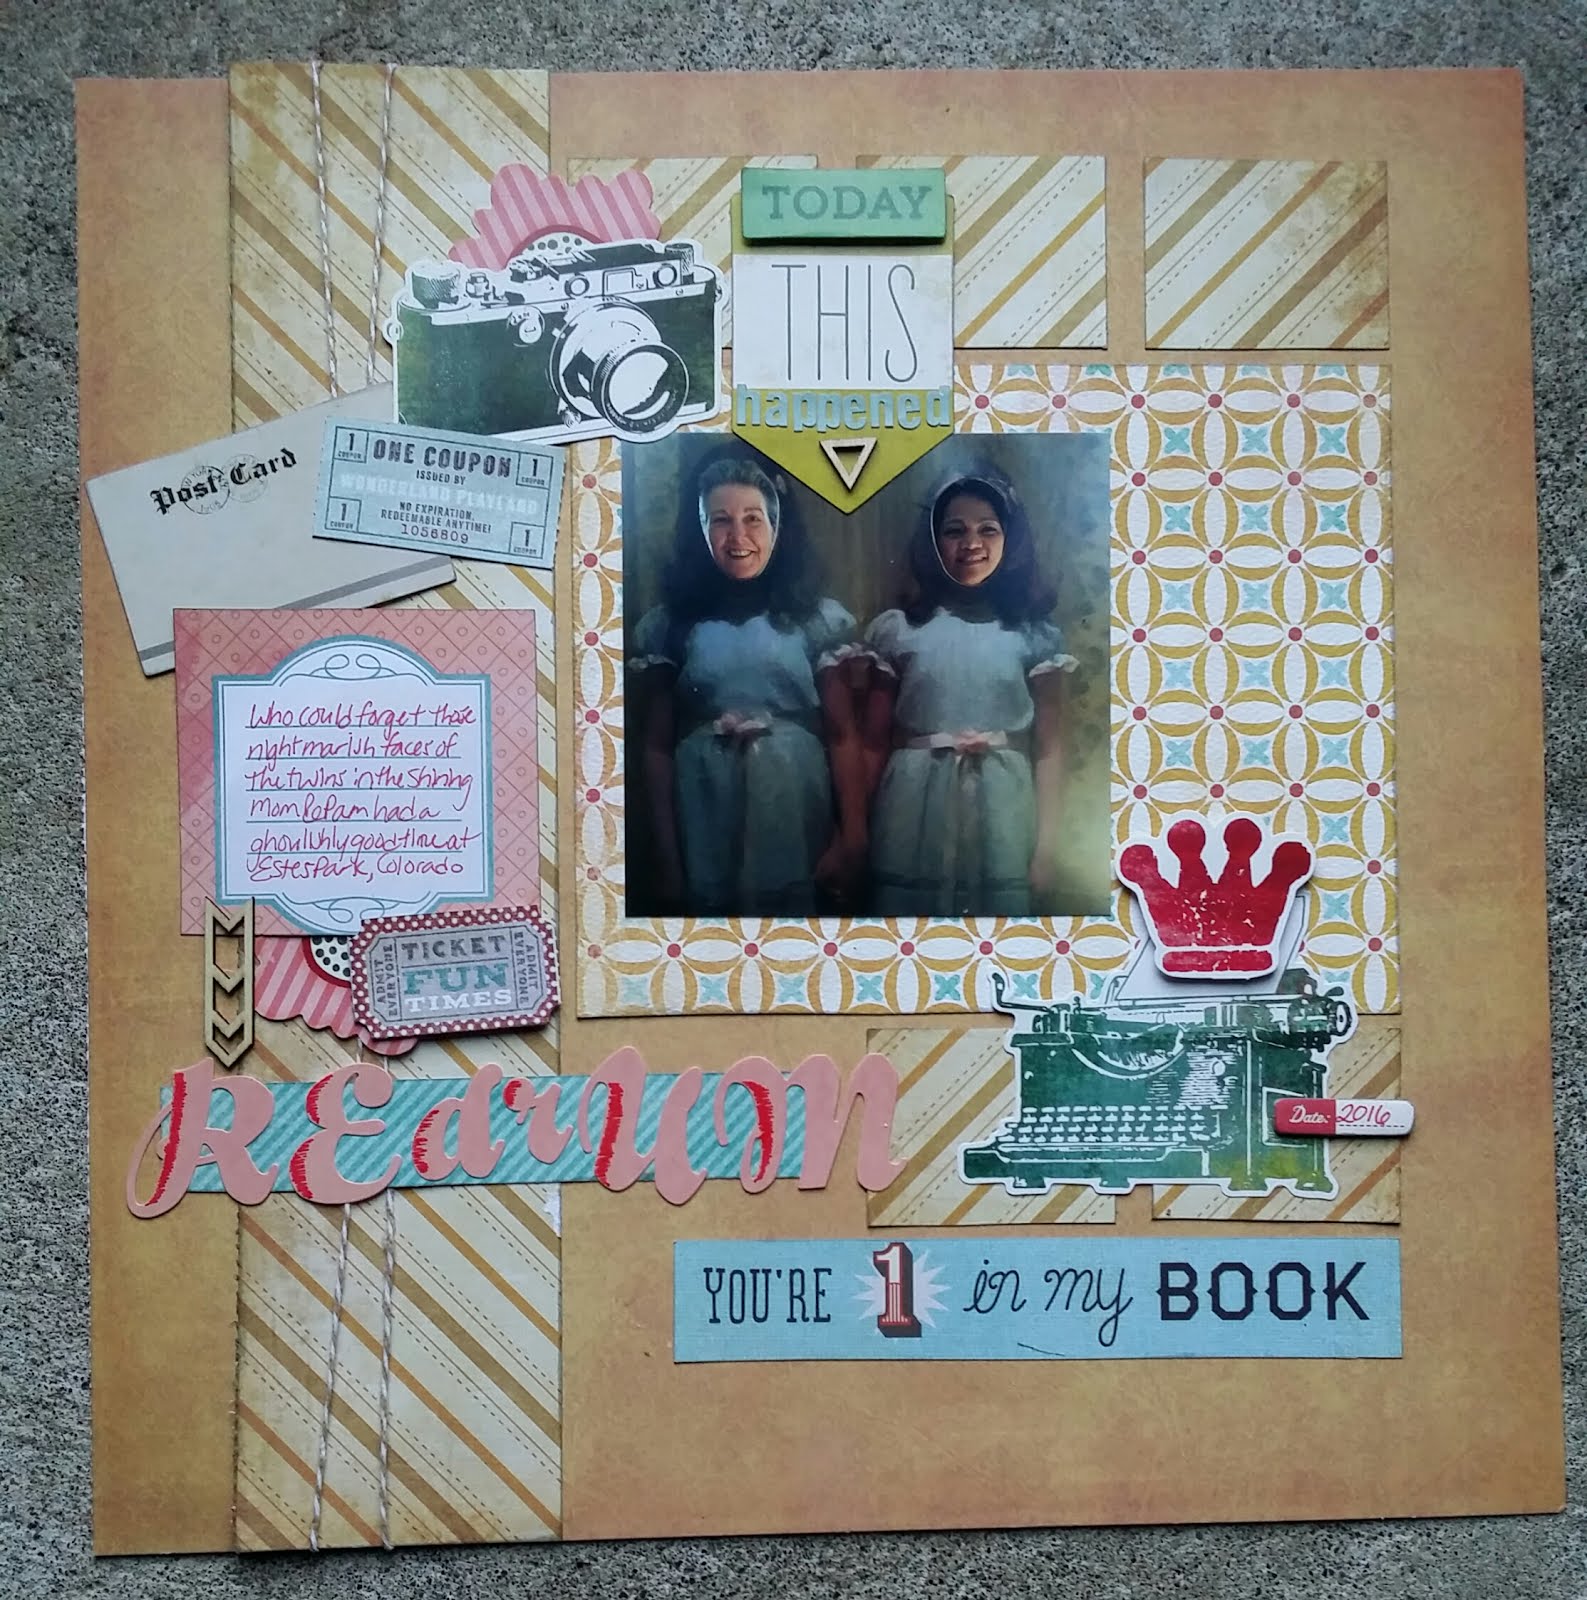
The funny thing is, I can't bring myself to read any of his new works-the idea of even trying is in fact too scary! Well, I'll be honest, I can't actually re-read his older books either- too scary (even though I know how they will end)! But, after my mom sent me this adorable photo of her and a bestie all dressed up in matching outfits- oh, wait, that's a cardboard cutout they are standing behind- I realized I could scrapbook something having to do with the Master of the Macabre. And, I could make it scarrrrry!

I thought my page (see photo above) was complete. It had a terrific photo on show, a typewriter and crown as symbols for Stephen King, die cuts that compliment the story of how I got the photo and a clever title -Redrum. My layout felt flat though, despite adding foam adhesive behind a few layers... wood veneer arrows brought a little more dimension, as well as the tiny chipboard date block. Bakers twine ran down a column of patterned paper which brought the focus inward toward the picture. Still, I wasn't quite satisfied with calling it complete.

Despite my grounding bases, there still seemed to be some floating of elements going on down at the bottom. And, even though I had designed the use of space to include a resting area to the right, my eyes felt unsettled as they roamed the page, trying where to decide to look away. Turning to a gigantic amount of unused chipboard I keep "just in case," I found a few rain drops, and, inspired by the scene in which two twin girls stand against a backdrop of cascading blood in The Shining, I painted them bright red!

Dripping down from a chandelier, again, reminiscent from the "remembered" ball room scenes of the movie's main character, Jack Torrence, powerfully played by Jack Nicholson, they are now drops of blood. Ew! right?  Thinking about that unnerving performance, and replaying critically frightening scenes in my mind while creating this one page layout brought out one of my favorite secondary titles to date, "Who needs Johnny?!" (You're number 1 in my book). A little strip of highway looking sticker reminded me of the isolation of the characters during their catastrophic caretaking job with their little boy, Danny.

As much as I adore how the finished version turned out, I still get a little shivery looking at it. Who could have predicted that a few dozen well-written, word packed novels read in my youth could have such a profound effect on my scrapbooking today? Or that, while I've donated my entire collected works by Mr. King, and planned to load them on my Kindle, I just can't seem to get the courage to do so.

Perhaps I have to admit, ever since I've had children of my own, I'm more likely to squeal with delight over a new Fancy Nancy than I was over the release of Stephen King's latest trilogy about "Mr. Mercedes." Perhaps, dear reader, I would have been too frightened to even go into the massive Stanley Hotel, where The Shining was filmed. Perhaps I was only too happy to scrapbook a memory of my mother's than to experience the fear myself... yeah, that's it, I'm sure :-)


Friday, August 28, 2015

The family that's scrapped together...

Whoo-ee crafters, I've been busy busy busy this month! What with making all the pages and the cards featured in this new video, spending more time than ever with my loved ones, and creating a storm of cards to sweep through the latest Key Peninsula Barter Fair, I've hardly known where to hang my hat! Or, I guess it should be a place to hang my scissors. Or the washi! (Oh, the waaashiii)
I counted making something like 20 cards this month... not bad, huh? That's a little more than a card a day. UNLESS you're like me, and postpone somehow the inevetible and then crank out 9 in a single sit down! Okay, I realize you may not have that kind of time, motivation, or inclination. One of the reasons I never sold cards regularly was because it does indeed take a certain amount of discipline. Not a word I tend to accompany with my craft habits lol.
I've found myself in the conundrum of wanting to make, having reasons to make, and yet, not being willing to part from participating with my family to do so... good thing I've raised the girls to make right along side me! But, supervision is often times necessary, and not always easy to give when the desire to create for me is in the way. I suppose being aware of the problem is half the problem itself, and I think with a little thought towards scheduling some paper time, I can get a good little cushion of ready to sell's amassed yet again.
The holidays are coming- no, I know they are not just around the corner- but friend, they are! Lucky for me, my creations didn't sell quite as quickly last year and I have a box of fall through the end of the year beauties to re-release next month. For now, I'm going to turn my attention back to the family, and mentally compose some late summer, early fall colored patterned paper themes, harvesting good times inside and out :-)
As always, hope you enjoy the video, and thanks for reading!

Sunday, August 16, 2015

Simple Stories Scrapbooked & a New Video!

It's time for a new Scrapbooking Tutorial, featuring this kit: Once I lined up the photos I wanted to accompany the two, double page layout designs featured on the full color example, it was a snap to create gorgeous layouts. The Simple Stories papers have always been a few of my favorites. I actually used some of these same embellishments earlier this year to make a darling card.

I find it easier to select place my die cuts when I put all of the ones I may want to use right by my workspace. Then it's playtime! Layering with pop dots adds dimension and inking the edges adds texture. In the video below, you'll see both those techniques. Thanks for stopping by- I'm only three subscribers away from a contest give away, so click on the link below and subscribe today if you're not already :-) Enjoy!


Thursday, June 11, 2015

June Scrap Share

Dad's Day is Coming! 
This week, Poppop and Nana are occupying the "T" -as we call the camping trailer we keep for out of town guests. Working with the June Scrapbooking kit from EmbelliskKits.com already had me in a nostalgic, old timey car loving mood, but that feeling is always enhanced when in Bundro company. As a teenager, my older brother painted the image of Ed's truck onto the rig's air filter. Even after the truck was sold we were surprised to see it while filling up at the local "Four Corners" Texaco. One of my clearest memories of my younger brother as a toddler is of him exclaiming "Car-ee" while proudly holding up the decoration off a birthday cake. Needless to say, it was no trouble finding memories that went perfectly with the designs included in this month's kit.
 
Let's get SCRAPPY!
One thing about memories, though, is that they don't always have tangible photos readily available. That didn't stop me from using up all but 3 die cuts, a few inches of twine, and roughly 4 x 0.5 inches of the papers Shelby assembled for our two, double page scrapbook layouts! The stickers were harder for me to find homes for, just because personally I'm not inspired by "son" stuff- SUN stuff, yes though lol.

Add caption
My daughter's have taken practically every class I've taught, and being the mimics that kids are, a mini cardmaking class was taught to Poppop in the front yard next to our newly created firepit.
Using a group of similiar themed items is a great way to embellish a card or even a scrapbook page. Put them in a grid as my family of crafters chose, or group them with some fibers, brads, and or bling to create a whimsical banner as I did on our second layout created from this month's kit!


Throwback Thursday
My brother's birthday being this week, there was plenty of inspiration for those car themed items. One of my annual goals is to use supplies in my stash that are collecting dust, and acrylic of any sort seems to be the product I can never think to include. I've always liked the look of acrylic cards and decided that a little birthday card/mini album for my bro would be the perfect way to give him photos from that trip we took to Lake Cushman last weekend.
Inside features awesome family camping trip pics


Back Cover closes with a Smile


I love having a pre made album prepped before an event... knowing which shots and even which orientation I need photos for not only makes for a terrific finished product, but helps me seek those shots that make it so. And then, sometimes those candid moments come completely un-staged, like the ones I included of us climbing into photo shoot position and of Ed flexing his guns for his visibly unimpressed son.
For the second layout feaured in the June Scrapbooking kit from EmbellishKits.com, I was really stumped for pictures. I considered doing a layout about my own dad, with a focal/main photo of him holding my girls, and an accompanying page of him through the years with each of my brothers and myself. Alas, as mentioned before in this post, sometimes the images of memory aren't readily available in tangible photo form. Instead, I crafted up a couple lovely cards perfect for Father's Day.
Then, inspiration hit! That title of This Is What Handsome Looks Like brought to mind the hilarious photo Rainies dad sent me of her one day while I was still working full time (at being a part time employee). Our little chub-a-lub was decked out in an ill fitting polo shirt with an accompanying caption of "Isn't he handsome?" We have two daughters, folks!
Anyway, I still crack up thinking about it and decided to give Sunday a few more reasons to resent my scrap-a-licious ways by dedicating that "handsome" decree to images of her first haircut. See how I layered icons that fit my theme to create a banner similar to the one shown in this month's design? This is a super fun way to use a lot of products to create a wow embellishment.


Second layout from this month's EmbellishKits.com scrapbooking kit.
By continuing those same icons in embellishment clusters across the two pages, we can easily create a coherent layout! Considering the amount of pictures I had on hand, I could even spread those themes of time, barbershop, and camera across a couple more pages. The top two photos on my page flip up to reveal an additional layer of cute, as well as my personal musings about why in the world I get so emotional about a few snips with the scissors. For now I've housed the remaining photos from this sentimental snapshot in pocket pages. If I forget to come back and scrap them, they will still be on show for viewing, and I can always add a few patterned papers or project life cards and call the story told.


I couldn't help but reflect on how much I ended up enjoying working with both the May card kit and this June scrapbooking kit, both of which featured patterned papers and embellishments from the Jack and Jill collection from Echo Park. Shelby included so much product with each shipment, that I had enough left overs to create over ten additional projects! And, having those smaller patterns left over to add to this kit made it possible for some more wood veneer fun, like the "hello" I adhered with mini glue dots next Sunday smiling with her new hair-do. Hey, justifying an addition to your club membership is certainly something I'm qualified and happy to do! You can find more subscription details at EmbellishKits.com.
So what's next for creativity this week? I've got my CraftWithAnna team registered for this weekend's Relay For Life at Peninsula High School where my crafty friends will guide participants through a quick but cute thank you card to send out their supporters. We'll also be creating mini memorial albums, so a lot of fun and memory sharing will be bound to fill my heart with happy. I'll be spreading the word out about my upcoming craft cruises, too- wouldn't want to deny any crafties the vacation of their dreams don'tcha know!
Another card just waiting to happen
Aside from that hub-bub of fab, I've got just a few more scraps to, well, scrap, including this pile which just happened to fall into a card design on it's own... gotta love it when THAT happens! Watch my instagram account @AnnaBradshw to see how it turns out and to catch highlights from this weekend's event.
Now, GO GET CRAFTY!


Sunday, May 31, 2015

It's Time For A New Scrapbooking Kit Preview!

Remember how much fun we had in last month's EmbellishKits.com cardmaking kit preview video? Well this month we're using the super sized versions of those Echo Park papers to build some scrap-tastic layouts! The Jack & Jill collection by Lori Whitlock features old-timey icons like antique cars, baseball, bowling, airplanes, horses, and more- all cool stuff to pair with your favorite heritage photos or even just your friends hanging around the ball park.

The June 2015 Scrapbooking kit from EmbellishKits.com also includes beautiful aqua neutrals from Simple Stories, a great big wood veneer from Heidi Swapp that spells out Journey, and black and blue toned fibers to accent our layouts. To further customize our pages, we've got a full 12x12 sheet of stickers AND a 12x12 sheet of pop-out-your-own die cuts to play with!
I like to take all tear all of the die cuts away from their paper backing right away; for me it's easier to store them in one of those plastic packaging bags I always seem to have floating around the craft room. Don't have any yourself? Hmmm... I think a shopping splurge at EmbellishOnline.com may be in order lol.
I've seen crafters store their die cuts in pretty displays of stacked cake plates, elaborate drawer systems, baskets, and even Tupperware containers! It's all about doing what works for you, in your craft space- the important factor is your ability to enjoy them :-) And enjoying the die cuts included in this month's kit is easy to do- think subtitles, & embellishment clusters! Next week you'll see how I use some of these fun little paper bits to enhance a few handmade greeting cards and even a mini album... as one of the tags reads, "the sky's the limit!"
For this month's kit preview CraftWithAnna tutorial, we're building a fun, two page layout featuring photos of my two girls living the life of jet setters! You know me, I'm always interpreting the examples my own way; something that is so easy to do with the designs and products included in each kit from EmbellishKits.com.
Of course, there are wonderfully detailed written instructions and the full color examples to guide you with product placement and the general look of what your layout can look like if you do everything just as directed. Either way, you'll soon have a beautiful layout to include in your album!
I hope you enjoy our latest preview video- be sure to that subscribe button so you don't miss the exciting reveal of what I come up with using the supplies included for an additional two page layout. I know I'll be able to create additional projects using those numerous die cuts, stickers, an off-cuts too. So follow along on instagram @AnnaBradshw or search for #CraftWithAnna to see what's coming from the craft room and comment away!

Friday, May 15, 2015

I Am... Still Using the EmbellishKits.com May 2015 Scrapbooking Kit!


From the first time I saw this "I Am" collection from Simple Stories in Shelby's class last earlier this year, I was smitten. The soft aqua mixed with first and second generation golds, coral and greens, and flashes of gold foil and outline accents in a creamy white spoke of the pleasant days of Spring to come. Now that they are here (and even more pleasant than I had hoped for to be honest), the May 2015 scrapbooking kit from EmbellishKits.com is the perfect companion to the (1000's of) photos I've been taking!
 
As I previewed in our kit release video for National Scrapbooking Day earlier this month, this collection also offers a die cut pack with nearly 100 Bits and Pieces in it- limitless possibilities there! You could use a few of these to highlight your embellishment clusters, spell out a title, or even become the focal point of a page or card. Shelby also included black twine, aqua ribbon, and sheets of rich Bazzill cardstock that perfectly coordinate with the colors in this collection. I loved these papers so much, that when I saw some additional sheets being sold at the Scrapbook Expo a few weeks ago, I just had to grab them! Instant gratification and all that... you can find order more from Simple Stories through embellishonline.com though :-)

Can't cut this couple apart card.
Cut Apart Collage
Cut apart sheets are papers that I sometimes avoid buying because I don't always know what to do with them! Maybe not so much avoid buying, but more along the lines of, easier to say no to lol.  I love getting kits like this, that include ideas for how to use products I love but haven't been inspired enough to experiment with. Sometimes we just need a little practice project, no?
One of my bonus cards from this kit is this wedding card, where I stacked those cards behind a cute cartoon sticker of a couple exchanging a loving glance. The anchor and suitcase cards made me think of "honeymoon," and by wrapping some of that aqua ribbon around the grey polka dot square, it becomes a wedding present! Even the two heart cards which had been cut down too far to show as full sized hearts got included. No one can see behind to see what isn't there lol.

May 2015 Scrapbooking Kit Preview tutorial layout on the left
I love how this two page layout came together- made separately, they feature two very distinct styles, and yet because the pieces are all coordinated, it comes together beautifully. A grid pattern for my four by four photo collages on the left also includes ten of those 2x2 inch cut apart squares, while my four by six photos get my favorite free for all treatment - a color block background for each photo and lots of layered die cuts to spell out a long title. On each page I also opted to follow the full color examples provided by including two of the pocket folders included in this month's kit. One is just for looks, but I did journal a tiny bit about my girls current accomplishments on the other.

If I had a flower for every time I thought of you...
I do love me some shine!
Look at how I used this flower filled basketed bicycle die cut, and the "so thankful" banner to spruce up the front of this card. Of course I had to add in a handful of my favorite blings from Queen & Co., too! I still have a few pieces that I can create more cards with, but frankly, with so much card making going on around here, the times when I can devote my energy towards scrapbooking are now cherished moments, so took this opportunity to add to my albums instead of my store front card racks.
I am... an artist
Scrapbooking as an art form has become such an important storytelling tool for me; it has allowed me to explore memories that I fondly look back on from the perspective of motherhood,
I am...thankful
I am...loving life
 
I am... one of many
highlight relationships that mean the world to me, and well, when you have cute kids you've got to do something with all those photos! Putting pretty papers together with pictures I enjoy and then finding litte add-on's to enhance my page is a very creative process, and one I absolutely think of as essential in my personal quest to avoid card-makers burnout lol.

Thank you for joining us for our first layout share post, using the May 2015 scrapbooking kit from EmbellishKits.com
Be sure to click on the purple social media icons to the right of this post to follow my channel on YouTube, catch my latest instagram posts and Surivor fan-atic tweets, or to take a stroll through my etsy shop... your comments are always welcome below, too!
I'd love to hear your current "I am...," or about what scrapbooking or card making means to you, or maybe you want to share about how you feel about gold foil? Lol, whatever your weekend brings, I hope it includes a bit of bling!