Showing posts with label patterned paper. Show all posts

Thursday, October 24, 2019

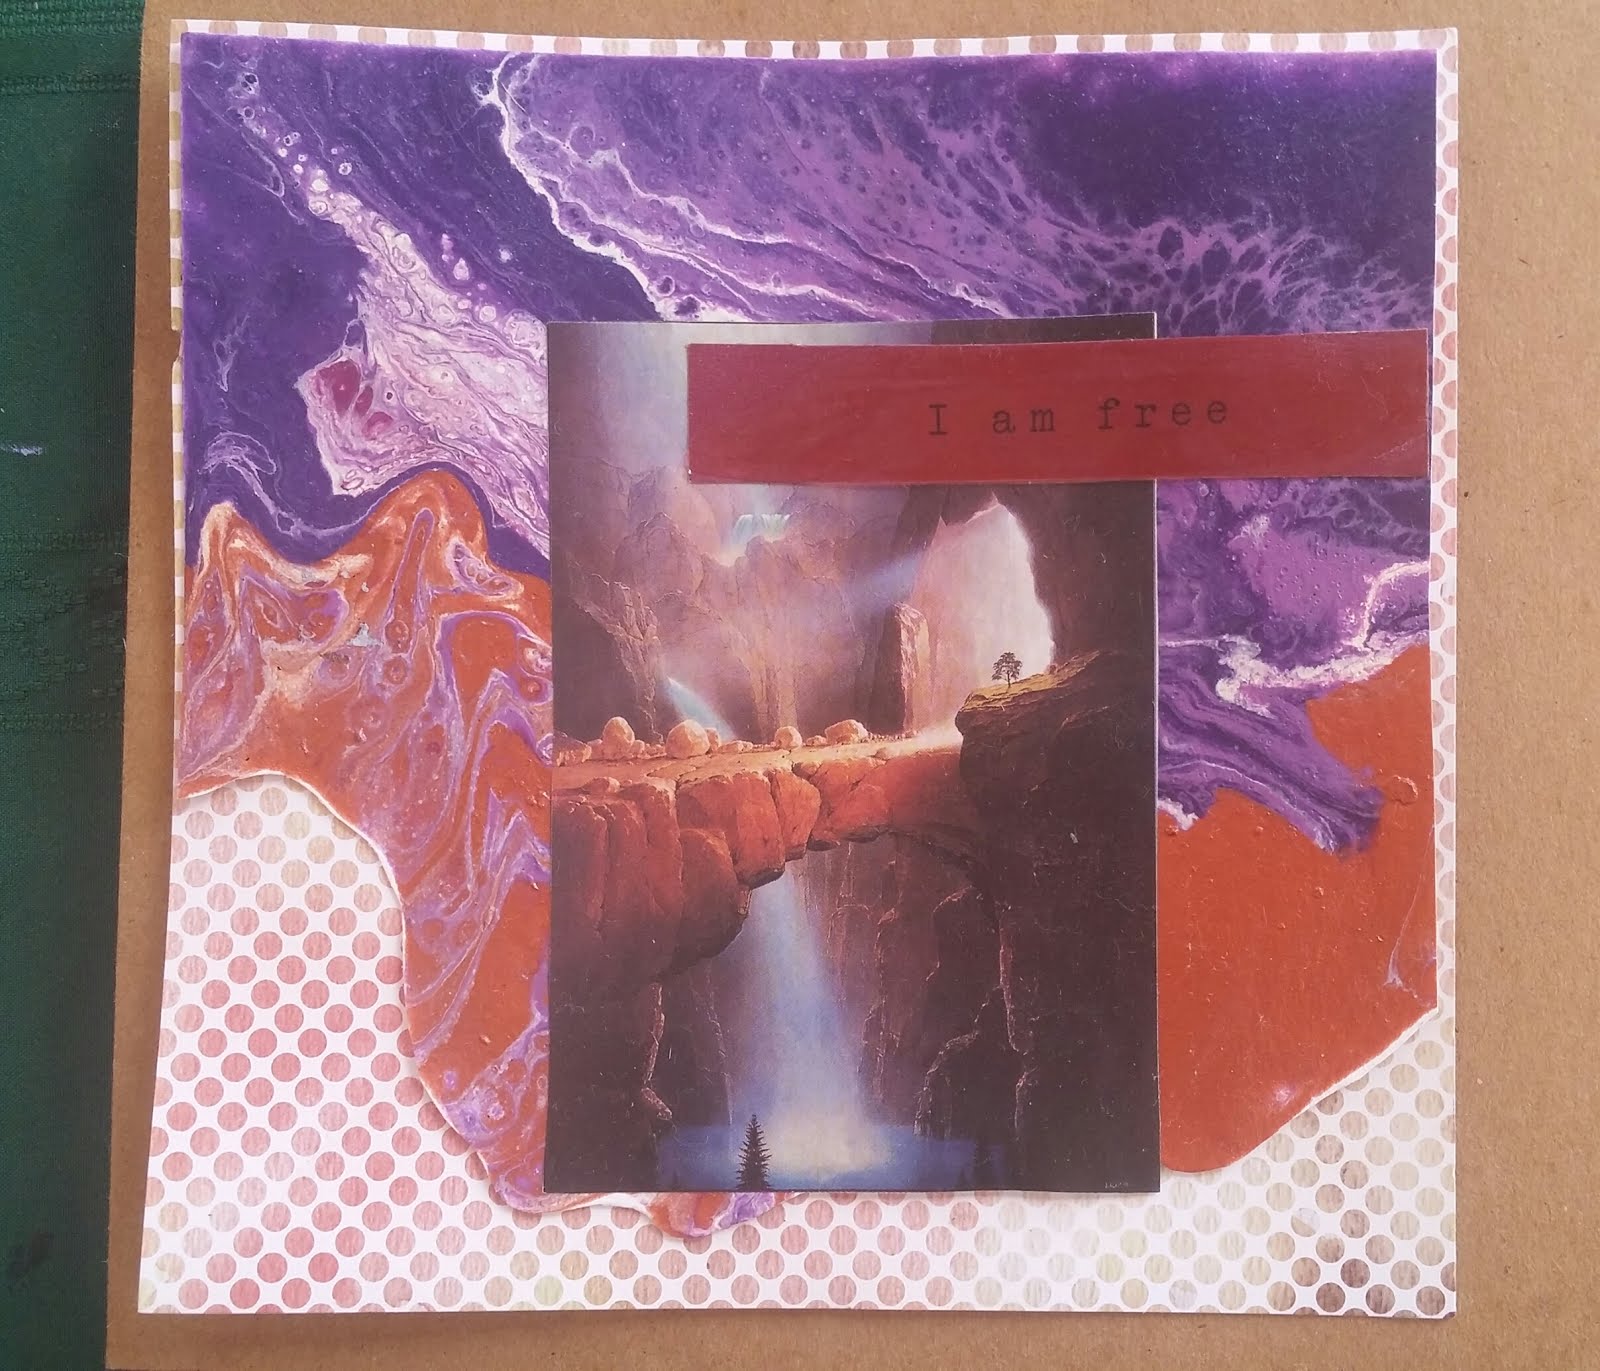
Free to Choose

I am Free
mixed media 6x6 paper canvas
$10

I'd have to say choosing which mediums to combine is one of my favorite steps in design processing. Often times I haven't a clue about what I will end up with, but working to pull similar colors together and finding a phrase to match my mood leaves me in awe of what I've created. Above, I have a small paper canvas combining a fluid art pouring cast off, a couple bits cut from a fanicful magazine, all mounted on a six by six piece of patterend paper on top of kraft cardstock. The phrase, "I am free," reminds me that everyday, many times a day in fact, I get to choose what kind of attitude I want to have and for the most part how I spend our time. Now that fall's splendor is upon us, freedom can mean taking time to for a seasonal activity like kicking some leaves around, taking a more adventurous journey to town for a cart full of groceries, or maybe just basking in the afternoon sunlight with a good book- and some craft supplies, of course :-)

Saturday, September 16, 2017

MOPS Make and Take Mini Albums


My local MOPS group which meets up the street at the Lakebay Community Church during the school year contains some of my favorite people. As we gathered for our first get-together after summer, I was more excited than usual because I had the opportunity beforehand to assemble paper bag mini album kits for everyone.
 After a good bit of socializing over a provided dinner, and a tiny amount of business-ish information, we were all set to start gathering the precut papers and assemble our mini memory keepers. As I looked around at my friends intently glueing and cutting, my heart was truly full. In fact, I enjoyed commenting on everyone's joy so much that I didn't even sit down to make one myself!
 

Monday, April 10, 2017

Paper Bag Mini Albums

Oh my word, did I ever have an exhilarating time at this weekend's Woman's Wellness Retreat, hosted by the YMCA at local Key Center neighbor Camp Seymour. Along with various camp counselor-led activities like the climbing wall, archery, boating, and a ropes challenge course, there were camper/instructor-led courses on topics like creating your own makeup, bath bombs, henna paste, neck warmer/coolers... and of course, two opportunity for campers to CraftWithAnna!
I met women who attended guided meditations on non-traditional prayer, as well as ladies who learned information about how to "Make Change Stick," which, it turned out, was not the class I envisioned as I had read, Make A Change Stick lol. #Makers want to make change sticks! There was a book club discussion led by my cabin mate Scarlett on The Orphan Train. I got to know a vivacious lefty during what turned out to be an epically tall game of Jenga!
Now, about a month ago I led the teens at the Red Barn Youth Center through an easy to do project that is so customizable, it can be made for any occasion- and on the cheap! It's a class my friend DF developed, and she had even donated all of the class contents for the kids to use how they would. Of course, no two booklets were alike :-) I am always inspired by the creativity that is shown, and also by the amount of product they are able to cram onto small surfaces.
These books measure 6x6" and are made from paper lunch sacks. Yes, paper lunch sacks! By adding a few patterned papers and pieces of cardstock, these ordinary household items become unique memory keepers. I knew they would be the perfect project to teach at this weekend's Retreat... and it turned out to be an extremely enjoyed class for both myself as the teacher and for the students who took  time out from the great outdoors to make with me.
I saw a cat book made by a dog lover (?!), an album that was intended as a graduation gift, a "Kirk book" (turns out it was not an ode to Star Trek; Kirk was a meaningful marriage recipient), and even one or two that were for what I had in mind- camp memory keepers! To finish off our paper stash and kit contents, we even made some greeting cards that could be sent to loved ones we thought of while making our goodies... be still my heart!
Now, I've learned a few things in the course of my teaching career; first off, I should not drink wine before crafting with others if I plan to teach them how to do something :-) That wasn't a problem this weekend! Another lesson is that, if I start to make the same project at the same time as my students, I get kinda grumpy about helping others... and that is just not cool! So, during my classes I mostly walk around encouraging others and trying to be helpful when I sense someone not embracing their inner craft goddess. Plus, I get such a kick out of seeing what other's make, and I would miss that if I was all wrapped up in my own creation.
BUT, the next morning, I had the (brilliant) idea to collect a few cardstock momentos from campers whose company I enjoyed immensely. Paper momentos that I can now use to create my own unique- to- my- experience mini album- JOY! Double joy actually, with the potential for a soon third; reading those comments after my return home filled my heart with appreciative happy. The comments were truly touching, personal, and boosted my spirits- I will treasure the reading again and again. Once I've bonded paper to lunch sack myself, I can include those cards in the folds of my pages.

Towards the end of my appointed teaching time, I quickly ran through some simple ways to use leftover embellishments and trimmed off papers to make some greeting cards that could be sent out the old fashioned way- through the postal mail. Once I have my version complete, I'll do the same thing and send thank you's out to my new friends who shared their contact information :-)
To anyone reading this who I might have met this weekend, as well as my faithful blog readers~ thanks for stopping by today and Happy Crafting!

Sunday, March 19, 2017

Stampendous Trash to Treasure

I'm a hoarder. Not of all things, but many. When it comes to empty sticker sheets, I have the darndest time putting them where they belong once every sticker has finally been used. After all, some of these have been with me longer than my own children! That's funny, but it's not a joke, lol. 

So, this last year I have made a huge effort to a. not buy any more stickers, and b. use up as many stickers as I have available, especially those that have had like, two or three left on them for ages. And while I recently succomed to a small shopping splurge at Scrap That's closing sale, I have also made a considerable dent in the amount of space that all of these sticky bits need for keeping!

The only thing I found discouraging was my complete inability to throw away that empty packaging... so I needed to have a space for sticker sheets with stickers, and sticker sheets without. And that, my friends, is just ridiculous. Especially when space in any crafting area is at a premium... on Saturday, I finally did it.

 Upcycling Saturday 
I grabbed that considerable stack of empties and I dumped them into the garbage. I even crumpled it all into a big ball, so I'd be less likely to try to retrieve them later in the day. Like five minutes later. 'Cause this isn't the first time I've tried this method of disposal/effort!

But then, guess what? I went back to my craft space and stood marveling at that newly empty space, and inspiration hit- BLAMO! And back to the garbage can I went, to retrieve before mentioned ball of garbage to carefully smooth out and look at with a fresh gleam of creativity in my eye.

What if... I used the sticker backs on a piece on top of a piece of paper- let's say it's patterned. And then, what if... I used my new WeRMemory keepers stamping tool to fill in those "frames" with all of those stamps I have and also don't find much use for. I may have danced in my pants just thinking about the possibilities!

 This idea was...
What a fun project! Both kids were so interested in seeing how I was going about placing the clear stamps, picking out colors with me, and marveling at how easy it was to stamp repeatedly in the exact same place (most of the time). I know the clear acrylic block/clear stamp combo is supposed to make that an easy task, but my stamp skills are not all that terrific, nor do I usually care to be careful when I'm making a mess.

The best part about this process was that if I didn't love the results, I didn't feel the need to keep them. That is HUGE! So I gave them to the kids. What, you didn't think I'd actually throw them away, did you :-)

Trash to Treasure #318: Stampendous Sticker Sheets!

Sent from my Verizon Wireless 4G LTE smartphone

Monday, December 7, 2015

December Scrapbooking Plans

I love and adore the concept of a December Daily album. As you may have read in previous posts, I'll be following along with Shimelle's Journal Your Christmas class again this year. It's always interesting to see what the prompt of the day will be, as well as my family's reactive conversations.

For instance, I don't think I realized just how much my mother-in-law enjoyed shopping for Christmas ornaments, or that my older daughter had picked up on  (and insists that we carry on) many of the traditions we shared from our youth with last years journaling prompts. These small smile-abouts have only been tempered by knowing that, despite my best intentions and pre-plans for success, I'm still staring at empty pages in last year's album for this month. I still have stories that are not included in those album sleeves, too. I guess there is no wrong time of the year to continue recording, and I have put chronological scrapbooking way out of mind, but the way I do scrap is by putting my pages into a "current" album. And without that album at least purchased, that's a little harder for this crafter to do!
This year I decided to put some of my pre-holiday shopping into a plan of action that will be fun to use. Starting with a few scrapbooking kits I picked up on discount from EmbellishKits.com, I've now got plenty of product and pretty patterned paper to choose from once I get a few photos printed and make time to document our month's happenings.
A trip to Michael's on Black Friday brought home a gorgeous new addition to our memory hoarding library, which, coincidentally was just moved into a new location. This new album features gold roses outlined on a kraft background~ simple but stunning! What a joy it will be to place inside our memories of Christmas past and present, and now, housed within a few chosen sleeves of various sizes, are those gorgeous kit contents. Embellishments galore from Fancy Pants and Simple Stories, sparkley rhinestones, and perfectly coordinated twines and ribbons are included too!
You can see what I'm talking about, and maybe even get some ideas you can incorporate into your December scrapbooking process, in my latest video:

One bonus I did not mention in this video: with all I need within a grab-able place, I could actually take it with me while I travel about spending time with family. This album has the most potential to include hand written pieces from family of any that I've created to date. If even one sentence written in another's handwriting gets included, I will have a very merry memory indeed :-)
So, what are you doing (or not doing) to record the sights and sounds of the season so far? I'd love to hear about them~ leave a comment below or on the video and as always, thanks for stopping by to CraftWithAnna today!

Monday, September 7, 2015

Birthday Card Bonanza

Just had to share these coordinating birthday cards my family created this morning. My cousins son is celebrating his ninth birthday at a football themed party this afternoon. With a couple dollars tucked inside, I'm sure he'll appreciate these even more :-)
Not every family has the time or desire to get scrappy so early in the morning, but my girls and I have no such restriction ideas. Dad, on the other hand, is not so generally inclined. I was happily listening as he misinterpreted my prompt to assist Rainier with her desire to draw a wolf... help her, I reminded him when I saw his hunched form and tightly clutched penciling! She and I were pleasantly surprised by the outcome. He thinks it looks part coyote, but we say, it's 100% awesome!
Her card at top left is turned out so great- I love her use of the sticker at the bottom, the tilt of the vellum birthday cake, and washi tape border with twined buttons layered at the top. Rainie has learned how to interpret the designs of cards she likes pictured in magazines... a great skill for getting past that sometimes monumental task of deciding, What To Make? How many times have we let that question stump us huh?
For my card with the purple background, I turned to a design I use often- that look of a polaroid photo through matting.  I then had the amusing idea to place a square of matted football print paper over a background image of one of those persons. By mounting that scrap in the place of a belly, I was able to tie in with my sentiment inside about not knowing what the future will bring when we hold our children within. This card is for Lil B's mom and dad; I think the parents need to be honored for their dedication to their children as opposed to the kids getting a prize for staying alive another year lol. Both can be considered feats of accomplishment though, of course!
Now we're off to pick up my grandma, who the kids call GG- great grandma :-) She's really excited to join us for the festivities. Getting older, giving up her car, becoming more forgetful... as we celebrate the advncement in age for one member of our family, we remember that she is traveling cautiously but continuously down the other end of that road we call Life. We cherish the times we can spend with each other so much, I know this day ahead will contain fits giggling, barely contained joy, and a lot of hand holding hopefully.
Enjoy your day of Labor free loving!

Wednesday, December 24, 2014

JYC 2014 Album Prep Payout

The stars at night...
my Artsy Super Star, Radient Rainie!
This year I signed up for Shimelle.com's Journal Your Christmas class. The daily prompts allowed me to explore Christmas memories throughout the season and also provided some really intriguing photo-taking challenges.
 I figured early in the month that I'd be doing a lot of writing, but more than that, I'd be doing a lot of Christmas card making. Which I did! Well, not so much the writing, but definitely a lot of cards were made and sold which was really invigorating for me. Every day there was also a short video showing a 3x4 card being dressed up for the season, and I enjoyed watching and using the ideas on a few of those cards I made, as well as in creating little mini masterpieces with the girls.
I knew in the past that it has taken almost an entire album to contain just the one month of December's scrap worthy photos, so early in the process I chose an album and then after about five-ten prompts I added patterned papers, project life cards, and embellishments that fit the seasonal theme. I figured it would be easy to maintain a consistent theme throughout the entire album with this base to build on, plus I just like to build kits without pictures for a challenge occasionally. I used the prefilled sleeves that came with the album, added pocket pages as well, and kept everything for the season's recordings in there, adding mementos as they came across my desk.
Now, the title of the class does include the word Journal, which has never been something I've really enjoyed doing in my albums- I'm more of a record happenings daily on a calendar person than a record feelings type of person. So while I thought a lot about the ideas presented, what I ended up doing was more about talking to other people, sharing my own traditions and anecdotes, while learning more about my friends and family through their own story telling.
Photo Prompt: Through the Window
Some of my favorites; Hearing about the little boy who got a bike but didn't know it until he was completely disappointed about not having found one under the tree (it was in the backyard)! The little girl who was shocked to receive a paint by number set from her parents (she thought they were oblivious to her artful inclinations). My friend whose dad took her and her sister to get their ears pierced on a whim while their mom shopped the other side of the mall. Sharing my own story of being up on stage in preschool and being so mesmerized by my granddads shiny bald head glowing under the lights that I forgot to follow my classmates into the wings!

Photo Prompt: Add Sparkle
So, not having written most of the storytelling down as it came my way, how HAS my album benefit from this class? Well, for one thing, I've been able to take some really cool pictures throughout the month that I may not have thought to try otherwise, like this amazing picture of my mom and Sunday in a restaurant before dinner. Tried out a few new apps and created really cool effects on otherwise terrifically seasonal photos. I'm thinking more about stories that I've told over the years and how they all impact how I enjoy the sights and sounds and the whirl of Christmas cardmaking around this time of year... and the awesome bonus is that I'll have access to this class for many years to come and can continue to visit the prompts and tell those stories that make the background for my families traditions.

Thanks for joining me today, I wish you and your family all the best of the Holiday season, and the best hopes for a happy, healthy, scrappy New Year!


Thursday, September 11, 2014

Sons of Scrap-archy


You may have read before that I am a big fan of late night scrappin... well, if you've read enough of my blog to know that, you probably know that I'm a fan of anytime scrapbooking lol.
Earlier this summer I found that one of our tv trays works perfectly for creativity in the living room. On the one hand, I am forced to gather a limited amount of supplies to work with. This challenge can help me to focus and also flexes my brain to come up with alternate ideas. My craft room is 30 feet away, too so it's not like I can't go and find the item I think will make a layout perfect!
On the other hand, I get to spend some quality time with Ray after the girls are asleep. By "quality" I am referring to the type of interaction couples nationwide experience nightly- zoning out in front of the boob tube! We hardly watch any tv in our house, so binging on some Netflix can really be a treat. One of our favorite shows is the Sons of Anarchy. We also enjoy House of Cards and the Orange is the New Black- or, the Orange and Black as my hunny refers to it.
Well yesterday I was griping to a friend that I've been doing altogether to much house cleaning and that it is really interfering with my creating! It was no surprise to me that such a build up of not making had me in the mood to really crank out some craft last night, and I was able to create three layouts in their entirety. Go me!
Often times the lack of supplies on hand will have me making most of a layout or card, and then finishing it up the next day or sometime later in the week. Last night I managed to get pen to paper on all three pages as well, and tucked them into my brand spankin' new red canvas fall album. A much better feeling than the one I had the previous day, when the only crafting I managed was putting a completed page into the same album. Not working on the page, just putting it away... lame!
So, often times I'm asked how I'm able to whip out the pages so fast? A lot of times it is because I'm working out of a pre-assembled kit I've made. Have you ever seen  a collection of items on your desk and thought, gee that's pretty! Well, when I do that, often times I will enclose said collection of goodies in a sheet protector. I keep between ten and twenty of these on hand to grab and put with photos at a whim. By adding a few more embellishments, or sometimes just an additional piece of background paper, I can sometimes stretch these one-page kits into three or more layouts, like I was able to do last night.
For September, my challenge product of the month is going to be using my stash of pre-made kits. A lot of them have photos in them that I want to include in albums already moved out of viewing, and seeing what I wanted to scrap with last year is like having my own Throwback Thursday any day of the week!
If you'd like some tips on how to create your own scrapbook kit, check out this movie I made last year. Grab a pen and paper, jot down some notes, and then go shop your stash (or favorite scrappy outlet) and then go to town! Or, go to town, shop, and then stay up late making something awesome :-) The choice is yours, of course.
Thanks for choosing to spend some time on my blog today, and if you've got a good show for me to watch I'd sure like to hear of it... the Sons had their final soap opera style dramatic conclusion last night and Survivor is merely on the horizon of my viewing schedule!
Hmmm... anyone else extremely disappointed that "Jax" is no longer being considered for the role of Christian Grey...? He does bad boy gooood! I'm not saying he's a great actor, but I believe it when he gets into a heap of trouble episode after episode all while wearing his custom baggy leathers :-D

Wednesday, July 16, 2014

Same-Month Scrapping

Working on a layout featuring photos taken within the same month...is that an even thinkable task with scrapbooking?! With the blossoming of Project Life style scrapping, i.e. daily, weekly, or monthly recapping of life's happenings, this idea is becoming more realistic. Add to this equation tiny printers that you can wirelessly send your photos to for instant printing, and you've got a recipe for some same month scrappin.
Well, I don't have a Project Life album per se, and I don't have a cool new Selphy printer, but I do have pictures, an album and I do have a printer! So even though the ink is running out in said printer, I did print off my fourth of July pictures and scrapped them within the same month. I'm pretty proud of this accomplishment.
I started with a series of photos of my family taken down at the beach as we waited for dusk to turn to night. My hunny is known for his dislike of the traditional family portrait taking session, but my mom's got an iPhone, so within the 30 or so pictures she snapped I found three that I really liked and wanted to have all on the one page. You can tell when looking at the photos that I was trained to hold my picture smile! 'Cause I am like the wax statue that my family is posing around lol.
This year I've been working really hard towards reaching for my not-favorite items. Not that I don't love all my products, but there are definitely some with dust accumulating on their edges. Instead of patterned cardstock, I got into my patterned paper (probably purchased over a decade ago) and chose an unlikely sheet of a snow covered treescape. It reminded me of that grey light that our eyes see as the sun sets. Next I pulled that striped sheet from a gifted paper pack which includes the die cut letters you see in my title.
When I have trouble getting my die cuts to pull cleanly from their background, I simply cut around the letter for a fun and funky new look, and then pull up the edges on the letters for a bit of dimension. This saves me a lot of frustration (and wasted letters)! Plus, on this layout especially, it can lend my alpha a bit of visual weight it may be lacking.
Under my title I added some scraps as banners. Some banners got their edges inked for more depth, and I even cut the lighthouse from Graphic 45's By the Sea collection and turned it to create a nautical flag as well. There are so many different reds in the picture itself that I didn't worry about matching, and tried to use bright, dull, and everything in between shades without fear. The same idea was in mind for the many blues, and it seems to have translated well. Rub on stitching and Queen & Co.'s star shaped rhinestones helped to emphasize our Fourth of July fun.
It doesn't show much in the photo above, but I got really creative with some washi tape fireworks as well. I'll be sure to post an additional entry with my completed left page and a close up of what I think are some of the coolest fireworks amongst my album to date. Thanks for reading today, and don't forget to comment for a chance to win either a die cut or a scrapbook page designed just for you in my Scrapbook Expo contest going through the end of the month.  

Sunday, June 29, 2014

Mason Jar Madam

Inspired by Friendships
The world has gone mad for Mason Jars the last couple of years and its easy to understand why. In this fast paced and ever advancing technological age, we appreciate the simple symbols of captured space that we've grown up with.
Click on my Pinterest link to the right and then click on the search field. You'll see countless and duplicable ways to use those versatile wonders.
  • Home Décor - seashells and sand, die cut paper flowers or butterflies, wine corks
  • Dry Storage - detergent, beans, pasta, soup mixes, cereal
  • Wet Storage - tea brewer, portable drinking glass, food preservation
With so many ideas, how can you incorporate the Mason Jar image itself into your next project? Think of the practical and whimsical applications and search your supplies for matches. With a little masking, my jars below were easily filled with stamped hearts! Leave a comment below with some of your ideas.
Filled with Fun - and LOVE!
This weekend I was fortunate enough to get four opportunities to create. Saturday after work I headed to Michael's to shop for and prep July's class samples. Oh darn, a reason to shop! Did you see last week's video from a shopping trip I took this April? So many sale items are available, but I had a good list to work off and got right to work with a custom home décor piece and TIm Holz mixed media clock.
Later in the day I enjoyed a beautiful view of Lake Nahwatzel, in Shelton. A good friend hosted me overnight in her grandparent's cabin. She always lets me bring plenty to craft with and oohs and ahs when prompted :-)  Early Sunday morning I was up working on these cards and sent a quick pic home to check in with Ray. It's awesome to have a respite from mom-ming.
Included in my overnight kit was a package of watercolor and my acrylic block. I also brought and stamped with Momento black ink for the first time. It may have been my photo-type paper, but I didn't find the ink to be as steadfast as I expected it. I love how the watercolor added such vibrant pops of color, but also subtly highlighted the jar lids on the first card.
 While stamping with the paint was possible, its not advisable if you want a crisp image. A while back I watch Kristina Warner and Jennifer McGuire stamp a text image and then paint over the top of it, and that's what I did on the "Save the Date" lable. This is a technique I'll be repeating!
After a quick dip in the lake and an even shorter search for my glasses that flew off my face when I jumped in without thinking last year, I was in the car jamming back to Gig Harbor for an afternoon class with an eager student named Laura. Together we explored the intuitive Cricut Expression. I was so proud of the card she created, I'm thinking of adding a "student gallery" tab up above! This would be a place I could show off what my fabulous students are producing under my guidance.
So where are your mason jars hiding? Think how cute a handful of fresh cut flowers out on the patio would be, inside the sturdy glass container. Thanks for checking in and don't forget to comment on how you're gettin' crafty!

Tuesday, June 24, 2014

Michael's Haul and Projects!

I'm really excited today to be posting my latest video, a Michael's shopping trip and what I've made with the stuff I've bought!


I love working at Michael's in Gig Harbor, the store is so clean and bright and the scrapbooking section is close to the front of the store so I can still see outside. This really helps because otherwise time disappears when I'm in there lol. It's almost like the casino, except, well I never leave with more money than I came with...
There are a lot of good sales usually and then my employee discount boosts my percentage off as well. It's hard not to find SOMETHING to take home! I find that shopping from a sales rack almost guarantees my products will coordinate, too. So that's a great tip for a shopping trip :-)
Coming home with the intention of sharing what I had bought and then building a kit was so exciting! It took a little longer than I expected for my video to get made, mostly because of getting my cards in the store and then just my usual scrapbooking and teaching schedule (You know, whenever possible).
Looking back through the finished projects, I realized I must have got an additional sticker sheet, or maybe I already had one from the same DCWV Vintage collection. I also used a lot from Basic Grey, one of the 4x6 Journalling card pads.
I hope you enjoyed this shopping trip! I love to read your comments and am grateful for my followers. What do you find yourself bringing home from Michael's? Let me know if you need suggestions, and Happy Crafting!

Friday, June 6, 2014

Six by Six Series: Episode Two


I'm back today sharing some more from my Six by Six series, all about how to use those awesome miniature versions of our favorite paper collections.
A simple square torn right from the pad makes a great background- as long as your photo is smaller than 4x6... but this idea can be easily interpreted and used for a piece of paper that is about 8x8 inches.
 I have a lot of these because I'm a paper hoarder and often times will cut the back out of my scrapbook pages. What I mean is, that when I'm only using a sheet as the very background layer and the middle will be covered, I just cut that part out. I generally cut in about two or three inches all the way around from my 12 inch sized patterns, leaving me with about a 9x9 or 8x8 square to use on another project.
I'm bad! I even do it for really small pieces of paper. There is something about a beautiful print that gets to my paper cutting heart :-) So what then do I do with those tiny scraps of paper? Well, I've been known on (only) one occasion to go through them all and donate them, but I love to incorporate them somehow.
What I've been doing a lot lately is using them in little border clusters.  A couple strips of paper from the same 6x6 paper pad can help to balance the page, and of course the colors go effortlessly together.
See how I layered a couple pieces behind the top of the green photo mat, as well as under the title block?Check out the bottom left and top right hand corners of this page. This is a fun and funky way to bring some color to the corners of your pages and help the eye travel around.
For more funk, add in a sheet with similar colors from an entirely different collection. You can't tell, but this soft pink on cream is actually from Christmas collection!
If you are having trouble matching cream and white colors together, a simple swipe of ink on the edges will make it easier for the colors to blend together. The ink works really well at distracting the eye from "clashing" colors. Try it on an outfit soon!

I'm off to the library to upload a new video, creating a special card for the grad in your life with items from around the house. So come back and check it out!
I hope you're enjoying this series- I'd love to get your feedback through a comment! & Happy Crafting!

Saturday, May 24, 2014

Six by Six Series: Episode One

In this series, I've been exploring different ways to make use of those cute little six by six inch paper pads of patterned paper available from most designers. These miniature replicas of the full sized sheets are perfect for using on your scrapbook pages, as well as on your cards; their smaller sized prints can even help you include somewhat bolder patterns with ease. Another bonus? If you fall in love with a new release but can't justify the purchase price, you can still get the designs you love and not break the bank- or appear to be walking through the door with yet another ream of paper!
Bonus number three? A lot of the collection pads are coming out double sided. Yes, twice as much fun in one small price! Look at how easy it was to just tear out two of the same pattern (green snowflake) from my Jillibean Soup Winter Tortellin & Spinach Soup 6x6 mini pad. This brand actually gives you three sheets of each double sided design, so I had no problem using two sheets for my background. I did have a problem tearing the paper out, but no worries, I just cut it across with my paper trimmer and used my kraft background to create a lovely border. A little inked distressing on the edges, along with a few coordinating stickers from the same company, and my Mommy & Me layout was almost done.
Do you have a problem cutting into a 12x12 sheet of paper... I'm not sure why it is so hard for me but I really struggle with it. With the smaller designs, I don't have that problem at all! See the row of houses that anchors my page? Yes, it was cut from a pint sized sheet as well. Perfectly coordinated embellishment base for my word cluster down there! A few more little houses up at the top help to create that visual triangle, along with the repeated cirlces stickers and typewriter motif.
I'm really pleased with how this page turned out. It was super simple to create, with the die cut circle as a photo mat to break up the very linear design of photo and sticker placement. So many people comment that Sunday is like a little mini-me, and what better way to visually tell that story than with some little mini prints! So how will you use your little darlings? Leave a comment below and come back by my blog to see the rest of my Six by Six series. Happy crafting friends!

Friday, May 16, 2014

Six by Six Series- Episode IV: Smile

Remember when the Stars Wars series renewed itself by starting its saga all over again with prequels, leaving you wondering how will this all lead up to what I already know?! Well this series won't be filled with laser guns and jet planes, but there will be a love story and maybe even some hairy animals!
I've got about four six by six paper pads that I've been experimenting with including on my scrapbook pages and card fronts. I'm seeing other designers incorporating these miniature patterned  papers in their projects too, and hope you'll share with me in the fun of training our brains to reach for them too.
6x6 patterned papers, and 8x8 for that matter, come in a down-sized version, making them ideal for including in cardmaking, but I find that really helps to makes them more neutral when adding them to a background in scrapbooking, too. Their size is perfect for creating a quick grid of four sheets to equal 12 inches all around. If, like me, you tear a page a bit in your haste to rip it from the binding, just think of that whoops as a reminder that these papers would like a scrap piece or background underneath them. Trim off -or maybe enhance - the torn edge and you'll end up with a crisp little border frame on your page.
When selecting my prints for this layout, I looked for four busy designs with background colors going from light to dark. The little miniature cut-apart sheet provided me with some coordinated title pieces, and I used a couple of circle punches on the starbursts print for some simple confetti-like sprinkles. My Minds Eye papers are generally cream based designs, and for the journaling space I needed a really neutral piece, preferably with lines to write on. I remember using the full size version of one of the papers in a layout I made last year, and turned it over to find the same grid which would be perfect. You can see the full-size version layout here:

Have you ever experienced the rhapsody of pre-breakfast scrappin'? I spent Wednesday night at my moms house and she had that lovely 8.5"x11" enlargement of Grandma and little sister waiting to show me. Isn't this a beautiful print? It was taken last Friday while visiting with our cousin Paulette from Arizona- Hi Cousin!!!  I love that simply looking at the photo leads to a grin on my face.
While the girls ate breakfast and did a little crafting of their own, I whipped this together in less than 20 minutes. Now that's a habit that could use reinforcing! 
Thanks for stopping by my blog today. Check back throughout the week as I share the prequel pages in my six by six series, and if you happen to be at the craft store, investigate those handy pads of miniature designer papers!

Sunday, April 20, 2014

Toilet Paper Vertical Mini Album


I made this darling little min album for my Aunt Jody, who very kindly sent me some beautiful clothes last week. They fit perfectly and made me feel so glamourous- a description Ive always thought fit her in the three decades Ive known her :-)
Jody has this soft spoken, demureness but she is quick with her quips too! Her hair is always blown to perfection and my Uncle must have known early on what a knock out he'd have for a life partner!
I filled the album with pics I gleaned off facebook of my cousins and their families. I know it will be an egg-stra special reminder of my love and appreciation for the thoughtfulness of her gifts to me.
Happy Easter to Friends and Family who found their way here today- "He is risen! Alleluia" :-D

Wednesday, April 16, 2014

Dancing Days Are Here Again

Hand cut fries at the marina-
hand cut grass on my page!


Last summer my mom and I took the girls down the street to our local Marina for some bluegrass music and of course some dancing.
My mom was always dancing and singing around the house- well, anywhere, really- and that's one of the traits I've tried to exhibit myself! Sometimes my older daughter will say, mom, that's weird! And that's okay. I'm glad they see me being a little crazy and cutting loose now and again.
This layout came together really quickly. I really just layered up a handful of scraps from the page I had completed last and stuck my photo strip on top. The  picnic table die cut is fun- I actually like its super sized ratio to the photos. And my custom grass on the cooler has a little bling to it :-)
The theme of this page as I made it was "travel." All summer long I had hoped to go down for dancing and we just kept not getting around to it. Its only about 5 miles away, and we have to drive by it to actually go to town, so there wasn't any really good excuse not to have got there.
Check out Rellys challenge as she fills in over at Shimelle.com  Then go see my gal Lisa's incredible custom map layout!