Showing posts with label Stamping. Show all posts

Thursday, January 25, 2018

Silly Pocket Tag Cards h

My life has been pretty hectic the last couple months, leaving very little "me," i.e. craft time. Crafting isn't just a hobby for me, it is also a source of income and more importantly, a therapeutic activity which my mind finds solace in the act of doing. So, going without has a profound and multifaceted effect; my supplies go unused, my talents are not utilized for the good of my wallet, and my creative urges go unsatisfied, leaving me restless and distracted by my desire to MAKE.
I have two upcoming excuses, er, opportunities to Have to do just that; an upcoming Yoda themed birthday painting party for a boy turning 8-and 15 of his friends!- & the Key Peninsula Cooperative Preschool ' s  now annual CraftWithAnna cardmaking fundraiser at Blend, February 10th at 6pm.
I thought it would be fun to share the 6 cards I designed for the event and tell you how I made them, in case you are looking for some inspiration or just want to know, "how'd she do that?"

My first card to share starts with a white card base. To this I've added a pink doily, offset and adhered to the top of the card in the left corner. The placement does not matter, but the bottom will get covered up so leave a fair amount sticking up.
On a red tag I layered a pink square stamped with red hearts. Through the punched hole at the tag top I tied a bit of red Silly String.
Next I ran my tape runner all along the edge and down the middle of a strip of dark red cardstock. I cut about a forearms length of that same red Silly String from Queen & Co.  I got it at convention a few years back. It's stretchy and shiny and oh so fun to use! When I wrapped the string around, I made sure to keep both ends tight against a gluey area, then I ran some more adhesive over those ends, for good measure. Before I placed this wrapped piece on my card base, I slipped that tag in behind.  Another way to say this would be that I made a paper doily, tag, twine sandwich. .. anyway there is a lot of texture going on here.
You could easily replace the Silly String with any kind of fiber; bakers twine comes immediately to my mind. How about you, what's your go-to string of choice? Do you make your tags or buy them pre cut, tie in a knot or tie in a bow- you know I wanna know, comment below :-)
Sent from my Verizon Wireless 4G LTE smartphone

Tuesday, September 26, 2017

My Library Peeps

 The Friends of the Key Center Library sponsored another #CraftWithAnna class on Monday and it was SO much fun! The theme was Faux Batiking, and the idea I had was that we would use bleach on fabric with wooden block stamps to create some unique impressions.
The images were decidedly not distinct, except in their originality! There was hardly any way to predict what would happen. Depending on the fabric, the amount of bleach and water ratio'd, the quality of the stamp and or the image of it, they all created something! I made sure to caution each participant that the most important thing to remember was that the goal was to experiment, and have fun, not to expect perfection, and to enjoy the process.
Judging by the feedback, I'd say those goals were achieved!
 

Sunday, March 19, 2017

Stampendous Trash to Treasure

I'm a hoarder. Not of all things, but many. When it comes to empty sticker sheets, I have the darndest time putting them where they belong once every sticker has finally been used. After all, some of these have been with me longer than my own children! That's funny, but it's not a joke, lol. 

So, this last year I have made a huge effort to a. not buy any more stickers, and b. use up as many stickers as I have available, especially those that have had like, two or three left on them for ages. And while I recently succomed to a small shopping splurge at Scrap That's closing sale, I have also made a considerable dent in the amount of space that all of these sticky bits need for keeping!

The only thing I found discouraging was my complete inability to throw away that empty packaging... so I needed to have a space for sticker sheets with stickers, and sticker sheets without. And that, my friends, is just ridiculous. Especially when space in any crafting area is at a premium... on Saturday, I finally did it.

 Upcycling Saturday 
I grabbed that considerable stack of empties and I dumped them into the garbage. I even crumpled it all into a big ball, so I'd be less likely to try to retrieve them later in the day. Like five minutes later. 'Cause this isn't the first time I've tried this method of disposal/effort!

But then, guess what? I went back to my craft space and stood marveling at that newly empty space, and inspiration hit- BLAMO! And back to the garbage can I went, to retrieve before mentioned ball of garbage to carefully smooth out and look at with a fresh gleam of creativity in my eye.

What if... I used the sticker backs on a piece on top of a piece of paper- let's say it's patterned. And then, what if... I used my new WeRMemory keepers stamping tool to fill in those "frames" with all of those stamps I have and also don't find much use for. I may have danced in my pants just thinking about the possibilities!

 This idea was...
What a fun project! Both kids were so interested in seeing how I was going about placing the clear stamps, picking out colors with me, and marveling at how easy it was to stamp repeatedly in the exact same place (most of the time). I know the clear acrylic block/clear stamp combo is supposed to make that an easy task, but my stamp skills are not all that terrific, nor do I usually care to be careful when I'm making a mess.

The best part about this process was that if I didn't love the results, I didn't feel the need to keep them. That is HUGE! So I gave them to the kids. What, you didn't think I'd actually throw them away, did you :-)

Trash to Treasure #318: Stampendous Sticker Sheets!

Sent from my Verizon Wireless 4G LTE smartphone

Monday, August 25, 2014

Little Odds and Ends

Didn't get to make too much last week as I have been downsizing my collection of papers and momentos and have a ton of "junk" spread all over my workspace. Got so tired of that mess I shoved it all in a bag last night and was able to make two really cute cards you can see on my instagram feed today. (click the purple camera circle to the right to be taken there)
This card was made for a friend of a friend recently and was made with very little dimension, using stamps and lots of fun summery colors. I need a bit of something though, so I went over the heart with some Liquid Glass which turned it into a custom enamel shape. After this photo was taken I also added the glass effect to the Smile word too. Baker's twine and my favorite Queen & Co. bling twinkling dressed the card up further and then I drew on some stitching at the top left with my new alcohol pen freebie from the Scrapbook Expo last month.
So where does one house an incredible selection of acquired bling (brads are not included in this mix)? Why, in my Queen & Co. miniature suitcase, or trunk, of course! It's the perfect size for the tiny packages and I also recently organized it so I can show you how well all my rhinestones and pearls live together. There are also enamel dots in there. I have another trunk that I keep washi tape inside. A great reason to sign up for one of their classes at an event!
Speaking of, it's almost November! Well for most readers that will be insignificant and not worth mentioning, but for me it's the peak of my year as that month is when Seattle hosts the Creating Keepsakes Convention. You will see a lot more about this as it approaches so I won't spend too much time on it here, but it is on my mind of late and if you've never gone you ought to look into it. And start saving your money for the vendor fair lol (the paper is calling me DF)!
Anyway, having all my blings together in one place allows me to flip through them easily and also to reach for all my options with one lift of the arm. You can take a tour of my craft room here.
I'm considering a new shoot of my set up; some items have changed places since I uploaded that video, but for the most part my room is the same. More paperwork stuffed in out-of-sight places since last night, but otherwise... plenty of stash to shop from at home!
Thanks for stopping by today. I've got a new scrapbooking process video coming out this week, click on the purple YouTube link up at the top right and subscribe to my CraftWithAnna channel, do so and you won't miss any of my latest movies as they get online. Have a great week and make it crafty!

Friday, August 15, 2014

Die Cut Crazy Birthday Blog Hop!


 Welcome back! I'm glad you stopped by today, because there is a super fun birthday themed Blog Hop going on amongst my Co-Contributor's at DieCutCrazy.com. This month, Eric from the PaperWizard has donated a lovely piece of blog candy, so be sure to comment on everyone's blog for a chance to win that! If you can follow us on facebook and hit the Like button on my post from yesterday, you can win a little something from ME as well :-D We're all so excited for the launch of our new website too! I hope you enjoy my little birthday card, it's full of die cuts and should somewhat easy to duplicate in your craft space of choice :-)

Ah, birthdays... who doesn't love a good excuse for a party, huh? Well, I've been surprised over the years, how many people actually don't enjoy them, but I wasn't raised that way. Having a daughter born on New Year's Eve meant my mom sacrificed a lot of year end partying in order to make my birthday special each year. Even as I've gotten older and said things like, "Oh mom, do what you want this year, I'm grown enough to be happy with a special meal with my family." She just laughs and says she'll be on call lol. Without fail, she always mentions that it must be time for my half birthday, as well! What a mom :-D

For this card, I used die cuts from the Basic Grey RSVP ephemera pack. Using preselected, coordinated die cuts makes it so easy to create a card with lots of layers and depth; just select a few pieces that seem to fit together, glue them with some multi-dimensional adhesives, and voila! You've created an intriguingly beautiful card for your bestie, man, mom, or whoever's birthday might catch you off guard in the future. I was so excited for this hop, because it seems you can never have too many birthday cards on hand, am I right?

I have been wanting to use that flowered frame for awhile, and this project was the perfect occasion. There was a smaller frame within it that I wanted to have a little more lift too, so I managed to cut my very tiny foam squares even tinier to fit in that thin underspace. It can be kind of annoying when a corner of your foam adhesive peaks out from under your layers, but no worries, I usually just add some more layers on top! 

The bottom right corner where this happy little accident occurred was just the right spot to add some flowers. I chose one of shimmery fabric, and one made from mulberry paper,  the little brad holds it all together and eliminated the need to find yet another type of adhesive to hold it all together. Ever since I started selling my cards, the idea of my card not falling apart after I've made it is a lot more appealing.
Now, after adding the acetate flowers die cut under the frames, and the Party banner on top, my card was looking oh so festive, but I wanted it to be somewhat summery, so I thought about some stamp sentiments I could make work for me. A package of K & Co. die cuts with fancy borders has been very handy to have around, it came with four or five different shapes, and was very inexpensive at Michael's.  Ever made a stamping mask before? Simply stamp your sentiment or image onto a scratch piece of paper. I like to grab a post-it note, and there are lot's of new products out there made for this type of fun too. Another way to use the one word from this stamp would have been to just color in the word "garden" with a marker and stamp it that way onto that K & Co. die cut.
After stamping your image, carefully cut out the part of the stamp you want to show on your project. Line it up in the desired location, stamp over, and looky-here, you have a perfect stamped phrase without any mess.
It's nice to continue the theme of your card on the inside as well, so I stamped some CloseToMyHeart flowers off the page and a simple birthday sentiment to finish this birthday card.  Another advantage to the post it notes? They are thin and come in a variety of colors, so if you aren't the best stamper (like me) and you make a boo-boo,* you can just cut out the post it note version and cover your mistake right up, while adding another bit of visual interest!
*If you don't remember to mask the "nd" in "and" to make an "A," you can also work a little piece of cover up paper into your design and the recipient will never know the difference!


I love the way the plastic die cut adds some shine to my card. It was even shinier after I realized I'd left the protective plastic cover on it! Yeah, I noticed that after I'd glued all my layers down, tried to lift part of it back up, and tore the plastic. So I just took a deep breath, carefully lifted it apart, got the plastic off, and made a mental note not to do that again!
I hope you've enjoyed reading about how I spruced up my die cuts to make this lovely card, full of dimension. Now, hop on over to our new site, www.DieCutCrazy.com and comment on each blog for a chance to win that amazing layout from the Paper Wizard. Follow DieCutCrazy on facebook for even more inspiration, and tune back in to see my latest round of cards going out in the shops next week!
Enjoy...
xoxoAnna


Thursday, July 31, 2014

Another Fun Stamping Class


Need some crafting help?


My classes at Michaels are always such fun, and last night was no exception! My friend Becca and I met at the six o'clock start time and got right to work, excising our creative muscles with a trendy Mason Jar stamp. Not being an experienced stamper wasn't at all a problem for her, and hopefully the little tid bits of stamping lore I supplied her with will inspire her at home as well.


Aren't these two cards she created so cute? I love the mason jar stamp she chose, it is so versatile and could be filled with any idea. We chose a few little birdies helping a friend, and some hearts and flowers to fill our stamped jar images. Can you see the subtle hand painted accents added to the jars? It makes them look sooo realistic! Especially the brown swatch painted on the yellow card's jar- it looks like the kraft border is showing through the glass...The baker's twine and ribbon definitely added some textural pizazz to the card fronts, and then we trimmed the bottom edges to show some peekaboo pattern showing from the inside.
The custom, color coordinating envelopes were made with the WeRMemoryKeepers envelope punch board. A unique tool and defiantly a cool addition to your go -to tool supply, once you get the directions down that is! We laughed as we attempted envelope after envelope with mixed results. I have the same kind of fun with my Martha Stewart score-board, so I guess it's just all part of the process, lol. Another bit of patterned paper inside the envelope adds just the right amount of summer time fun and fabulousness to an otherwise plain yellow card cover.
WELL, this is the last day to comment to win in my July contest... go ahead and subscribe to my blog and or YouTube channel, and comment away for an opportunity to win either a custom die cut or scrapbook page made especially for you, by me:-)  
Thanks for reading and good luck!


Friday, July 11, 2014

ATC Ready to Win!

Artist Trading Cards- or Prize Winning tickets?
If you got one of these paper gems from myself or from The Paper Wizard's booth at the Puyallup Scrapbook Expo, or saw my post through facebook, instagram, or Twitter, and wound up here, you're in luck! Simply leave a comment below before July's end, and you could be a winner! Drawn at random from a hat, the recipient may choose from either a card or scrapbook layout made by me, and I will mail it out pronto. As promised in my last post, your envelope will be beautifully decorated as well.
Your prize inside will feature a multi-layer die cut. Don't know what a die cut is? or perhaps looking for some inspiration on how to use them? Take a look at the latest edition of DieCutCrazy, a digital magazine full of terrific tutorials, product reviews, and tons of photos of projects from around the world. All for just 0.99! Search for it in your Apple store or just click here.
    The last giveaway I had was for a YouTube milestone, so if you want a bonus entry, subscribe there to my CraftWithAnna channel. Click on the Process Videos tab above for more of my 'tube-ular If you'd like to follow my blog I'd appreciate that as well.
I'm honored you dropped my blog today, and look forward to our drawings end!
-Anna

Sunday, July 6, 2014

: Embellish It Again!

Shelby Dredge is one of my favorite teachers, and last week I had the good fortune to enjoy a lovely chat with her on the phone. I was actually calling her company office to get her address, so imagine the surprise got, speaking with the object of my inquiry herself!
Shelby was one of my earliest sources of inspiration that has led to my style of scrapbooking today. The first time I took her class during a Creating Keepsakes Convention, my mind was blown! Now I sort of laugh at my reaction, but that's only because I've incorporated so many of her tips and tricks into my everyday creativities.
The EmbellishIt! scrapbook layout of the month kit club is fabulous, and I definitely recommend it to anyone in the market for such a treat delivered to their door. Beautifully coordinated papers from top shelf designers, and plenty of stickers, alphas, and even fibers to go along with her designs. In fact, there is so much included in each kit, you'll reach for it long after the double page spread you get instructions for has been completed. Even though this kit was a Valentine intended kit, I've used it for Winter/sledding, and here for some bright, sunshining outdoorsy fun too.

Now, since I love to use all my resources, I even included some of the Basic Grey packaging on my card front (fussy cut flower) and Yes, that is the manufacture's strip you see at the bottom of the card too :-) My bestie and I are cruising with Shelby next February to the Caribbean, so the little paper line title/phrase reading "Paradise Beach" had to be included! You'll be looking at your packaging differently now- see how I even used what was left for my photo mat --->

Even after I've made two double page layouts, this single layout, and a card with matching envelope liner, there are still lots of goodies to play with. Perhaps I should have titled this post, Embellish It again and again and again, cause that's what I'll be doing!

You can find more information about the cruise by clicking on the green, Cruise With Me! blinking badge on the right hand side of this blog, and see lot's of ready-to-make, shopping cart delights at www.EmbellishKits.com There is a card kit of the month club as well, so be sure to check that out too.
Thanks for stopping by today~
Anna


Sunday, June 29, 2014

Mason Jar Madam

Inspired by Friendships
The world has gone mad for Mason Jars the last couple of years and its easy to understand why. In this fast paced and ever advancing technological age, we appreciate the simple symbols of captured space that we've grown up with.
Click on my Pinterest link to the right and then click on the search field. You'll see countless and duplicable ways to use those versatile wonders.
  • Home Décor - seashells and sand, die cut paper flowers or butterflies, wine corks
  • Dry Storage - detergent, beans, pasta, soup mixes, cereal
  • Wet Storage - tea brewer, portable drinking glass, food preservation
With so many ideas, how can you incorporate the Mason Jar image itself into your next project? Think of the practical and whimsical applications and search your supplies for matches. With a little masking, my jars below were easily filled with stamped hearts! Leave a comment below with some of your ideas.
Filled with Fun - and LOVE!
This weekend I was fortunate enough to get four opportunities to create. Saturday after work I headed to Michael's to shop for and prep July's class samples. Oh darn, a reason to shop! Did you see last week's video from a shopping trip I took this April? So many sale items are available, but I had a good list to work off and got right to work with a custom home décor piece and TIm Holz mixed media clock.
Later in the day I enjoyed a beautiful view of Lake Nahwatzel, in Shelton. A good friend hosted me overnight in her grandparent's cabin. She always lets me bring plenty to craft with and oohs and ahs when prompted :-)  Early Sunday morning I was up working on these cards and sent a quick pic home to check in with Ray. It's awesome to have a respite from mom-ming.
Included in my overnight kit was a package of watercolor and my acrylic block. I also brought and stamped with Momento black ink for the first time. It may have been my photo-type paper, but I didn't find the ink to be as steadfast as I expected it. I love how the watercolor added such vibrant pops of color, but also subtly highlighted the jar lids on the first card.
 While stamping with the paint was possible, its not advisable if you want a crisp image. A while back I watch Kristina Warner and Jennifer McGuire stamp a text image and then paint over the top of it, and that's what I did on the "Save the Date" lable. This is a technique I'll be repeating!
After a quick dip in the lake and an even shorter search for my glasses that flew off my face when I jumped in without thinking last year, I was in the car jamming back to Gig Harbor for an afternoon class with an eager student named Laura. Together we explored the intuitive Cricut Expression. I was so proud of the card she created, I'm thinking of adding a "student gallery" tab up above! This would be a place I could show off what my fabulous students are producing under my guidance.
So where are your mason jars hiding? Think how cute a handful of fresh cut flowers out on the patio would be, inside the sturdy glass container. Thanks for checking in and don't forget to comment on how you're gettin' crafty!

Wednesday, June 18, 2014

Fathers Day Gift-Cards

Traditional gifts for dad this year in the form of a shirt from me and another shirt with tie from Rainier :-) in the form of handcrafted paper cards, of course! I saw this idea while surfing the web (working) last Saturday. We made them Sunday morning and I think that helped them look so crisp and fresh.
My card is on the left and used a six by six My Minds Eye sheet as the shirt base. Its a subtle dark grey pinstripe which paired beautifully with these dark greybuttons from an Sei album kit. There was no + sign in the glitter thickers, but a couple snips later it is barely noticeably pieced together.
Rainier has been using scissors since a very young age and I'm so proud to see her advanced skills in how closely she followed the outline of the tie on her card. I drew a line around the outside, which she cut around, then she cut closer to the line again, and finally, cut the line off. On the inside of the card (which she makes first for some reason, and I always leave for the end), she stamped DAD and drew her sister's name as well as her own, and some other...sentiments.
Dad loved his card and we love dad!

Tuesday, June 10, 2014

Faux Copic Marker Coloring


Today is my younger brother's birthday, and I'm sharing with you the techniques I used to make this adorable card for him. DIeCutCrazy has added some new contributors, and one of my new peeps, Deepti, recently shared a card made with a little monster. I had to grab an old set from CloseToMyHeart that NEVER gets used. Now, I'm in love! 
My little brother is a lot bigger than me, now. I laugh a little whenever we are introducing each other, becuase he literally towers over my 5'3" short self. But to me, he'll always be little, and he'll always be the monster that irritated me to no end as a teenager. Fortunately, I now realize there isn't anything that doesn't irritate a teenager, and I've learned to respect him and admire the man he's grown to be the last decade.
For my first technique, let me tell you how I gave my little monster such depth. I've been watching a lot of copic marker coloring tutorials, (even though I don't have any!) and decided to try my colored pencils at creating a similar 3D color look. Start by stamping your image in a light color. With your lightest color desired, lightly color in the entire image where applicable. For me, this was the light pink body of my space buddy. Now, grab a watercolor pen and, with small circular strokes, blend the color until it looks smooth.
Next you'll want to go for your darker colors. I chose to go for the darkest shading color of the dark purple in the creases and shadowy places. Again, blend with the watercolor pencil. Then fill in and blend with your mid tones, repeat until your are pleased with how it looks. Accent areas can be colored and blended with less color applications if you desire. I guess it depends on the sharpness of your pencils, or how many colors you have!
My brother is such an amazing guy. He can find the silver lining in any situation, he's a terrific friend and coworker, is always willing to lend a hand when he can, is a terrifically loving uncle, and in our house, is known as "the perfect movie date EVER," much to my honey's chagrin.
 For an out of this world effect in the background, I stamped stars with clear versamark ink, then heat embossed them with clear powder before painting over with some regular blue crayola watercolor paint. To acheive a constellation effect, I sprinkled salt on the wet paint! Once dry, I just brushed it off. Try layering a dab or two of another paint color over the salt for a really cool spacey look.
As I mentioned before, my brother's influence on me has taken on nicer significance the older we get. He taught me to share, how to recognize when winning is more important to another, and how to fart on command. Well, I never really got the hang of the last one... But who would I have been able to take out my teenage angst on? Who would I have screamed, "Get out of my ROOM!" at all those times, my parents? yeah right. 
On the other hand, who would have accompanied me on all those unapproved drives to go swimming with my friends, who would have lived with me for years (and never asked me to clean my room),  who would have taught me that family can be friends too? I remember vividly the day we brought him home from the hospital. In retrospect, my life changed for the better, and our household dynamic was made even stronger. 
To make your image really pop after all the color treatments, stamp over the image again with a darker ink, or for a more subtle look, use the light color you started with. Clear stamps make this really easy to do, but you can use a stamp-a-ma-jig or other stamp positioner too.  I even colored in the speech bubble and the monster's eyes with a white pen to make them extra bright, then went back with my colored pencil to darken the pupils.
On the back panel of purple paper, I stamped a repeated  calendar image. Then I overlapped that back panel and the card with a die cut star, to bring the layers together. My cropodile punched out the little circles from a multi-colored polka dot print by SEI. Here's a tip: apply little dots of glue where you want your small dots to go, and you won't end up with glue all over your hands. Or at least not as much glue :-) You can put all the glue down at once like I did, but I recommend doing it one dot at a time if you're a little more fastidious. 
My brother is really one of my best friends, and my life would be seriously lacking if I didn't have him around to bring a smile to our faces on a regular basis. A simple Happy Birthday stamp on the inside doesn't express that, but my happy little monster can hint at what a delight he is to have around, as he is pretty smile-inducing too. I hope you enjoyed some of the techniques I shared today, and feel inspired to try them yourself!
Happy Birthday, Jeremy!

Sunday, June 1, 2014

New Stamping Technique

Hi there stampers! My apologies if you stopped by here before and there was no text for this awesome new stamping technique, but let me tell you , it is super easy and the effect is awesome!
Simply lay a piece of washi or painter's tape across the paper you plan to stamp on. I used a couple sizes of flower stamps, but was thinking this could be really cute with some stars or firework-like shapes for the fourth of July coming up.
Randomly stamp around and over the top of the tape with an ink that dries fast, or thoroughly heat set your pigment ink. Carefully peel off the tape and you have a cool blank stripe going through your design!
The example I watched on YouTube was stamped with black ink on black paper. Hmm, you're right, it just barely shows. But, it shows enough that you could trace over the top with your colored pencils of choice for a really sketchy look. I decided to use dark red ink on purple paper for a more feminine look. I still filled in the flowers with watercolor pencils and I love the vibrancy of the color.
Embossing Powder shows off your Sentiment
A simple sentiment stamp down the center, embossed with either clear or otherwise colored embossing powder brings a bit more sparkle to the card. It would have been cute to add some tiny sparkles as well, either to the centers of the little flowers or even surrounding them in some of the emptier looking spaces. 
 For a little drama, and to help hide the fact that as usual, I miscut my paper and it doesn't line up perfectly with my card base, I added my rhinestones to the bottom right corner of the card, overlapping the focal piece and the background.
Now, go back with a ruler and run your colored pencil along the edge of the masked area to finish it off. Pretty, AND Awesome!

Wednesday, April 2, 2014

Charisma Cardz Meets Die Cut Crazy Blog Hop


Welcome to the Charisma Cardz Meets Die Cut Crazy Special Challenge & Blog Hop. The incredible design team at UK's Charisma Cardz have this week teamed up with my peers at Die Cut Crazy to bring you some wonderful inspiration from the world of Die Cutting, as well as a fab packed April Edition which is available for download on all IOS Apple Devices via the Newstand & in PDF format from the website. We've been hard at work creating beautiful Easter and Spring projects to inspire your own crafting with your die cuts.

This week at Charisma they have an ‘ANYTHING GOES’ Challenge where you can join in by linking or emailing Charisma with your cards/designs- and of course as always there are some fabulous prizes to be won! The  winners will be announced next week on the blog, AND featured in next months issue of Die Cut Crazy. Fame awaits you!
As well as this we have a spring influenced blog hop, showcasing all the designers. You should have a look around! For each comment you leave at each stop we’ll be drawing some random winners for prizes. This could be YOU...
If you just joined our hop, be sure and go back to the 
Charisma Cardz Challenge Blog to start from the beginning! But first, my little Spring Fling Mini-Album!


Ah, Spring...there's just nothing like the feeling of the earth stretching towards the sun all around you, is there? There's also nothing like the feeling in your legs and back after a full day of gardening, which, lets face it, usually is just weed pulling with a nicer name!

You may have guessed, I'd much rather be creating with paper die cuts next to a window than sowing seeds out in the sun! What's a crafty girl to do? In a few months I'll drag a used bassinet outside and soak up the sun. This table is just the right height and has a bit of wind protection around the top edge, making it perfect for outdoor crafting! 
As the days get longer and the rain falls less often in our state, we approach the most beautiful weather of the year. You can see that trend reflected in many online mood boards and in our favorite YouTube crafters too.


In the spirit of following my own passions while honoring the traditions of another, I chose to create a custom seed collector for the master gardener in my life, my mom!


I found the idea for this fun mini-album on the Score-Pal blog. It was really easy to put together and even easier to customize. What really makes this mini ideal for seed collectors are the tabs that slide in and out of the pages- ideal places for envelopes holding a bounty of beauty waiting to burst from the ground!

The base of my pages is the "B" side -or maybe it's the "A" side, I can never figure out how that works- of a beautiful soft pink, DearLizzy's Neapolitan: Delightful Bouquet 12x12 sheet.
 As the name suggests, a delightful bouquet is indeed on the reverse and helped me to pull and mix in colors for my project, like Heidi Swapp's Primrose Color Shine Mist.
Here's a fun idea I recently shared here on my blog: next time you have a few extra holes punched out, cover them with some Liquid Glass or another clear-drying hard glue. Let them dry overnight, and you'll wake up to your own custom enamel dots!Sprinkle amongst ink splatters and enjoy the bling!

Me & My Big Ideas die cut notecards, some generic small manilla envelopes, layered with Graphic 45's Secret Garden die cut tags and pockets made every page pop with a little bit of unique, and then I tied on an orange ombre ribbon to close it all up.
No, I may not have a green thumb; instead, I possess have a tombow mono-ink splattered thumb that can tie a mean bow tie! Let's see your next die cut covered mini; just tag it on instagram or Twitter with #DCCMini, and you may see your creation in next month's issue!


 Thanks for stopping by the Charisma Cardz Meets Die Cut Crazy Magazine Blog Hop & Challenge! I hope seeing my project leads you to create your own Spring/Easter piece.  Please leave a comment to let me know you stopped by, I love to read those comments!
 Next up in the hop is Eemeli. Enjoy!

In case you just joined the hop at my site, here are the other bloggers to hop about for inspiration:
You are Here -->--->Anna Bradshaw - craftwithanna.blogspot.com
Going on to Eemeli's site--> –> www.eemelike.blogspot.com
Stacey – www. lasatas.blogspot.co.uk/
Emma Pountney – http://tinyurl.com/m42q998
Dianne Grayson's work will be featured on Die Cut Crazy's home site! Get your copy of April's issue on your IPad. You will see MANY ways to use your die cutting equipment to produce incredible works of art. I've been inspired again and again by my peers manipulation of die cuts. Some styles are whimsical, like fairies, cartoon like stamping and paper piecing, or animals. Lacy borders and doilies seem to be another beautifully textured inclusion. "Add feathers, and voila it's Fans-chy!" As my daughter Rainie would say :-*. I love making a few little deluxe paper animals with my cricut and a lent Pooh Bear cartridge- thanks DF!
Don't forget, instagram #DCCmini to show off your die cut mini album!


Thursday, January 30, 2014

Advertisement Repurposed

I love a chance to use a bit of advertising in my projects, and once I realized the Lumber Liquidators flyer had all these choice samples of woodgrain in them (drool), I quickly started adding large cuts to my stash box.
My coworker will receive this on her birthday, along with another repurposed item I worked up for the February 2014 Valentine's themed issue of Die Cut Crazy. Be sure to check that out, I'm really proud of how it turned out!
You can see that I've made a little garden out of die cut Close To My Heart flowers, with enamel bling centers, and a cute butterfly flying about, trailing a few pearls. For some extra dimension I added my theme product of the month, baker's twine. Then I stamped the Celebrate phrase onto some scraps cut into banners. Pretty much anything outdoorsy, I put banners on!
 Anyway, these office cards get passed around for everyone to sign, and my card has a lot of delicate layers of embellishment on it. Imagine my horror at thinking of all the blings and flowers flinging off as the card slides in and out of an oh-so-secretive envelope. So, instead of walking it around personally to ensure no damage ensues, I sealed the top of the card with a bit of packaging cellophane.
Around the outside edge of the card I ran four pieces of double-sided Scrappy Tape. It has a peel off backing, so once I had that off, I could lay the packaging plastic right on top, and then trim off the excess. This worked beautifully and it felt awesome to hand it off for circulation care-free.
Tomorrow I'll be uploading a new movie (yeah!) and then on Saturday morning you can blog hop with the DieCutCrazy contributors as we share fun Valentine's tutorials.
My projects will feature some different ways to incorporate punched shapes in your backgrounds, so find a couple of your favorite dies or punches or cut files or whatever, and lets craft together!

Wednesday, November 20, 2013

I am the Cruise&Crop Blinkie Contest Winner!

 
Have you noticed my Cruise blinkie to the right ? I'm so grateful to my loving honey for fulfilling my tropical island dreams: he's sending me on a cruise with my Dear Friend! Wow, right? What could be cooler than seen days at sea, visiting Mexico, Belize, and Honduras... oh, well it happens to be a scrapbooking cruise! With classes taught by one of my favorite teachers, Shelby Dredge of Embellish It! (embellishonline.com) 
Well Gail and Cheri at Cruise & Crop have been nothing but nice to work with, and they recently posted on their blog a contest for putting their new blinking badges on trip taker's blogs. Of course, I immediately put one up here. even if it wasn't for a contest I was so excited to share that my reservation has been made. It makes more real somehow! (After all, isn't everything you read online True!) You can click directly on the blinking green cruise button and it should take you directly to their site. Pretty cool!
Then .... Surprise surprise, I won! And the package came today! and it was filled with wonderful scrapbooking at sea paraphernalia! Yippeee!
 
It was such a beautiful morning that I had to take my girls for a walk. The sun was shining and we didn't get too cool in the shady spots. Sunday fell asleep on Rainier's shoulder, isn't that about the cutest thing you can hope to have happen at nap time? I was also able to submit the last of my creations and articles for next month's DieCutCrazy magazine. Both girls took their afternoon nap at the same time. Survivor is on tonight, too, so I think this is a day that I should celebrate as going MY WAY.
The cutest thing in the box was a page kit all about towel animals :-) If you've ever gone cruising, you may remember these adorable gifts from the stewards as being one of the trips highlights. There were also a lot of Glitz designs items, a cute stamp set with the word Friend included, and I'm just so excited to start packing now.
Oh Yeah,
Did I mention the cruise isn't until 2015...
 

Wednesday, November 6, 2013

Prepping for CK: Artist Trading Cards

One of my favorite memories from the first year I went to CK, is that of an elderly artist handing out Artist Trading Cards to the vendors at the Make and Take tables. The fact that it was a MAN and that he was there for himself, not his wife or other female companion just made it stick in mind that much more! Every year at the Creating Keepsakes Convention since has found me wishing I had some of those cards to pass out to the wonderfully creative people I encounter.
Well this year, I will!

It was so much fun making this batch of cards, Rainier and I are going to whip up another group some time today. First, we dripped watercolor on shiny paper. Its got an interesting effect with paint, if I knew what type of paper it is I'd tell! But alas I do not. The cool thing is that it lets the paint dry without it soaking in, so the paint remains really vivid. On some parts of the papers we did some ombre style painting, other areas we just went hog wild with drips and splatters. We recently watched a video by Wilma F. at Two Peas and could see that influence lol. After the paint dried, I got out my special Artist Trading Card Stamp and used that on some cards for my information. Other cards just got the same details freehanded in. Then we dripped on more color in the form of spray ink. Stamps by Ali Edwards that read Live In the Moment, Life, and Love were dispersed.

I wish I'd had these cards with me yesterday at the Library to share with all the storytime moms!

One of these days I'll have to do a tutorial about how to make this teabag gift holder. Turns out, it works great for holding this set of cards. Even if it is Halloween themed!

On a side note- did you happen to see how messy my desk is in the background shot from above?! I usually try to get it cleaned off in between projects, but I feel like I'm in creative limbo this week, storing up my mojo for this weekends outpouring :-)

Making some updated versions of this nifty holder might be a good side project for this afternoon... People often ask me, how do I find time to do all the art projects my heart desires? well, I'm pretty sure exposure to papercrafting from birth for both my girls is the key to my success, as well as the support and, time, and space to craft I get from their dad. Having the girls near me can be frustrating at times, like when they grab papers or fingerprint on stuff or peel off all the stickers from a brand new sheet to decorate the floor... but it's all worth it when I think about the fact that while sometimes a project doesn't turn out "perfect" it is perfectly full of the love of art we all share :-)

 I love the way my ATCs turned out,  and it will be so much fun making new friends and passing these little labors of love out. Maybe some will even end up in someones's Project Life or SmashBook Albums!

Friday, November 1, 2013

Die Cut Crazy Magazine Holiday Blog Hop!

 
Welcome to the Die Cut Crazy Magazine Holiday Blog Hop. The designers have made some wonderful holiday projects to inspire your own holiday crafting with your die cuts. If you just joined our hop, be sure and go back to the Die Cut Crazy Magazine Blog to learn how you can enter to win a prize from Die Cut Crazy Magazine when following the hop from designer to designer.  
 
The holiday project I am sharing today will inspire you to create a multitude of "say goodbye to fall" projects within a small budget. Can you say $10 or less!?

Often times craft stores will offer huge discounts on the previous season's supplies. I shopped my local Michael's with a 40% off coupon and was able to pick up 48 coordinating fall die-cuts in a large bracket shape, conveniently  bound up in a book that I can thumb through, looking for just the right pattern. As soon as I saw this leaf printed page, I tore it out and threw it onto a large card base. The die cut happened to land half off the page and I thought, hmmm... I like that! A few splashes of Mr. Huey's ink in Gold added interest to the otherwise plain background. Then I stamped the acorn onto a sticker which I fussy-cut, added a couple bling brads, and voila!

I'm not into waste, so I had to find  home for the strip of leaves I had cut off. I wanted another die cut that was more neutral toned, and found it in this barely brown, burgundy rimmed piece. Too lazy to cut the end off my card, my eyes searched my cluttered desk, looking for a way to fill in that gap. Ribbon? no. More ink? no.
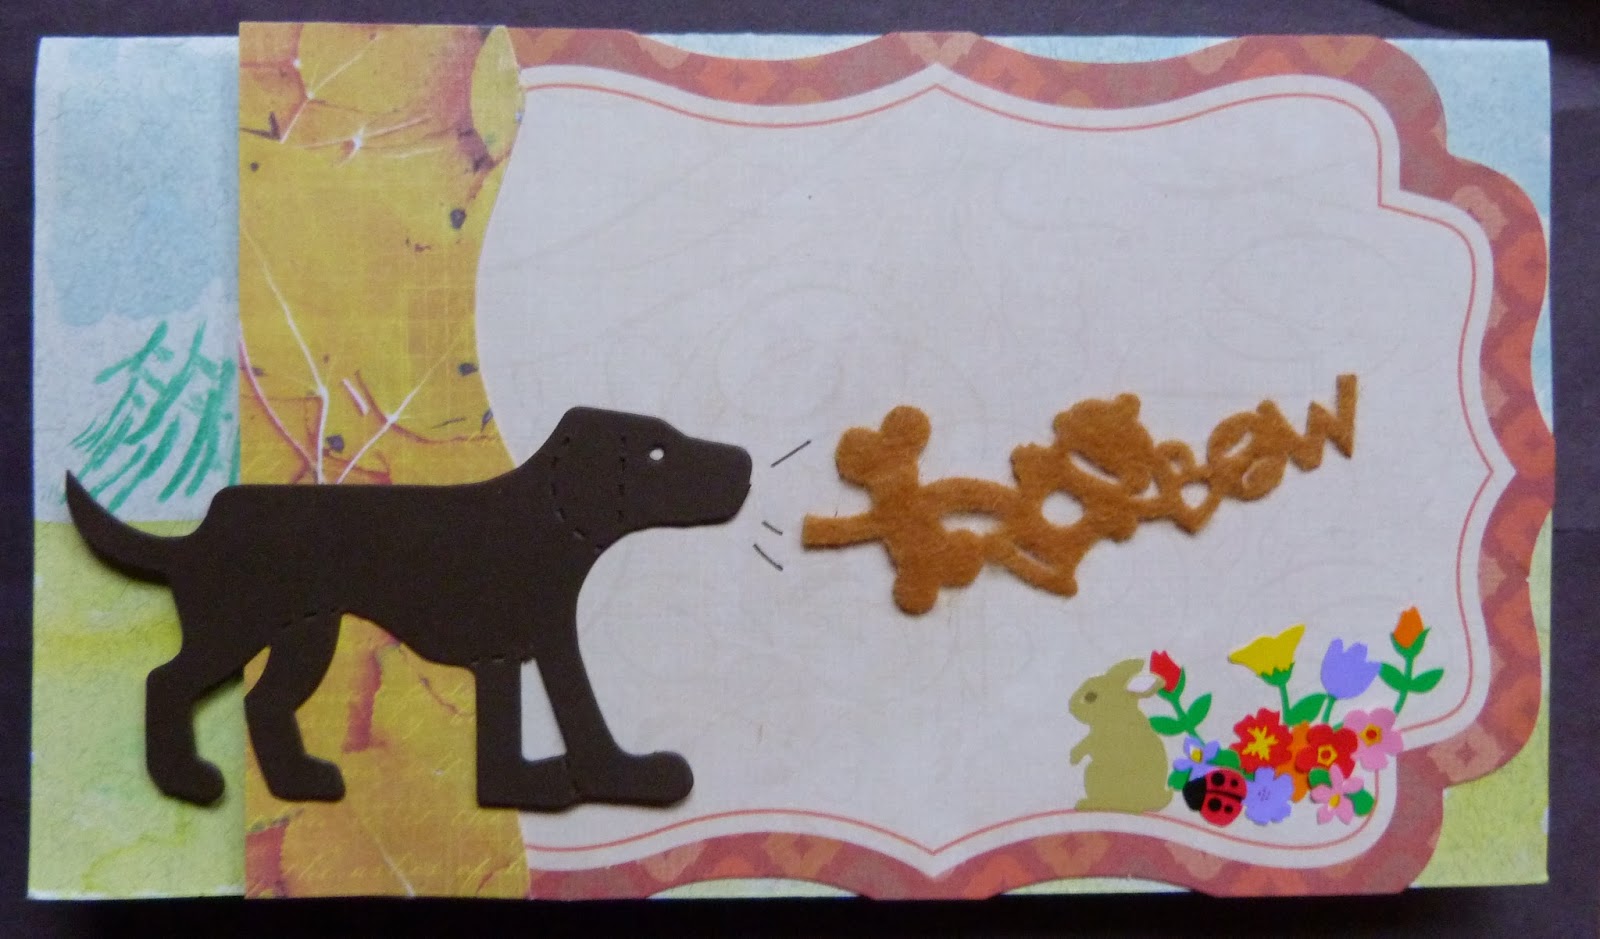
Cute little doggy die cut that reminds me of the one my best friend's son once owned? Yes! A scene quickly built itself on the card with the addition of a die cut felt border, some whimsical flower and animal stickers,  and the finishing touch of a water colored background.

My little doggy looks as if he's speaking! Roughly translated, "Bone, fire hydrant, bow," means, "Let's Play!" 
If you've watched my latest videos, you'll understand, I've got CK on the brain! Every year my bestie and I attend a scrapbooking convention in Bellevue, WA, and as of today it is officially only ONE WEEK AWAY! This card will be a perfect lead-in to our weekend of creativity together. I love knowing that thinking of how much her son loved that dog will bring a smile to her face; a boy and his dog can be the best of friends, and she is certainly mine!


 Well when I was looking around at my cluttered desk, I noticed these coasters collected from restaurant on a recent road trip. Remember these coasters from when you were little? My grandmother was a waitress for over 20 years, and growing up, nearly every Saturday morning my grandfather would take me to breakfast where she worked. I always thought it was so neat to be able to color and personalize my own coaster while he told me tales of his youth. The gold spray was still out, so I experimented with a little of that while I reminisced.
Once I realized the gold border matched my die cuts, another card was quickly crafted! And yes, I did continue to shop from my scrap laying about  :-)  My young male co-worker was recently promoted and will be leaving our office. Despite the explosion of multi-colored blings and enamel dots, this card is still masculine enough to bid him good luck in his new position.

For these cards, I used the book of die-cuts pictured above and an acorn block stamp which I purchased at Michael's, Mr. Huey's Spray Ink in Gold, My Mind's Eye Enamel Dots, my Red Duck transparent adhesive roller, my daughter's Crayola watercolor set, bling and pearls by Queen and Co., as well as some very old stickers, die cuts, and cardstock from my stash. On this last card, the This Happened banner, corrugated arrow, and Congratulations stamp are all from Close To My Heart.

With my coupon, all of my supplies actually came to a whopping 5.49 at checkout, and I still have about 45 more die cuts to go towards my "say goodbye to fall" projects. You may even see a few of them in this month's edition of Die Cut Crazy Magazine!
 
Thanks for stopping by my post in the Die Cut Crazy Magazine Holiday Blog Hop! I hope my projects inspire you to create your own inexpensive holiday projects, and maybe even clean a little creative clutter off your desk.
 
In conjunction with this Hop, I am also celebrating the awesomeness of having TEN+ subscribers to my YouTube Channel! So, if you comment on any of my videos or blog posts from within the month of October 2013, including todays video and post as well,  I will put your name in a drawing for the first card I featured here today :-) You can enter by commenting as many times as you wish, and I'll draw the winning commenter at the conclusion of the Creating Keepsakes Convention, Saturday, November 9th at 6:00 Pacific Standard Time. Good Luck!
 
Next up in the hop is  Allie .  Go see the amazing project she has prepared for you to enjoy!
 
If you just joined the hop, here is a list of designers so you don't miss any


You Are Here --->Anna http://craftwithanna.blogspot.com


You can find all sorts of incredible inspiration at the Die Cut Crazy Magazine  site!