Showing posts with label My Mind's Eye. Show all posts

Sunday, June 26, 2016

Color Wheel Challenge, Kit Reveal, & CK Portland Review


 If you were to click on the word "challenge" from the search list on the right hand side of this blog, you'd be able to tell by the number of posts that came up, how much I love a good challenge. A few years ago, I even challenged myself to scrapbooking 30 layouts in the month of June- and succeeded!
The latest challenge over at Shimelle.com is to scrapbook with the color wheel in an unusual way; using split complimentary colors. "Split complementary means choosing one colour to start, then going straight across the wheel to the opposing colour and instead of that central colour, choosing the one either side."- Shimelle.
I also love to be resourceful when it comes to my patterned paper. Truth be told, it's a compulsion to savor each pretty printed sheet in it's entirety. I've been working on using the beauty I have in supply instead of continuing to hoard the ones I've pay money for. The physical cost, the joy of purchasing remembered when I see favorites, the textures of some, like the Indi Chic print from My Mind's Eye, at left.
When I went down to Portland for the Creative Keepsakes Convention with my mom and brother a few weeks ago,  it was with the intent to bring home some intel on what's to come over the next couple months in the scrapbooking industry. That, and to sit in on some classes as a volunteer. Oh, and to celebrate my younger brother's upcoming 30th birthday. Let me tell you how thrilled he was to be helping out when all 10 of the drying tools wouldn't work in our mixed media assist! And you know the ladies enjoyed seeing his smile- we shared the same orthodontist.
You'll see the artsy layout I made to commemorate that trip tomorrow, when I (gasp!) guest blog for my scrapbooking savior (Glitter Girl) Shimelle Lain. Today, I played with the contents of my Bible Journal Society kits. The die cuts are vivid and have a doodled or handrawn look that is so on trend, I can't help but adore them! Bo Bunny in bright, watercolored hues of turquoise and green are offset by orange and brown.
The focal photo is of my Grandmother's side of the family reunion, and the large arrow in the middle points to her and my Great Uncle, Grant. Preserving the handwritten year and family name were essential.
 Stretching my supplies is also a must for me, and there are layers of cut-apart frames behind the large quote at the right. All of these colors from Basic Grey in the background compliment the vibrantly hued curtain behind this group photo.
Complimenting the story of this family's migration to North America from Norway are a big bold globe, with arrows pointing to the respective countries. Word sentiments included in the set are so versatile, I don't even have to include journaling :-) But one thing I will do is put this pic up on facebook and ask my  relatives to identify their kin. Technologically enhanced scrapbooking, will this be my next big focus? hmmm.


Once I'd finished this layout, I couldn't just put my leftover pieces of paper away, of course I had to create one more layout! It has been a beautiful summer day, I was scrappin' outside in all of God's glory (read:bikini) and here I had the die cuts to exclaim my appreciation. Couple these bits with a devotional read through written by one of my favorite kit designers, and it was easy to whip up another page with a single candid photo of my girls about a year and a half ago.
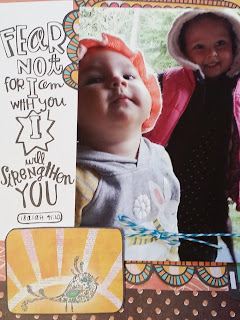

That look on Sunday's face... What a little toughie.
Growing up isn't easy. There are all sorts of fears that young children face. There are simple times of joy when I want to sing it from the back pasture, Girls, don't ever feel alone!, and the watercolor quote on the left with the printed sentiment is then perfectly echoed by that pretty block on the right.   It would be fun to get some colored pencils, markers, or paints out to play against that bold black doodled designs Shelby came up with.

The amount of love that is included in each of these kits has actually been a little moving. From the sentiments, book marks, rub-ons, washi-tape, die-cuts etc, to the words and references in the included devotionals, my thoughts naturally gravitated towards appreciation for my family - and the time they afford me to pursue my pursuit for Craft Diva Superstardom!
I've had a surprising amount of mini albums surface from the depths of my craft space, and put a little kraft covered, twine closing cutie from Close To My Heart to good use with little 3x3 pics.

 
Hey, thanks for reading down this far! And...
 
Here's Your Video!


@EmbellishKits #BibleJournalSociety #EmbellishKits
@AnnaBradshaw #CraftWithAnna #makersgottamake

Tuesday, April 14, 2015

It's April Card Share Time!


You can read all about and see all the details for the cards featured in the video link above in this post. I've been making away; aside from this collection and the bonus projects, I created about 20 more cards last week. Between store sales, custom orders, fundraising cards, preparing for the retreats I'm teaching at, and these videos, I barely had time to squeeze in this beautiful layout... but that's just the type of challenge I enjoy!


 Be sure to subscribe to my CraftWithAnna YouTube channel. You'll see all my videos show up on your watch list as they are published. Can I get a whoop whoop!

I'll post more pictures of this layout and some close ups of those gorgeous clusters tomorrow. Sign up to follow my blog and I will send you an email when I post. As always, I thank you for stopping by and watching!


P.S. Leave a comment below regarding your favorite card... there's no prize, I just love the feedback lol.

Sunday, April 5, 2015

Best Spring Card Kit Video Review is Here!

Happy Easter Blessings to you and my hopes that with all those dressed-up family photos you've taken today, some creative applications will evolve. Searching for just the right colors to go with this season? How about Sherbert Pink, Soft Coral Red, and Juniper...you'll find all the vibrancy of Spring and Summer are contained in the sophisticated My Mind's Eye Jubilee collection assembled for the April 2015 EmbellishKits.com card kit. Let me show you what's included, and then we can craft up a card together!
You can subscribe here on my site for an email version of my blog posts delivered as I send them. I've got a few more spring flings in the making; another card making tutorial for this kit, the card share of the 8 finished cards, and of course, you'll see what happens to all those leftovers!
Thanks for stopping by, now head over to EmbellishOnline.com and get some embellies to compliment todays wardrobe choices!

Sunday, February 15, 2015

Waiting in the Sun

All this year our weather has been unseasonable warm, which feels great but of course can confuse the early bloomers like daffodils and crocuses. What a treat to be able to spend so much time outside with the girls though. With our vacation on the horizon, it's good to get a little exposure on them too, and I'm always encouraging them to go out and swing awhile while I get chores like the dishes done inside. I guess I'm fortunate that they beg to help, I know most kids don't consider doing so, but I do kind of push them out the door, telling them t go chase chickens or that TaTa (or little dog) needs someone to play with.
Or, if Ray is home, he'll generously offer me some alone time, and I'll take advantage of the opportunity for a little spurt of unencumbered craft time, and can whip out a trio of cards like this one, created in about an hour while they walked around the back of the back yard. When you live on acreage, you have to be specific lol. Some of these will go into Pickers Northwest Antique Store and the horizontal card will head to Gig Harbor's Copy & Mail.
I don't usually use our dining room table, but the sun was shining on it so invitingly that I pushed aside the placemats and set up a mini studio of supplies, including crochet thread, that gold chevron trendy tape from Queen & Co, and a 6x6 paper pad that complimented a handful of scraps from my bin. Then it was onto the MME pinterest board for inspiration! My favorite is the one that looks like little polaroids... I'll be using that idea again for sure.
Interested in soaking up the sun while crafting, or just sitting in the dark of winter reading this post? Come craft with me in this cardmaking video I published last Spring:

Saturday, February 7, 2015

Late Night Love Life


One of my favorite holidays to design cards for, Valentine's Day is even more special for us because the day before is Sunday's birthday. Plus, I'm just a really lovey dovey kind of gal, and what better way to express that tangibly than with a handmade card? These were made with the My Mind's Eye woodgrain 6x6 paper pack. I also picked up a package of wood veneers to add to my stash and used the cupid one as I consider it to be the least versatile and therefore the first to go to the store in time for selling! Simple Stories chipboard and some foam adhesive built this embellishment cluster into a focal point of the card, but doing something as simple as adding gems to a pennant sticker really dresses up a simple embellishment. Feeling a little more advanced? Try layering trim behind a sticker as I did with the Be Mine card. Using grey lace, I did have to cut a little on the corners of the hearts to help the ribbon lie flat. Then over two border stickers, also layered, and to top off my fancy embellie, I pop-dotted that smaller heart and paced it slightly offset for some textural flair. Working from a 12x12 sticker sheet helped all of my cards coordinate, and I LOVE the look of each!


Tuesday, December 23, 2014

Quick Card Share for Dec 15th

Just a quick look at a few cards I made last week, and I'll be back to share more of what I've been doing with my time this month tomorrow!


Thursday, November 20, 2014

An Unexpected Punch of Fun

I absolutely love this card I made yesterday! It has layers of My Mind's Eye papers, a Jenni Bowlin argyle transparency, and Lawn Fawn stickers, a combination that pops with color and all the fun of the holiday season.

At the Creating Keepsakes Convention earlier this month, I learned a fabulous technique for creating Shaker Cards. Mike from Queen & Co. taught us to use washi tape to close our cards... WASHI! One of my all time favorites!

I brought home a lot of sequins from the convention, a product I sought out after I realized I have almost depleted my meager supply of 10 or so sequins I've been hoarding as they fall off our daughter's clothes and from Christmas decoration clean up in years gone by. Yes, I am too cheap to spend a dollar to get a bazillion sequins and prefer the distressed-by-my-concrete-floor versions... NOT.

Beloved washi, meet newly acquired mega-stash of sequins. Sequins, meet Transparency overlay that I never know what to do with. Washi, meet transparency... now that we're all acquainted, put it all together and look what happens!

Well, if you're me, what happens is that all that fun creates a bit of a mess and the inside of your card suffers. But, if you're me you go looking for a way to cover up you fingerprinting mishaps, and participate in a challenge at the same time~

Jen Schow is a somewhat new YouTube process video-er who has done what I haven't figured out yet; gained over 500 subscribers in the short time she's been 'Tubing! What an accomplishment. Jen and I sort of know each other online as members of the Nicole Jones 911 Facebook group, which a lot of fun. And to celebrate her gratefulness at all the subbie support she's getting, she is offering up an American Crafts prize pack for punched project share submitters!

Here is how I used my favorite Close To My Heart Scalloped circle punch: as a peek a boo to the back side of the background to my shaker card front. I fussy cut a snowflake and layered that inside with a pop dot, and ran another strip of washi tape down the side. If I were a forward thinker, I'd have ran the tape down the side before punching, but I just cut a fringe along the edge and folded the tape over the scallops and no one (okay, non card makers anyway) would know the difference anyway.

Thanks for stopping by and let me see what you're making!


Friday, May 16, 2014

Six by Six Series- Episode IV: Smile

Remember when the Stars Wars series renewed itself by starting its saga all over again with prequels, leaving you wondering how will this all lead up to what I already know?! Well this series won't be filled with laser guns and jet planes, but there will be a love story and maybe even some hairy animals!
I've got about four six by six paper pads that I've been experimenting with including on my scrapbook pages and card fronts. I'm seeing other designers incorporating these miniature patterned  papers in their projects too, and hope you'll share with me in the fun of training our brains to reach for them too.
6x6 patterned papers, and 8x8 for that matter, come in a down-sized version, making them ideal for including in cardmaking, but I find that really helps to makes them more neutral when adding them to a background in scrapbooking, too. Their size is perfect for creating a quick grid of four sheets to equal 12 inches all around. If, like me, you tear a page a bit in your haste to rip it from the binding, just think of that whoops as a reminder that these papers would like a scrap piece or background underneath them. Trim off -or maybe enhance - the torn edge and you'll end up with a crisp little border frame on your page.
When selecting my prints for this layout, I looked for four busy designs with background colors going from light to dark. The little miniature cut-apart sheet provided me with some coordinated title pieces, and I used a couple of circle punches on the starbursts print for some simple confetti-like sprinkles. My Minds Eye papers are generally cream based designs, and for the journaling space I needed a really neutral piece, preferably with lines to write on. I remember using the full size version of one of the papers in a layout I made last year, and turned it over to find the same grid which would be perfect. You can see the full-size version layout here:

Have you ever experienced the rhapsody of pre-breakfast scrappin'? I spent Wednesday night at my moms house and she had that lovely 8.5"x11" enlargement of Grandma and little sister waiting to show me. Isn't this a beautiful print? It was taken last Friday while visiting with our cousin Paulette from Arizona- Hi Cousin!!!  I love that simply looking at the photo leads to a grin on my face.
While the girls ate breakfast and did a little crafting of their own, I whipped this together in less than 20 minutes. Now that's a habit that could use reinforcing! 
Thanks for stopping by my blog today. Check back throughout the week as I share the prequel pages in my six by six series, and if you happen to be at the craft store, investigate those handy pads of miniature designer papers!

Monday, January 13, 2014

Using Your Christmas Cards

What to do with all those beautiful Christmas cards received each year... some I admit are easier to toss than others, but really, what good do they do in a box in the closet, never to be looked at again. Aha! I finally found a home for three of them! The top left purple with silver ornaments actually came from PartyLite. How did they know to send me a card in my favorite colors?! The card behind the girls came all the way from Ed and BJ in New Jersey, and the Christmas Wishes sentiment was cut from the front of a card, complete with popped-up letters!

If you watched my recent Album Review movie on YouTube, you know that one of my favorite layouts ever created was one of Rainier in front of the Christmas tree at my bank last year. My Little Christmas Angel has grown up quite a bit in the last year and has a new sister to pose with as well... which meant, back to the bank for a photo shoot this year!
She walked right over to the tree (shedding outerwear all through the lobby as she went) and turned on the charm for my camera;  highly unusual behavior for her! Of course I didn't have the camera ready, but I still managed to snap a lot of great photos of her and Sunday. I love the way the tree shimmered and twinkled behind them. After our shoot those two amused themselves and the tellers by touching as many of the ornaments as possible.
I really wanted the focus of this layout to be on Rainier and the look on her face. I did get a photo of her with a great big smile, but this kind of look is more "her." Using a CTMH flip flap sleeve allowed me to hide her sister and the journaling in one place. I'll carefully slice through the page protector and this page will become interactive.
 If you look carefully in the border near the bottom of the page, you'll see I continued my baker's twine theme for this month in green and white, lime green and white, and purple with white. A little washi tape on the back of my layout keeps the twine in place just fine. Another goal of mine this year is to use my supplies, and I'm happy to report that another sticker sheet went in the garbage after this! So long, Teresa Collins fabrication stickers!
What do you do with your old holiday cards, or birthday, Mother's Day, etc.? I'm looking for a way to house the hundreds of cards Ray has been fortunate enough to receive from me over the last five years- any ideas? I'd love to hear them! Leave a comment below and you could win a repurposed card from me. What you choose to do with it afterwards is up to you :-)