I used to love the thrill of self-induced fear... absorbed in a terrifying good read, I'd sometimes clap the book covers closed and regain control of my breathing, then slowwwwly reopen the frighteningly good novel to once again set my heart racing- much to the amusement of my family! Nowadays, I'm more likely to cause myself a near heart attack reading about the potentially harmful effects of consistently eating dairy products, but if anyone asked, I wouldn't hesitate to reply that my favorite author was, and still is, Stephen King.
The funny thing is, I can't bring myself to read any of his new works-the idea of even trying is in fact too scary! Well, I'll be honest, I can't actually re-read his older books either- too scary(even though I know how they will end)! But, after my mom sent me this adorable photo of her and a bestie all dressed up in matching outfits- oh, wait, that's a cardboard cutout they are standing behind- I realized I could scrapbook something having to do with the Master of the Macabre. And, I could make it scarrrrry!
I thought my page (see photo above) was complete. It had a terrific photo on show, a typewriter and crown as symbols for Stephen King, die cuts that compliment the story of how I got the photo and a clever title -Redrum. My layout felt flat though, despite adding foam adhesive behind a few layers... wood veneer arrows brought a little more dimension, as well as the tiny chipboard date block. Bakers twine ran down a column of patterned paper which brought the focus inward toward the picture. Still, I wasn't quite satisfied with calling it complete.
Despite my grounding bases, there still seemed to be some floating of elements going on down at the bottom. And, even though I had designed the use of space to include a resting area to the right, my eyes felt unsettled as they roamed the page, trying where to decide to look away. Turning to a gigantic amount of unused chipboard I keep "just in case," I found a few rain drops, and, inspired by the scene in which two twin girls stand against a backdrop of cascading blood in The Shining, I painted them bright red!
Dripping down from a chandelier, again, reminiscent from the "remembered" ball room scenes of the movie's main character, Jack Torrence, powerfully played by Jack Nicholson, they are now drops of blood. Ew! right? Thinking about that unnerving performance, and replaying critically frightening scenes in my mind while creating this one page layout brought out one of my favorite secondary titles to date, "Who needs Johnny?!" (You're number 1 in my book). A little strip of highway looking sticker reminded me of the isolation of the characters during their catastrophic caretaking job with their little boy, Danny.
As much as I adore how the finished version turned out, I still get a little shivery looking at it. Who could have predicted that a few dozen well-written, word packed novels read in my youth could have such a profound effect on my scrapbooking today? Or that, while I've donated my entire collected works by Mr. King, and planned to load them on my Kindle, I just can't seem to get the courage to do so.
Perhaps I have to admit, ever since I've had children of my own, I'm more likely to squeal with delight over a new Fancy Nancy than I was over the release of Stephen King's latest trilogy about "Mr. Mercedes." Perhaps, dear reader, I would have been too frightened to even go into the massive Stanley Hotel, where The Shining was filmed. Perhaps I was only too happy to scrapbook a memory of my mother's than to experience the fear myself... yeah, that's it, I'm sure :-)
Fall is a fun time to decorate your entry way, right? The Friends of the Key Center Library sponsored a fun, free, Family friendly event last weekend, and we had a blast creating our own door decorations. With the generous donation of supplies from one of my favorite scrapbook suppliers, Queen & Co., we were all set up with patterned papers, twine, and washi tape galore to decorate with.
Just look at these smiles! And imagine my own :-D
My older daughter Rainie was along to assist with any of the younger kids, and we were having quite the time by ourselves, waiting for our first victims er, participants :-)
Soon enough, our first family came in and we all got down to the business of crafting up a storm! Then I had the pleasure of a repeat CraftWithAnna student, and his sweet enthusiasm for repeating back info he'd gleaned from other classes was the cherry on top of a really fun filled afternoon.
I'm always surprised by how unique everyone's projects turn out. Actually, I always hope they will look nothing like my examples, because then I feel like it's really theirs.
The other part of this class that I got a kick out of was using more of those donated Queen & Co. supplies. You'd never know it, but those are all summer papers we're using! So, take a look through your stash and see if there are some "B" sides that can be used throughout the year. You might just make a surprise discovery of a really right now piece that just has to be used tonight... or maybe that's just what I'll be hoping to do myself~ so go ahead, get crafty!
Wow, the I love Sunshine collection pieces included in this month's scrapbooking kit from EmbellishKits.com were so packed full of fun and the warm colors of Summer, I could hardly stop making from it! In fact, after I completed the double page layout featured in our July EmbellishKits.com Scrapbooking kit preview video earlier this month, I went on to create two more scrapbook pages, ten cards, and two beautiful home décor pieces. And I STILL have goodies to play with! Check out this month's scrapbooking kit share video to see just how many stickers, chipboard elements and paper scraps I still have, and don't forget, many of these items should still be available through our favorite online source for papercrafts, EmbellishOnline.com
This month Shelby sent us a cool cut-apart sheet from Echo Park's I Love Sunshine collection. The 2x12 inch paper strips can be cut however you like, and in our tutorial video, we did some fussy cutting to create awesome embellishment clusters. For this half of the other double page layout designed for this month, we took the days of the week, and cut around the tabs, stacked them, and wow! Now we have layers that lead us through the week in filo-fax fashion.
Christmas in July~ Sliding Into Summer at St. Nicholas'
I love to dig into my own stash of stickers, but there were so many pieces to choose from this kit, I could go really go crazy! See how I split a rainbow polka dot chipboard frame to house two different stickers sets? I also added sunglasses, the rest of the rainbow dot border, a chipboard butterfly on top of a few squares from that ultra summery sheet that looks like postage stamps. The reverse pattern is stretched across the page and gives the photos a cohesive background. Another darker blue mat behind the focal photo pops it off the page- and don't those smiles bring a grin your way too?
I mixed my own alphas and combined them with that large chipboard SUMMER to create a fun title which reads, Sliding Into Summer. If you're ever stuck for a title, hit up Google and search for ___________scrapbook title. I typed in "Summer fun kids scrapbook title" and found one that fit my theme and style.
Relax- Days Like This Make Life Sweet
For the opposite side, I cut a tiny bit off of two sides of my background so there is a bit of white peeking out . I love that offset look. There was a reason for it though- you may have read or heard me say how much I hoard paper, so the background here is actually about five different paper strips, assembled on top of a plain white piece of cardstock. Using paper economically really makes these kits stretch, but even if you follow the clear cutting guide and placement directions included, you'll have lot's of left over paper and embellishments when you're done. Stacking pennant shaped pieces of paper is a terrific way to use up some or all of those scrap papers! Vary the widths and lengths for added interest and dimension. You could even use pop dots or foam adhesive under some of the tips so they appear to wave in the breeze.
A little birdie told me, Be Brave
Instead of one large photo, I chose four smaller photos of my daughter experiencing the glory of the outdoors on that same camping trip you saw photos from in June's scrapbooking tutorial and kit preview video. She loves paper (of course; she IS my teaching assistant), so I included some of my scraps in a little bouquet for that adorable chipboard bird to hold proudly. The wood veneer flag is the only piece on this layout that was pulled from my stash.
I love this photo of her with her dad; when I was a little girl my dad would coax me closer to the edge so I could see those amazing views that my fear of heights would have prohibited. Having my dad there when this picture was taken, well, it just made story come full circle and that is one of the best parts of scrapbooking memories to me. Oh, and yes I did venture close enough to the edge to look over this rock into the pristine blue-green waters of the river flowing behind us- and even snapped a photo (carefully). Now for the card collection!
Cats are people, too
An associate of mine recently gifted me a large assortment of greeting card fronts, and I put a few of them to use this month. For this cute cat card, I just layered a recycled card front with some washi tape on the bottom. Saved some glue that way, too! For the embellishment at the bottom, I layered a sticker that I didn't think I'd use under the chipboard flower cluster. On a large sticker sheet, it's okay to not like every single icon included. Take a glance a the sticker's shapes; think of how those shapes can be layered behind other pieces, and build up from there. A little bow made from the included baker's twine completes the front, and then I cut a small amount from the side and adhered a border sticker to peek from the inside. A little fun and it pulls all the colors together, too.
No really, it can't get any easier than this!
The next card was made in the same "batch"- I usually create between two and four cards at a go when I'm in the groove. You know, every day lol. Now, printed card bases are another really great option for creating quickly. Here, I've used one with a printed pattern on it- even easier than cutting a piece myself! Then, another card front cut down to size, a butterfly cut from another card, and finally, a foam adhesive backed sticker from our kit which reads, "It can't get any better than This."
Have you ever had a cool glass of lemonade on a hot summer's day? Well, if you haven't, you should, and if you have, I think you'll agree that there is little else that could be so refreshing this time of year (unless you are 21+ haha). I tried to channel some of that feeling into this Summer Fun card, and grabbed another pre printed card with a tiny black chevron on cream.
Customize your stickers!
Using some alcohol markers and a few big brush pens, I colored in a few of the stripes with cream and two different aquas on the top, and a green line at the bottom to mimic the sky and ground. Then the lemonade stand sticker, and a postage square of color, split in two and layered behind the Summer Fun chipboard piece to create a custom banner for my card front's booth! Tiny knots of the bakers twine at each end of the banner, a stamped pennant waving in the breeze, and a pinwheel sun. How Fun!
Splashing Optional
Here is that same preprinted background you saw earlier, this time I just layered a bunch of the scraps- I got the idea from that rainbow, "Paint Sample" patterned paper from this collection.
A few stickers, including the Cool in the Pool which I layered over a scrap of the blue swirl/postage icons paper. Add three or four different colors and sizes of blue bling, and you'll be ready for a dip! Hey, if you bring this card along, you can write to a friend about how much fun you're having. Even if they are sitting right next to you.
Here's another card that's "cool." The icons featured in the background all come on one sheet of paper- hmmm, that was hard! Actually, I did find some thinking required, for me anyway, in regards to which icons I wanted to cut solo, and how to keep a block big enough to include on other projects. I dressed up the front by adding blue bling from Queen & Co on top of that small piece of blue. Another little scrap was stretched to appear top to bottom- you can just barely see that peek of aqua, but it really adds a lot and helps to ground the entire card front. I also added tiny blings to the flip flops, the sun, to the pink square at bottom right, and to the O in HOT.
Can you see the shadows created by two different layers of foam adhesive? Bringing dimension to your project may cost more to mail, but the effect is well worth it. The elements seem to jump off the page now! If it's really hot where you are, like it is here this week, I apologize for making that popsicle look so delectable :-)
Now, where is the best place to enjoy the sun besides the pool (or for some, from inside an air conditioned haven)? At the beach, of course! My aunt and uncle were down there playing last weekend and inspired me to use eight more stickers from that large 12x12 sheet in this month's scrapbooking kit. Building a scene like this does take some imaginative planning- or not! Have fun, or if fun is fearful, cut your stickers from their sheets so you can move the elements around freely.
The sun up top is cut from a paper scrap, and the other journaling square, pulled from my stash for it's colorful border, is turned on it's side as a layering base. Speaking of having fun and using your imagination, take a look at my "waves," they are really just the pieces left behind from where I peeled off the border stickers!
Inspired by love <3
My aunt and uncle spent a lot of time downstate at the beach, and since we loved to spend time with them, my family was often camped nearby. I have so many fond memories of doing so, and many of them were stirred up when I saw their family photo up on facebook after their return. My beautiful aunt has set such a strong example for our family as she underwent multiple treatments in her fight against cancer these last few years, and I was happy not just for her returning hair, which looks uber-chic, but for her being in a place she loves, surrounded by the family that remains by her side through thick and thin. You just gotta love LOVE!
It's getting hot in here, so wear a cute swimsuit!
Another friend who just moved into an apartment with a pool inspired this next card- Hot Summer Days should come with some all natural sunscreen, huh? Or an umbrella with comfortable seating, and some rainbows! LOL, I found a place for one of the hundred or so paper clips I've brought home from the corporate world. It just goes to show, with a little pattern and bakers twine, even the simplest of household or office items can be transformed into a cute embellishment cluster.
Sequins + Fair Fun = End of Summer Fun
Sequins have made a resurgence amongst crafter's supplies, and it's no wonder! They are sparkly, simple to add, and you get A LOT for a little $. I built a little Fair scene on this card front and added gold sequins to the pre-printed background. For this custom stand, I used the chipboard lemonade stand and cut off the top where the lemonade sign sat. Then I used foam adhesive to pop up the Summer Fun banner sticker, and behind that I used some old Echo Park tile letters to allude to the fall fun that's just around the corner. Hmm, I'll have to take a look for my leaf-themed products and start to change my mood to sweater weather... But not quite yet! Another friend just took her family for a long needed vacation to Hawaii. As I remembered her expressions of "Why don't moments like that- amazingly good times- last forever!?" my eyes fell on the manufacturer's strips and the little paper collection titles that come on them. If you scroll back up to that camping layout I made for Rainier, you'll see I've used a few there as well. Layered over that pink chevron chipboard banner piece with a little splash of green behind that cluster, this tiny scrap of paper brings a simple sentiment to the front of my card. Truthfully, there is an "I" on that pennant, but I didn't want to use it that way! So remember, when you can't think of a way to use an embellishment, take a look at the colors and it's shape, and you may be surprised to find it on your next project after all!
Now, with all this colorful summer fun going on in my craft room (and sometimes in front of our picture window at the dining room table), I thought it would be great to pair a pop or two of color with some black and white and cream for a striking ensemble. Adding a bit of sparkle wouldn't hurt, either, huh? I used some of Heidi Swapp's gold & silver foiled calendar inserts for this card- just a few squares of your paper stash would work just as well, though, don't you think? This card was so easy to make, I thought the chipboard sentiment, Lazy Day was more than appropriate. Have you ever stopped to think about how many crafters you've had the pleasure of sharing creative space or ideas with, be it online or in person~ sometimes those people you watch on YouTube are almost like family! I tend to think of designers that same way, and my heart really went out to the Swapp family last week as they mourned the sudden loss of Heidi's son.
All because two people fell in love...
Unfortunate happenings like that can be a reminder to cherish loudly the ones we love ourselves. With a lot of realizations and positive changes in our relationships the last few months, I felt our family would benefit from an affirmation list of sorts. It just so happened that the last free class I taught at Michael's was going to be a Tim Holz inspired mixed media piece of home décor- perfect!
Taking an old frame picked up garage sale whose glass had broken, I layered more Heidi Swapp papers under and to the backs of a few acrylic tags. Another of her calendar cards made a place for my statements, and then I used one of her wood veneer pieces at the bottom. So why is this project included in this list of things made from our July EmbellishKits.com scrapbooking kit? Because if you look closely, you'll see another tiny bow made from the baker's twine from this month!
Love This!
And what did I bring to class to use in my in-class demo? More of that kit lol- I was able to use up the rest of those rhinestones, more stickers, and even some of the postage paper icons and some chipboard. Now that's what I call a sunshine filled piece of art!
Thanks for joining me in a review of the many projects I've created so far from the July Scrapbooking kit from EmbellishKits.com. There is plenty more Echo Park to shop from at EmbellishOnline.com, so if you'd like to recreate your own focal point for the home, your album, or to send to a friend, click on those links and send some happy to your home.
Next month I'll be scrapbooking and more with one of the Alternative kits... hint, hint, it's a heritage theme! So start looking through your stash (or just apply a few aging app filters) for your favorite family photos, and be prepared for an onslaught of memory preserving momentum coming your way :-)
Happy Scrapping!
This probably isn't the first post with this title found on CraftWithAnna.com, but it's still a phrase I quote to myself once a day (at least). I do hereby declare for all legal purposes possible that this is officially one of my catchphrases!
Washi tape, or decorative paper/masking tape, comes in huge variety of different printed patterns and widths. It takes about ten minutes to adhere permanently paper, making it very versatile. It also sticks well to things like refrigerators and tee shirts!
Since debuting on the paper crafting market, I've managed to collect enough rolls that I use it as an extension of nearly every tool in my kit... it also means I've had to upgrade my storage container a few times!
Need to hold something in place on my desk or within a layout or on a card front? Want a small amount of pattern in just the right place with the least amount of effort? Just feel like running your hands through a box of it like it's treasure, maniacally shouting, "My Precious!" ?
Boom- Washi is there for you!
I hope this Friday's Flashback has you reaching for a roll of your favorite tape this weekend, and if you're looking to fill up your YouTube queue with lots of National Scrapbooking Day vid's, be sure you're subscribed to my CraftWithAnna channel.
I've got two new tutorial movies for you this weekend, the first can be found HERE and previews the May 2015 Card Kit from Shelby Dredge of EmbellishOnline.com. I love the way she puts exactly what I love about her class events; the current paper collections, large packs of embellishments, coordinating quality cardstocks etc. together and sends them out each month through EmbellishKits.com.
This month's pack of 8 cards would be perfect for any graduate or to show your appreciation for a more masculine individual in your life. I've found myself reflecting on all the fatherly lessons I've gleaned over the years from the men in my life... how to set up a Washingtonian themed camp, how to get the best deal in the flea market, how now matter the age, a man in love can act like the kid in his heart <3. Lot's of good stuff both in the kit and in the process!
Then tomorrow you can take a peek at what Shelby puts in her scrapbook layout kits- ever wondered at a layout with awe at how it just looks so darn awesome? That's pretty much what I think with every layout she's helped me create :-) I can't for tomorrow's National Scrapbooking Day festivities, and sharing the gorgeous layouts from the May kit. If you're not already a subscriber to this YouTube channel, I have new videos coming out about three times a month, and there is a link to the right on this blog, just look for the purple circle icons.
Thanks for stopping by, and I look forward to your comments!
All this year our weather has been unseasonable warm, which feels great but of course can confuse the early bloomers like daffodils and crocuses. What a treat to be able to spend so much time outside with the girls though. With our vacation on the horizon, it's good to get a little exposure on them too, and I'm always encouraging them to go out and swing awhile while I get chores like the dishes done inside. I guess I'm fortunate that they beg to help, I know most kids don't consider doing so, but I do kind of push them out the door, telling them t go chase chickens or that TaTa (or little dog) needs someone to play with. Or, if Ray is home, he'll generously offer me some alone time, and I'll take advantage of the opportunity for a little spurt of unencumbered craft time, and can whip out a trio of cards like this one, created in about an hour while they walked around the back of the back yard. When you live on acreage, you have to be specific lol. Some of these will go into Pickers Northwest Antique Store and the horizontal card will head to Gig Harbor's Copy & Mail.
I don't usually use our dining room table, but the sun was shining on it so invitingly that I pushed aside the placemats and set up a mini studio of supplies, including crochet thread, that gold chevron trendy tape from Queen & Co, and a 6x6 paper pad that complimented a handful of scraps from my bin. Then it was onto the MME pinterest board for inspiration! My favorite is the one that looks like little polaroids... I'll be using that idea again for sure.
Interested in soaking up the sun while crafting, or just sitting in the dark of winter reading this post? Come craft with me in this cardmaking video I published last Spring:
This Danielle Flanders inspired watercolor card was created with just a few stamps and my gelatos. I've been really trying to use those magical marking crayons for more than just looking at! So simply scribbling a bit on my craft mat, adding a misting of water and then dunking my paper in swirling motions over that colorful mess has been a fun way to experiment.
I started with plain white paper, and colored the entire piece as explained above. Then I stamped with a (recently purchased -gasp) stamp in a newsprint design by KaiserKraft. I didn't try to be perfect with the stamping but I did use Momento black in hope that it wouldn't bleed. I've used this background for about 4 cards so it was effort that paid in multiples!
Using one of the cut pieces for my background, I reached for one of my only flower stamps, a Close To My Heart rose. Stamped that a bit off the page and then used a red and pink gelato/water mix to paint the petals. For the leaves, I simply stamped in green ink and used a watercolor blender pen to pull some of that color into towards the center. It ended up very subtle but that was fine.
Now, I had intended to put a block of patterned paper on the left side of my navy blue card base, but I happened to try putting a remnant from the piece I used over there, and the effect was pretty fab! So I left the card base peeking through and then added a bow in baker's twine by the sentiment. For some extra touchy feelys I layered two fabric flowers with a tiny die cut and topped them with white sequins and a pink Queen & Co. Rock Candy gem.
Although this card had a lot of steps, the effect is gorgeous and simply beautiful. The gelato brings a different depth of color and with a little experimenting, can be just as easy, or even easier to use, than traditional watercolors.
Have you tried these pastel-like tubes of color and had pleasant results? Less than pleasant :0 ? I'd love to hear about it, so leave a comment below and come back again soon to see what's making in my house!
I must be on a mini album streak; I've made one each week! Okay, it's only been two weeks, and I have no plans for another on the near horizon, but STILL.
And on top of that, I seem to be on a little YouTubing spree here as well! So yes, for the third time in the last three weeks, I have another video for you too!
Remember, all your comments, subscribing hits, and blog followings will get you a contest entry, so if you're loving your friend, tell her about it before Saturday's end of day as well. Your friend could say something like, "I'm commenting for my friend ____" and then you could both win!
Another great comment would be to suggest a product for me to focus on using this month. Each month I've been working on my stash by using a certain product on each project I'm creating. Not every thing has got every challenge product but it has been a lot of fun at attempting to push my creative boundaries.
So how do you push yourself out of your normal 12x12 box of usual additions? I'd love to hear about it (and you'll be getting those additional contest entries).
Recently I was listening to a piece on NPR about how depression and art "go" together... hmmm, being an artist who doesn't think of herself as being clinically depressed, I was intrigued enough not to change the channel. In summary, there was a correlation between the surges of creativity or highs, that a depressed person might cycle through, and how being medicated can actually impair a creative (but depressed) person's ability to, well, create! Of course there was a lot more information and examples given, but this is the basic idea that continued swirling in my head.
The idea of the highs and lows of being a creative person got me thinking, reflecting really, and questioning my own spurts of activity. Sure there are times when I don't feel creatively productive, but I was asking myself, do those lows have anything to do with my being stressed, anxious, or even mildly depressed? No. As in, I have no idea!
It is a concept that I've considered before, and even witnessed. I have a dear friend who lost her son in a car accident, and there was a distinct period of mourning (of course), but I remember thinking to myself, "she's going to be as OK as she can be" when I noticed art coming from her craft room once again. It's scary, thinking that a life altering event or even just a bad case of the baby blues could interrupt what has become my therapy, my go to feel good activity! I have also considered, what would I do to lift the funk if I didn't have that outlet? Again, I have no idea yet.
Here is a handful of cards I made a couple of weeks ago.
On the other, more positive side of the craft room, I got a little personal insight it is that I can spend all night up with the kids and tossing and turning myself, get up at 4:AM to participate in a triathlon that is an hour an half's drive away, complete before mentioned tri, lead a five hour crop at Michael's (completing a two page layout) and then come home only to stay up late creating a total of seven cards before finally retiring to bed again. WHEW! It was exhausting just writing that paragraph long sentence!
Part of my seemingly endless motivation comes from the friendships I'm blessed to enjoy. My coworkers daughter will be competing in her own Tri- Iron Man style in AZ soon. Since she is a high school mate of mine I felt it was appropriate to support her efforts with a collage card (#1 Encouragement) reading "Give 100 & 1 % .
My mom is part of Women's Drinking Team -did you know those actually existed? Complete with custom jackets and Octoberfest attending, how fun! "Dancin Donna" can give the Danke! (#2 Octoberfest) card for her next Designated Driver! Using a few cuts from the cricut to dress up the front, Queen & Co. pearls and a bead strung on bakers twine, there was still something else needed to complete my card front. I found the answer in a bottle of Liquid Glass! I also added one small orange gem to the sentiment and included a die cut on the inside of the card which peeks out at the bottom. That die cut was printed with a pumpkin, so I didn't have to do another thing in there :-)
When I first started dating Ray, there were many examples of his past wander lusting interspersed with our futures plannings, and although we have not traveled as extensively as I had imagined, I would still go anywhere in the world with him if asked. I think. See the gold chevron on that card (#3)? and again on the inside of that top encouragement card? It is a new product from the K & Co, Smash line, and it is actually a rub-on. Very easy to use and it adds instant drama- something we are never in short supply of at our house!
Finally, to honor my triathlete Hall-of-Famer friend , I made a card with a .50 stamp picked out of the bargain bin which reads, "The time you enjoy wasting is not wasted time." Dedicating part of your life to fitness takes commitment, one that some people have a hard time relating too. I admire his enthusiasm for racing, and this card will be a nice thank you for all the "You can do it!"s he's given me over the years.
Thanks for stopping by and reading through my musings today! I based many of my card designs above on a flyer for Embellish It!s monthly card kit club. If you're looking to spend a little time crafting with me, check out my process videos link above. I've got a Halloween Card Magic three part series coming out over the next couple of weeks starting TODAY. Happy fall!
You may have read before that I am a big fan of late night scrappin... well, if you've read enough of my blog to know that, you probably know that I'm a fan of anytime scrapbooking lol.
Earlier this summer I found that one of our tv trays works perfectly for creativity in the living room. On the one hand, I am forced to gather a limited amount of supplies to work with. This challenge can help me to focus and also flexes my brain to come up with alternate ideas. My craft room is 30 feet away, too so it's not like I can't go and find the item I think will make a layout perfect!
On the other hand, I get to spend some quality time with Ray after the girls are asleep. By "quality" I am referring to the type of interaction couples nationwide experience nightly- zoning out in front of the boob tube! We hardly watch any tv in our house, so binging on some Netflix can really be a treat. One of our favorite shows is the Sons of Anarchy. We also enjoy House of Cards and the Orange is the New Black- or, the Orange and Black as my hunny refers to it.
Well yesterday I was griping to a friend that I've been doing altogether to much house cleaning and that it is really interfering with my creating! It was no surprise to me that such a build up of not making had me in the mood to really crank out some craft last night, and I was able to create three layouts in their entirety. Go me!
Often times the lack of supplies on hand will have me making most of a layout or card, and then finishing it up the next day or sometime later in the week. Last night I managed to get pen to paper on all three pages as well, and tucked them into my brand spankin' new red canvas fall album. A much better feeling than the one I had the previous day, when the only crafting I managed was putting a completed page into the same album. Not working on the page, just putting it away... lame!
So, often times I'm asked how I'm able to whip out the pages so fast? A lot of times it is because I'm working out of a pre-assembled kit I've made. Have you ever seen a collection of items on your desk and thought, gee that's pretty! Well, when I do that, often times I will enclose said collection of goodies in a sheet protector. I keep between ten and twenty of these on hand to grab and put with photos at a whim. By adding a few more embellishments, or sometimes just an additional piece of background paper, I can sometimes stretch these one-page kits into three or more layouts, like I was able to do last night.
For September, my challenge product of the month is going to be using my stash of pre-made kits. A lot of them have photos in them that I want to include in albums already moved out of viewing, and seeing what I wanted to scrap with last year is like having my own Throwback Thursday any day of the week!
If you'd like some tips on how to create your own scrapbook kit, check out this movie I made last year. Grab a pen and paper, jot down some notes, and then go shop your stash (or favorite scrappy outlet) and then go to town! Or, go to town, shop, and then stay up late making something awesome :-) The choice is yours, of course.
Thanks for choosing to spend some time on my blog today, and if you've got a good show for me to watch I'd sure like to hear of it... the Sons had their final soap opera style dramatic conclusion last night and Survivor is merely on the horizon of my viewing schedule!
Hmmm... anyone else extremely disappointed that "Jax" is no longer being considered for the role of Christian Grey...? He does bad boy gooood! I'm not saying he's a great actor, but I believe it when he gets into a heap of trouble episode after episode all while wearing his custom baggy leathers :-D
My classes at Michaels are always such fun, and last night was no exception! My friend Becca and I met at the six o'clock start time and got right to work, excising our creative muscles with a trendy Mason Jar stamp. Not being an experienced stamper wasn't at all a problem for her, and hopefully the little tid bits of stamping lore I supplied her with will inspire her at home as well.
Aren't these two cards she created so cute? I love the mason jar stamp she chose, it is so versatile and could be filled with any idea. We chose a few little birdies helping a friend, and some hearts and flowers to fill our stamped jar images. Can you see the subtle hand painted accents added to the jars? It makes them look sooo realistic! Especially the brown swatch painted on the yellow card's jar- it looks like the kraft border is showing through the glass...The baker's twine and ribbon definitely added some textural pizazz to the card fronts, and then we trimmed the bottom edges to show some peekaboo pattern showing from the inside.
The custom, color coordinating envelopes were made with the WeRMemoryKeepers envelope punch board. A unique tool and defiantly a cool addition to your go -to tool supply, once you get the directions down that is! We laughed as we attempted envelope after envelope with mixed results. I have the same kind of fun with my Martha Stewart score-board, so I guess it's just all part of the process, lol. Another bit of patterned paper inside the envelope adds just the right amount of summer time fun and fabulousness to an otherwise plain yellow card cover.
WELL, this is the last day to comment to win in my July contest... go ahead and subscribe to my blog and or YouTube channel, and comment away for an opportunity to win either a custom die cut or scrapbook page made especially for you, by me:-)
Putting an emphasis on the photo is always my goal, but with all the hot products available today, my pages can sometimes get inundated with embellishment.
Today, I put the emphasis on white space! A few stickers and a single photo placed in a grid, a simple embellie of brads wound with crochet thread, and a die cut mat at an angle all pull the eye right to the middle of my layout where my photo takes off-center stage.
I felt the page lacked a little cohesive color, so I pulled a roll of coordinating My Minds Eye Washi out and selected the orange crosshatch pattern for the top and bottom. Once I laid it down I could see that a skinnier would be better, so I just placed the paper edge down the middle of the tape and cut off the excess for the bottom piece.
I love this "clean" and simple page which took probably all of ten minutes to create. Thanks for stopping by, and remember, there are atill a few more days to enter my Scrapbook Expo giveaway by leaving a comment below, on any of my YouTube videos, or by becoming a subscriber to either there or here- or do all of this for multiple chances at winning.
Good luck, and go get your washi-ng done!
Scent On the Go-www.PartyLite.Biz/AnnasCandlesTheres still time for me give you 10 dozen candles free in July!
Once the weather in Western Washington decides to get summery, it is so hard to stay indoors. Even going to the library is a reluctant venture, because we just love getting all that delicious vitamin D!
Oh yeah, this is the Life!
A crafty gal like me won't let the call of the great outdoors get in the way of creating every day, so I just move outside to the backyard :-) Rainier has gotten pretty mobile with her supplies as well and its a real joy to be whipping up projects in a creative frenzy together.
Here's a chance for you to craft with me,
Congrats, Grads! #PHSalumni
I had such a great time creating that elegant looking card with common junk drawer paraphenilia. If you've got the inclination, a search on instagram (see my social media icons to the right) for #DCCrestlye will bring you some interesting imagery.
Graduation is just around the corner for many... think back on how you might have felt at a similiar time of accomplishment in your life, and channel that energy into a thoughtful, handmade gesture for someone.
If you're looking for some new or inspiring ways to use your die- cuts, check out the latest edition of DieCutCrazy, a digital source of delight!
I hope you enjoyed my video, and go rummaging about for your own re purposeful items-
Now....
Get Crafty!
PS It has been some time since I was able to put up a movie on YouTube...hit that subscribe button and you'll see my latest uploads upon sign in :-) Suscribe to this blog and follow along on all my (published) CraftWithAnna-dventures!
Just thought I'd give you a glimpse into my creative process with a look at how I translate sketches into scrapbook pages. This page by Becky Higgins is more simple with colors and linear alignment than my style tends to be, but I was still able to use her layout as inspiration to create my Winter Wonderland Sledding, double page layout last weekend.
Just like Becky, I added a photo strip to the right and journaling on the right. There are a few other similarities, can you find them?
Turning to sketches for inspiration makes it even easier for me to capture the memories I want in my albums. Give it a try; the next time you're thumbing through a magazine, and pause to admire an article, advertisement, or other design, try incorporating some of those ideas into your own creation!
P.S. Do sentiment stickers count as letters?! Cause suddenly I'm not doing so well with my February product challenge :-)
Welcome to the Die Cut Crazy Magazine Valentine Blog Hop. I and the other designers have made some wonderful Valentine projects to inspire your own crafting with your die cuts. If you just joined our hop, be sure and go back to the Die Cut Crazy Magazine Blogto learn how you can enter to win a prize from Die Cut Crazy Magazine when following the hop from designer to designer.
I have two projects to share with you, first, a scrapbooking process video using a square punch to dress up a background:
This is a two page layout- the half you can't see is where I used my punch (of course)!
Next, I'm sharing with you a Memorial Scrapbook page!
What A Guy 12x12 Scrapbook Layout
Now, scrapping about a departed friend may not be the typical way to lovey dovey up your albums, but I was inspired around 6:00 in the morning on Thursday to create this for my best friend and her daughter, who I know continue to love and think of this amazing guy all the time. I hit facebook and pulled off some pictures from his sister's album, and then I found some really nice comments and rememberances that seemed to sum up some of my own memories about him.
You can see that I also used a few heart punches and die cut letters as well.
Here's a fun tip: when you're pulling your die cut letters off a big sheet, pull Towards yourself. That way if the paper tears (as it always seems to do) the tears will be on the back of the letter instead of across the front.
Another fun tip: go around the outside of your letters with a coordinating marker. In this case I used a black marker around the edge of the black letters. It's a very subtle way to get rid of those chits left behind without using your scissors :-)
I wanted to show you how I went about printing on my 3x4 die-cuts by Me & My Big Ideas. First, I added the photos and phrases to a word processing document. Once printed, all I had to do was adhere my die cuts over those printed areas with some repositionable glue. I used Herma dots. Put the printed-on paper back in your machine with the die cuts stuck down, push print again, and Voila! Custom die cuts!
Sometimes I get a bit lazy when it comes to technology, so in some places I just punched out the space I desired and glued down the cut journaling strips or pictures with my trusty square punch you saw me using in the video.
My last little tip today is also a bit of a lazy admission: I love the look of sewed paper, but I don't want to get my machine out. So what do I do? Well sometimes I use some rub-ons, but usually I can draw some very nice dash lines and I get a terrific effect! You can see below here how I just set my Tim Holz ruler down on the page, and with a red Creative Memories pen, I drew dash lines. I usually turn or angle the ruler a couple times to make it look like I ran it through the "machine" a couple times. Most times, people looking at an embellishment like this won't be able to tell its not actually thread!
Thanks for stopping by the Die Cut Crazy Magazine Valentine's Blog Hop. I hope my projects inspire you to create your own lovey- dovey Valentine project. Please leave a comment to let me know you stopped by.
I'm hoping you will give me some ideas about what product I should feature in every project this month!
Next up in the hop is Allie. Go see the amazing project she has prepared for you to enjoy!
If you just joined the hop, here is a list of designers so you don't miss any. Remember, if you leave a comment on each blog, you will be entered to win a six month subscription to Die Cut Crazy! Good luck :-)
I love a chance to use a bit of advertising in my projects, and once I realized the Lumber Liquidators flyer had all these choice samples of woodgrain in them (drool), I quickly started adding large cuts to my stash box.
My coworker will receive this on her birthday, along with another repurposed item I worked up for the February 2014 Valentine's themed issue of Die Cut Crazy. Be sure to check that out, I'm really proud of how it turned out!
You can see that I've made a little garden out of die cut Close To My Heart flowers, with enamel bling centers, and a cute butterfly flying about, trailing a few pearls. For some extra dimension I added my theme product of the month, baker's twine. Then I stamped the Celebrate phrase onto some scraps cut into banners. Pretty much anything outdoorsy, I put banners on!
Anyway, these office cards get passed around for everyone to sign, and my card has a lot of delicate layers of embellishment on it. Imagine my horror at thinking of all the blings and flowers flinging off as the card slides in and out of an oh-so-secretive envelope. So, instead of walking it around personally to ensure no damage ensues, I sealed the top of the card with a bit of packaging cellophane.
Around the outside edge of the card I ran four pieces of double-sided Scrappy Tape. It has a peel off backing, so once I had that off, I could lay the packaging plastic right on top, and then trim off the excess. This worked beautifully and it felt awesome to hand it off for circulation care-free.
Tomorrow I'll be uploading a new movie (yeah!) and then on Saturday morning you can blog hop with the DieCutCrazy contributors as we share fun Valentine's tutorials.
My projects will feature some different ways to incorporate punched shapes in your backgrounds, so find a couple of your favorite dies or punches or cut files or whatever, and lets craft together!
What to do with all those beautiful Christmas cards received each year... some I admit are easier to toss than others, but really, what good do they do in a box in the closet, never to be looked at again. Aha! I finally found a home for three of them! The top left purple with silver ornaments actually came from PartyLite. How did they know to send me a card in my favorite colors?! The card behind the girls came all the way from Ed and BJ in New Jersey, and the Christmas Wishes sentiment was cut from the front of a card, complete with popped-up letters!
If you watched my recent Album Review movie on YouTube, you know that one of my favorite layouts ever created was one of Rainier in front of the Christmas tree at my bank last year. My Little Christmas Angel has grown up quite a bit in the last year and has a new sister to pose with as well... which meant, back to the bank for a photo shoot this year!
She walked right over to the tree (shedding outerwear all through the lobby as she went) and turned on the charm for my camera; highly unusual behavior for her! Of course I didn't have the camera ready, but I still managed to snap a lot of great photos of her and Sunday. I love the way the tree shimmered and twinkled behind them. After our shoot those two amused themselves and the tellers by touching as many of the ornaments as possible.
I really wanted the focus of this layout to be on Rainier and the look on her face. I did get a photo of her with a great big smile, but this kind of look is more "her." Using a CTMH flip flap sleeve allowed me to hide her sister and the journaling in one place. I'll carefully slice through the page protector and this page will become interactive.
If you look carefully in the border near the bottom of the page, you'll see I continued my baker's twine theme for this month in green and white, lime green and white, and purple with white. A little washi tape on the back of my layout keeps the twine in place just fine. Another goal of mine this year is to use my supplies, and I'm happy to report that another sticker sheet went in the garbage after this! So long, Teresa Collins fabrication stickers!
What do you do with your old holiday cards, or birthday, Mother's Day, etc.? I'm looking for a way to house the hundreds of cards Ray has been fortunate enough to receive from me over the last five years- any ideas? I'd love to hear them! Leave a comment below and you could win a repurposed card from me. What you choose to do with it afterwards is up to you :-)

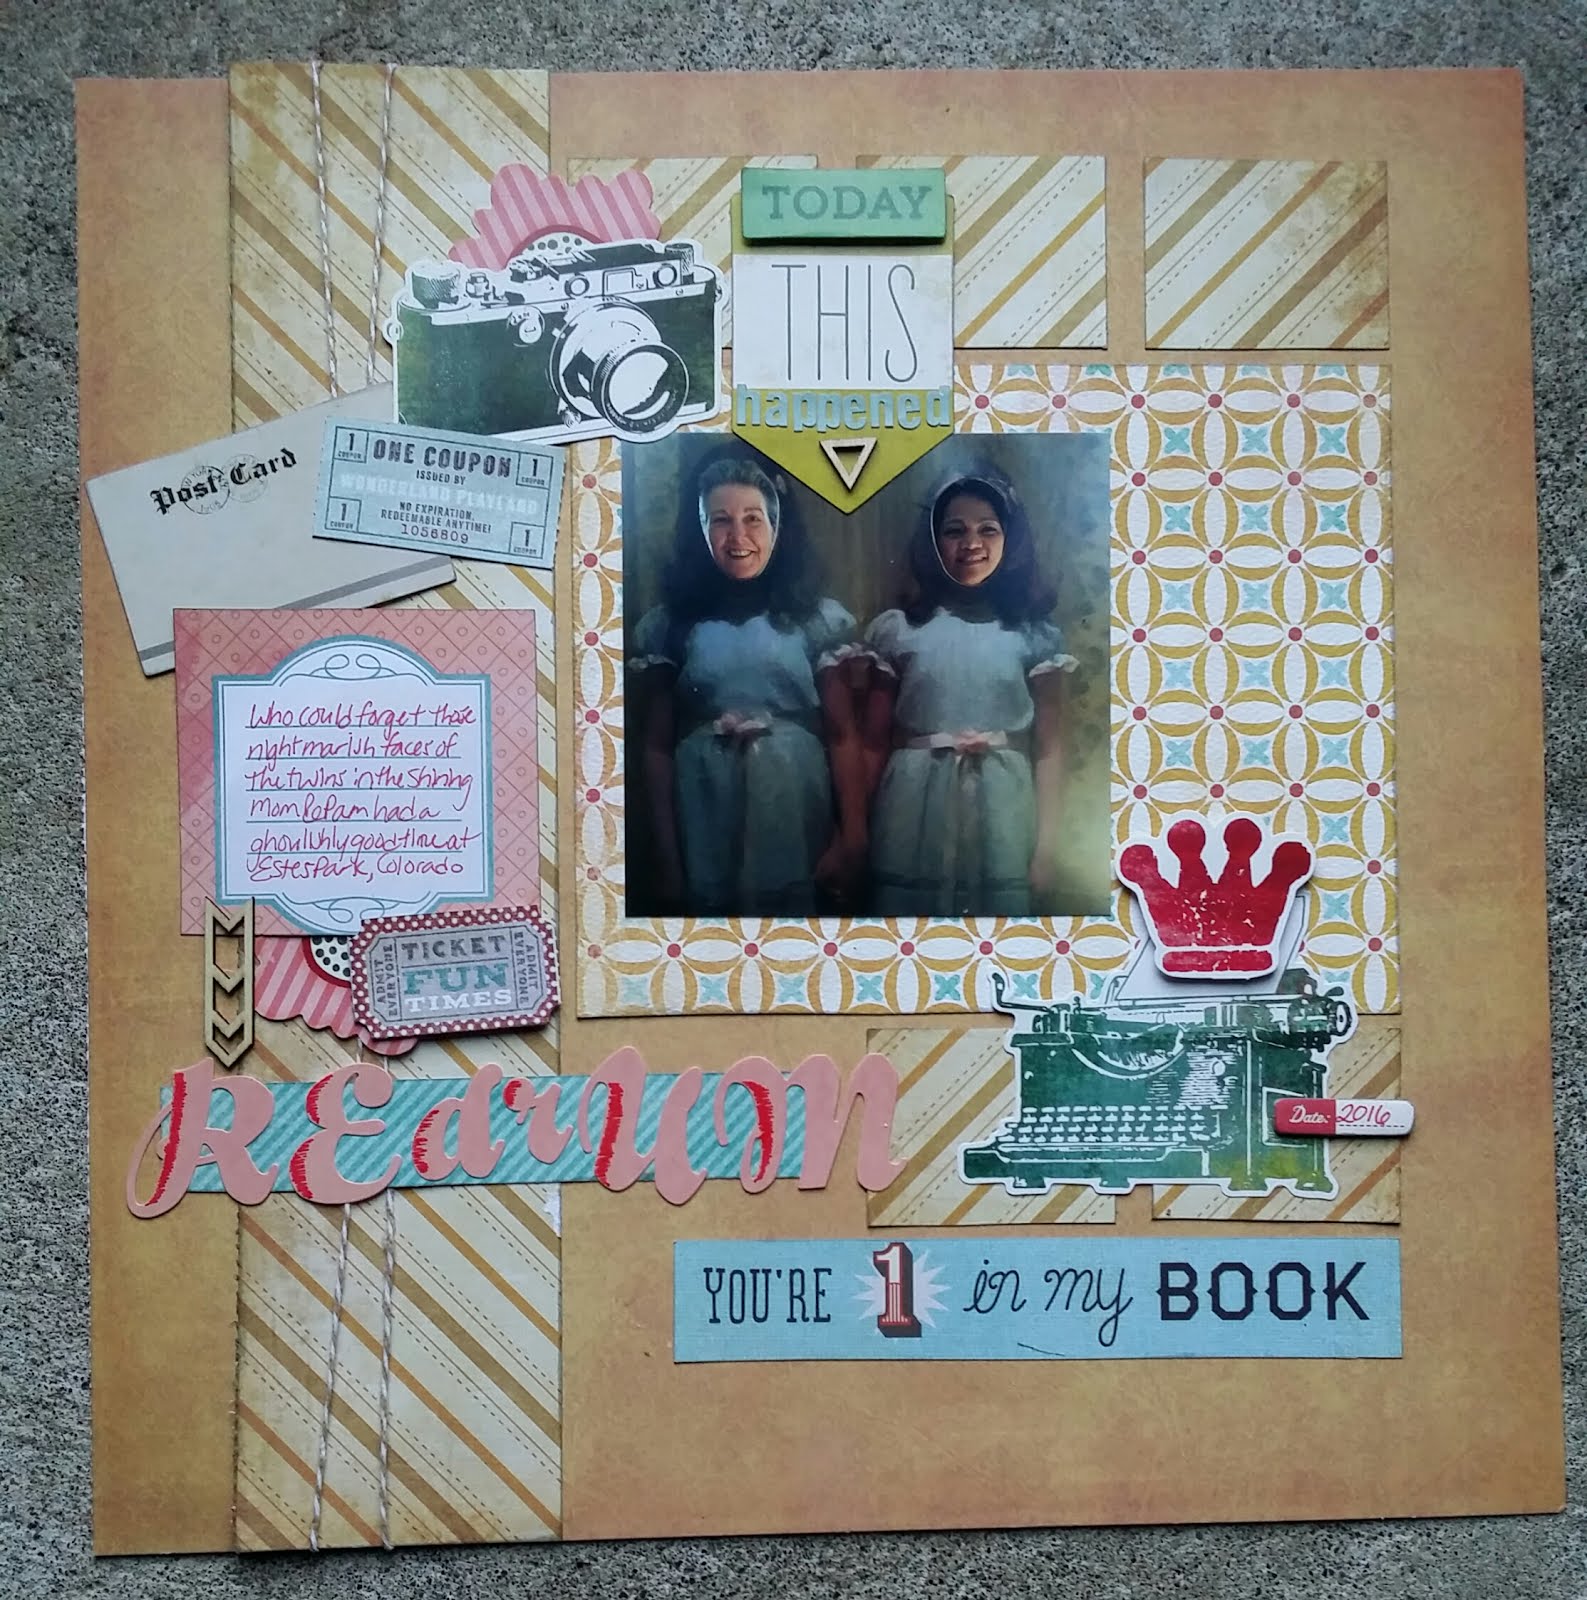
 I thought my page (see photo above) was complete. It had a terrific photo on show, a typewriter and crown as symbols for Stephen King, die cuts that compliment the story of how I got the photo and a clever title -Redrum. My layout felt flat though, despite adding foam adhesive behind a few layers... wood veneer arrows brought a little more dimension, as well as the tiny chipboard date block. Bakers twine ran down a column of patterned paper which brought the focus inward toward the picture. Still, I wasn't quite satisfied with calling it complete.
  Dripping down from a chandelier, again, reminiscent from the "remembered" ball room scenes of the movie's main character, Jack Torrence, powerfully played by Jack Nicholson, they are now drops of blood. Ew! right? Thinking about that unnerving performance, and replaying critically frightening scenes in my mind while creating this one page layout brought out one of my favorite secondary titles to date, "Who needs Johnny?!" (You're number 1 in my book). A little strip of highway looking sticker reminded me of the isolation of the characters during their catastrophic caretaking job with their little boy, Danny.
 Dripping down from a chandelier, again, reminiscent from the "remembered" ball room scenes of the movie's main character, Jack Torrence, powerfully played by Jack Nicholson, they are now drops of blood. Ew! right? Thinking about that unnerving performance, and replaying critically frightening scenes in my mind while creating this one page layout brought out one of my favorite secondary titles to date, "Who needs Johnny?!" (You're number 1 in my book). A little strip of highway looking sticker reminded me of the isolation of the characters during their catastrophic caretaking job with their little boy, Danny.


