Showing posts with label doily. Show all posts

Friday, February 15, 2019

Hello Love


Between Ray and I, Valentine's is more of a one-sided affair- I provide the cards, hearts and flowers sentiments and he receives them amicable enough that I feel "special occassion" loved. I've always enjoyed making and sending cards. Valentine's Day in elementary school was always so anxiety ridden. Anticipating how my themed notes would be recieved and wondering if my mailbox made from a shoebox and paper top would sit in lonely emptiness or overflow with friendly rhymes from classmates. I'll never forget the year I recieved 9 Teenage Mutant Ninja Turtle cards- from one boy! Yeah I felt pretty special that day. Even if I am the one to make the effort, sharing the love in red accents and morning - made poetry, I enjoy doing so enough that I don't really need reciprocal givings. The gift is for me is found in the moments of making, and I'm never upset about having a valid reason to create!
Hope you had a love-ly day as well <3


Sent from my Verizon Wireless 4G LTE smartphone

Thursday, February 8, 2018

Thanks Love Card

Thanks Card-
1. Fold a large cream cardstock base in half to 4.25x5.5”
2. Center and Adhere the Large Patterned Paper block to front.
3. Center and Adhere the Medium Patterned Paper block to front*
*if your patterns are the same, turn one to the reverse side for contrast.
4.Center and Adhere a Large Pink Doily.
5. Adhere a yellow stamped “Thanks” banner die-cut to the center of the Doily.
6.Under the banner die cut, center and adhere a Yellow Baker’s Twine Bow.
7. Adhere a yellow stamped “Thinking of You” banner die cut to the inside of your card.
8. Sign the back


Sent from my Verizon Wireless 4G LTE smartphone

Monday, February 5, 2018

DIY Banner card


1. Select your favorite large patterned paper and fold in half.

2. Center and Adhere the Large Pink Doily to your card front.

3. Write a cute phrase on a coordinating banner sticker, i.e. I (Heart) You, You Da Man, etc.

4. Adhere the banner sticker to a coordinating small patterned paper strip.

5. Place 3 pop-up squares  to piece #4.

6. Peel off pop-up backings and adhere to the Doily.

7. Adhere Pink Heart Paper Tape to the bottom of the inside of your card, Trim Excess tape.

8. Sign the back!


Sent from my Verizon Wireless 4G LTE smartphone

Saturday, February 3, 2018

Washi Tape Tag Card


1. Fold a piece of Pink Cardstock in half to create a 4.25x5.5” card

2. Center and Adhere a Large Pink Patterned Paper block.

3. Select and Adhere an Alternate Patterned Paper block to the front of your card.

4.  Adhere a Large Pink Doily.

5. Adhere a Paper Flower of your choice centered over the Doily.

6. Adhere a Heart Die Cut to the left of the Paper Flower.

7. Wrap the Small Tag Die Cut with a piece of Black Butterfly Washi Tape.

Wrap ends to the back of the tag.

8. Adhere the Tag on top of and to the right of the Heart.

9. Adhere a Pink Rhinestone Gem to the Tag top.

10. Adhere a coordinating Small Paper Strip to the inside of your card.

11. Sign the back!


Sent from my Verizon Wireless 4G LTE smartphone

Friday, January 26, 2018

Red Velvet

Next in my series of How She Dunnits, I have the Red Velvet Cupcake Card.
Starting with a white cardstock base cut at 8.5x11" and folded in half, I adhered a 4x5.25" block of red and white polka dot patterned paper flush with the bottom edge. To this I added a pretty white doily I got for free in a large package of 144 doilys in four colors from a gal on the Key Peninsula Buy Nothing site. Boy, do I love free embellishments, and this card features four of them. 
I had a little bit of red velvet paper left from an art journalling class I taught at KPMS last October. A half inch strip of that, notched at either end, made a striking base for my next layer. I love the monochromatic red on red and white on white mixed together.
See that white cardstock circle stamped in red ink with "from the heart ♡"- both free, including the ink! Thank you, Queen & Co. for the circle, Phaedra for the Tim Holz distress ink,  and another Scrappy Sister of mine for the stamp! 
This was a simple card with a lot of impact thanks to that rich red velvet paper in the middle. Any sentiment or color scheme would have made this card design shine, but I think the Red and white were excellent for Valentine's! And no, there's no cupcake involved. .. this is the Organic Anna version lol
So what is your favorite color combo for monochromatic mixes? Better yet, what's your favorite Valentine treat,   spending time with your sweetie or a sweet to eat? Comments below welcome! 
Sent from my Verizon Wireless 4G LTE smartphone

Thursday, January 25, 2018

Silly Pocket Tag Cards h

My life has been pretty hectic the last couple months, leaving very little "me," i.e. craft time. Crafting isn't just a hobby for me, it is also a source of income and more importantly, a therapeutic activity which my mind finds solace in the act of doing. So, going without has a profound and multifaceted effect; my supplies go unused, my talents are not utilized for the good of my wallet, and my creative urges go unsatisfied, leaving me restless and distracted by my desire to MAKE.
I have two upcoming excuses, er, opportunities to Have to do just that; an upcoming Yoda themed birthday painting party for a boy turning 8-and 15 of his friends!- & the Key Peninsula Cooperative Preschool ' s  now annual CraftWithAnna cardmaking fundraiser at Blend, February 10th at 6pm.
I thought it would be fun to share the 6 cards I designed for the event and tell you how I made them, in case you are looking for some inspiration or just want to know, "how'd she do that?"

My first card to share starts with a white card base. To this I've added a pink doily, offset and adhered to the top of the card in the left corner. The placement does not matter, but the bottom will get covered up so leave a fair amount sticking up.
On a red tag I layered a pink square stamped with red hearts. Through the punched hole at the tag top I tied a bit of red Silly String.
Next I ran my tape runner all along the edge and down the middle of a strip of dark red cardstock. I cut about a forearms length of that same red Silly String from Queen & Co.  I got it at convention a few years back. It's stretchy and shiny and oh so fun to use! When I wrapped the string around, I made sure to keep both ends tight against a gluey area, then I ran some more adhesive over those ends, for good measure. Before I placed this wrapped piece on my card base, I slipped that tag in behind.  Another way to say this would be that I made a paper doily, tag, twine sandwich. .. anyway there is a lot of texture going on here.
You could easily replace the Silly String with any kind of fiber; bakers twine comes immediately to my mind. How about you, what's your go-to string of choice? Do you make your tags or buy them pre cut, tie in a knot or tie in a bow- you know I wanna know, comment below :-)
Sent from my Verizon Wireless 4G LTE smartphone

Wednesday, September 9, 2015

Let Me Tell You A Story


These pictures show a family out for a brisk afternoon walk. Pretty unremarkable, even with the balanced posing and picturesque background. What they don't show is the story of a mom attempting to capture her darling girls against that lovely brick and wrought iron background while completely blocking the sidewalk. They don't show the group of Gig Harbor visitors trying to make their way past us without interrupting the shot. These pictures don't show a kindly member of the group offering to include mom, her deferring, and his insistence that her smile reflecting those of her children also be captured.
Ah, stranger, thank you for prompting this photographer's joy to be thus recorded!
You know, there is something about this fresh face showing up in my album- having no make up on does not detract in any way from the brilliant beam of my trademark mega watt smile. The selfie "beauty," i.e. softly blurred, filter is missing; all my blemishes (real or imagined) are evident only to my internal knowledge, not in the picture itself. The redness of my cheeks matches my children's and shows that indeed, this spring day had shining skies but a brisk chill still...
Thank you, strange but kind gentleman, for preserving for us the beauty of our happy trio, thoroughly enjoying our day trip to town!

Saturday, June 7, 2014

Back in the Backyard -Crafting!

Little Photo Sesh Outside the Library
Once the weather in Western Washington decides to get summery, it is so hard to stay indoors. Even going to the library is a reluctant venture, because we just love getting all that delicious vitamin D!
Oh yeah, this is the Life!
A crafty gal like me won't let the call of the great outdoors get in the way of creating every day, so I just move outside to the backyard :-) Rainier has gotten pretty mobile with her supplies as well and its a real joy to be whipping up projects in a creative frenzy together.
Here's a chance for you to craft with me,
Congrats, Grads! #PHSalumni
I had such a great time creating that elegant looking card with common junk drawer paraphenilia. If you've got the inclination, a search on instagram (see my social media icons to the right) for #DCCrestlye will bring you some interesting imagery.
Graduation is just around the corner for many... think back on how you might have felt at a similiar time of accomplishment in your life, and channel that energy into a thoughtful, handmade gesture for someone.
If you're looking for some new or inspiring ways to use your die- cuts, check out the latest edition of DieCutCrazy, a digital source of delight!
I hope you enjoyed my video, and go rummaging about for your own  re purposeful items-
Now....
Get Crafty!


PS It has been some time since I was able to put up a movie on YouTube...hit that subscribe button and you'll see my latest uploads upon sign in :-) Suscribe to this blog and follow along on all my (published) CraftWithAnna-dventures!

Thursday, February 13, 2014

You're So Silly!


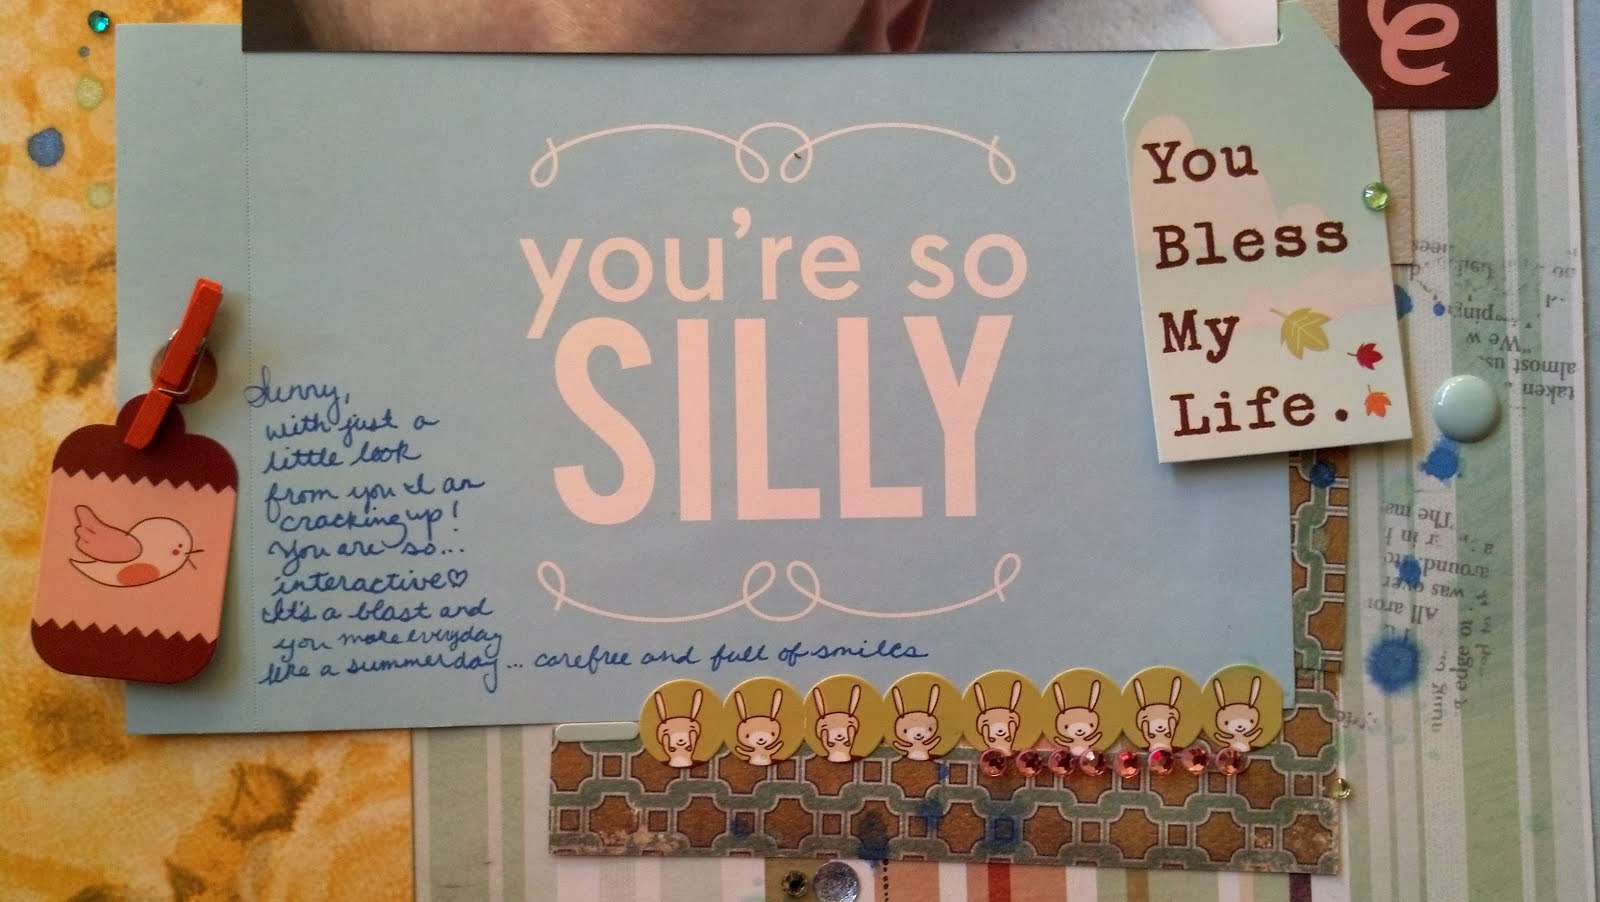
That's what I feel like saying to myself when I get down creating two scrapbook pages in less than a couple of hours; "Anna, Why don't you scrap from pre-made kits more often? Anna, Why don't you create kits that include paper and embellishments that can work for more than one layout? Why don't you make it completely color coordinated- or include something from every color! You're so silly to work as hard as you do at finding things that 'go' together, when all these random bits and pieces 'go' just fine (and look just as good)! Why don't you take more candid photos of the kids being goofy?"

Oh, on the last one, I don't take more photos because that really would be silly! I already take about 35 a day, and I do want my kids to recognize my face, not just the camera lens and the blinking red light :-)

Aren't these pages fun? I love the expression here on Sunday's upside down face. Now, what do you think, place the photo so her face is right side, or use it from the angle it was taken? Leave me a comment below on your opinion.
One of the first songs my daughter learned at story time is "Brown Bear..." and even though my title is long, I'm glad to use up all those little letter stickers.  It's worth all the lining up and hoping they'll stick just to be able to capture the lines of a song that we sing a few times a week at this age.
This last week, Shimelle revisited the childhood memory revisiting topic. I love how a tiny prompt can invoke so much of what scrapbooking for me is all about, those all important memories. When it came time for my journaling, I chose to tell the story of how much I loved going to this same zoo and aquarium when I was in grade school instead of just the usual, we had a great time and it was sunny, type of sharing I tend to feel comfortable with.
And the 25 year plus memory recall didn't end there.  Later in the week, I recalled how much I enjoyed getting my hair washed in the kitchen sink by my grandmother when I was little. I was trying to get my daughter to let me do the same for her, but she thought that was so weird (already, at three, I'm Weird?) I was telling my mom, you just don't realize how much you will enjoy telling your children about those small moments in your childhood when you are still the child. I'm so glad my craft allows me to really focus on passing down those stories of my generation to my two girls!

Monday, July 29, 2013

While Moms Away, She's Gonna Play!


Every summer, my friend Angela invites us (adult) girls up to her family's cabin outside of Shelton. This year it was my and Marilyn staying overnight with her and I managed to fill in some of the time making some scrapbook pages- what a surprise!
I keep a to-go package of papers and some old photos that I can grab on a whim. I'll need to add some more photos though, because I used quite a few of them this weekend. Included were these darling pictures of Rainier that were taken when she was between three and six months old. The one of her in the striped shirt looks so much like Sunday! A new technique I tried on this layout, I used my new EK Success Scalloped border punch to cut from  the same patterned paper for a dimensional but very subtle look. Using pop-dots helped to bring some more attention to that detail. And then underneath I put the title and another photo.


Then it was a trip even farther back in the past to scrap some photos from when my mom first met and started dating her husband Peter. That is the look of love in their eyes! It also looks like it was a really nice summer! Some scraps made the layouts really easy to put together and I', happy with the way they turned out, even if they are a bit simple. I figured I could always add more bling to them if I felt they needed it in the future.


 Then it was time to use what was left on my desk to create these four cards. That's a great way to avoid cleaning up! Plus I knew all the papers would go together since they were pulled from coordinated paper packs.
  My sister Ruby came out to see us the summer after Rainie was born and we took her to Ruby beach. These photos show her wonder at playing in the sand for the first time at the Pacific Ocean. Using paper packs is a really easy way to get a cohesive look when you're scrapping a series of photos like this beach trip that spans more than one page.


 I even managed to get Marilyn to make a few pages for her recent trip to Punta Cana! She did a great job for it being very late at night when she made them!


Oh and did I mention that I lost my glasses upon jumping into the lake immedieatly upon my arrival?! So despite our best efforts to look for them, all of these pages were made "blind."

What a fun weekend filled with memories :-)